Checklist for Shaker Cabinets with the Right Hardware
After speccing knobs, pulls, and handles across hundreds of Fabuwood kitchen installations in our Virginia, Maryland, Delaware, Texas, and Illinois showrooms, we’ve learned one thing the hard way — on a Shaker door, the fittings aren’t a finishing touch. They’re the defining detail.
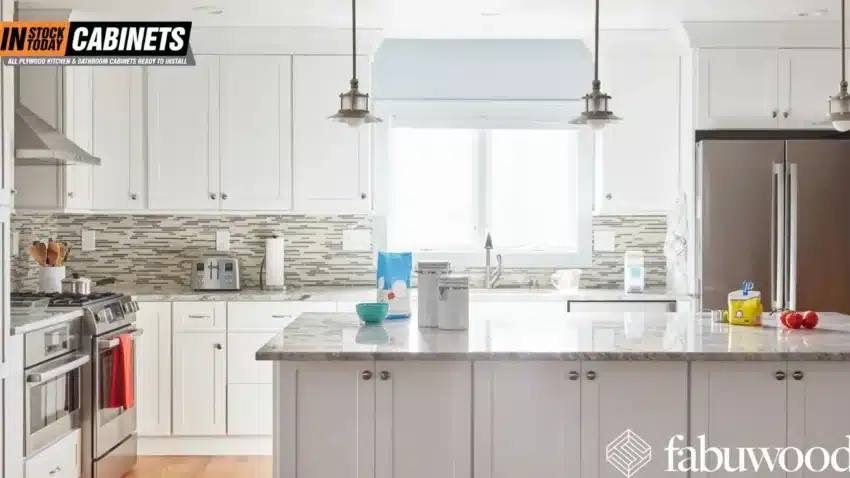
Shaker cabinets earn their reputation on restraint. Flat panels, square edges, five-piece construction. Nothing decorative for decoration’s sake. That simplicity puts every pull, knob, and finish choice under a spotlight. Pick the wrong scale or a clashing tone, and it quietly undermines the entire kitchen. Get it right, and the space just feels intentional.
Hand-forged specialists often call cabinet fittings “the jewelry of the kitchen.” On Shaker cabinets, that analogy lands harder than on any other door style. Choosing the right shaker cabinet hardware requires more than picking what looks good on a screen — it means matching proportions, finishes, and placement to the specific geometry of the Shaker frame.
This checklist covers every decision point, from understanding Shaker construction to choosing brands, sizing pulls, matching finishes, nailing placement, and handling maintenance after installation. Bookmark it. Print it. Tape it to your project binder.
The Complete Checklist for Shaker Cabinets with the Right Hardware
Check each item before placing an order.
Design Decisions
Sizing & Proportion
Placement & Installation
Technical Details
Need help choosing? We offer free design consultations.
istcabinets.com
4 Categories
Understanding the Shaker Design DNA
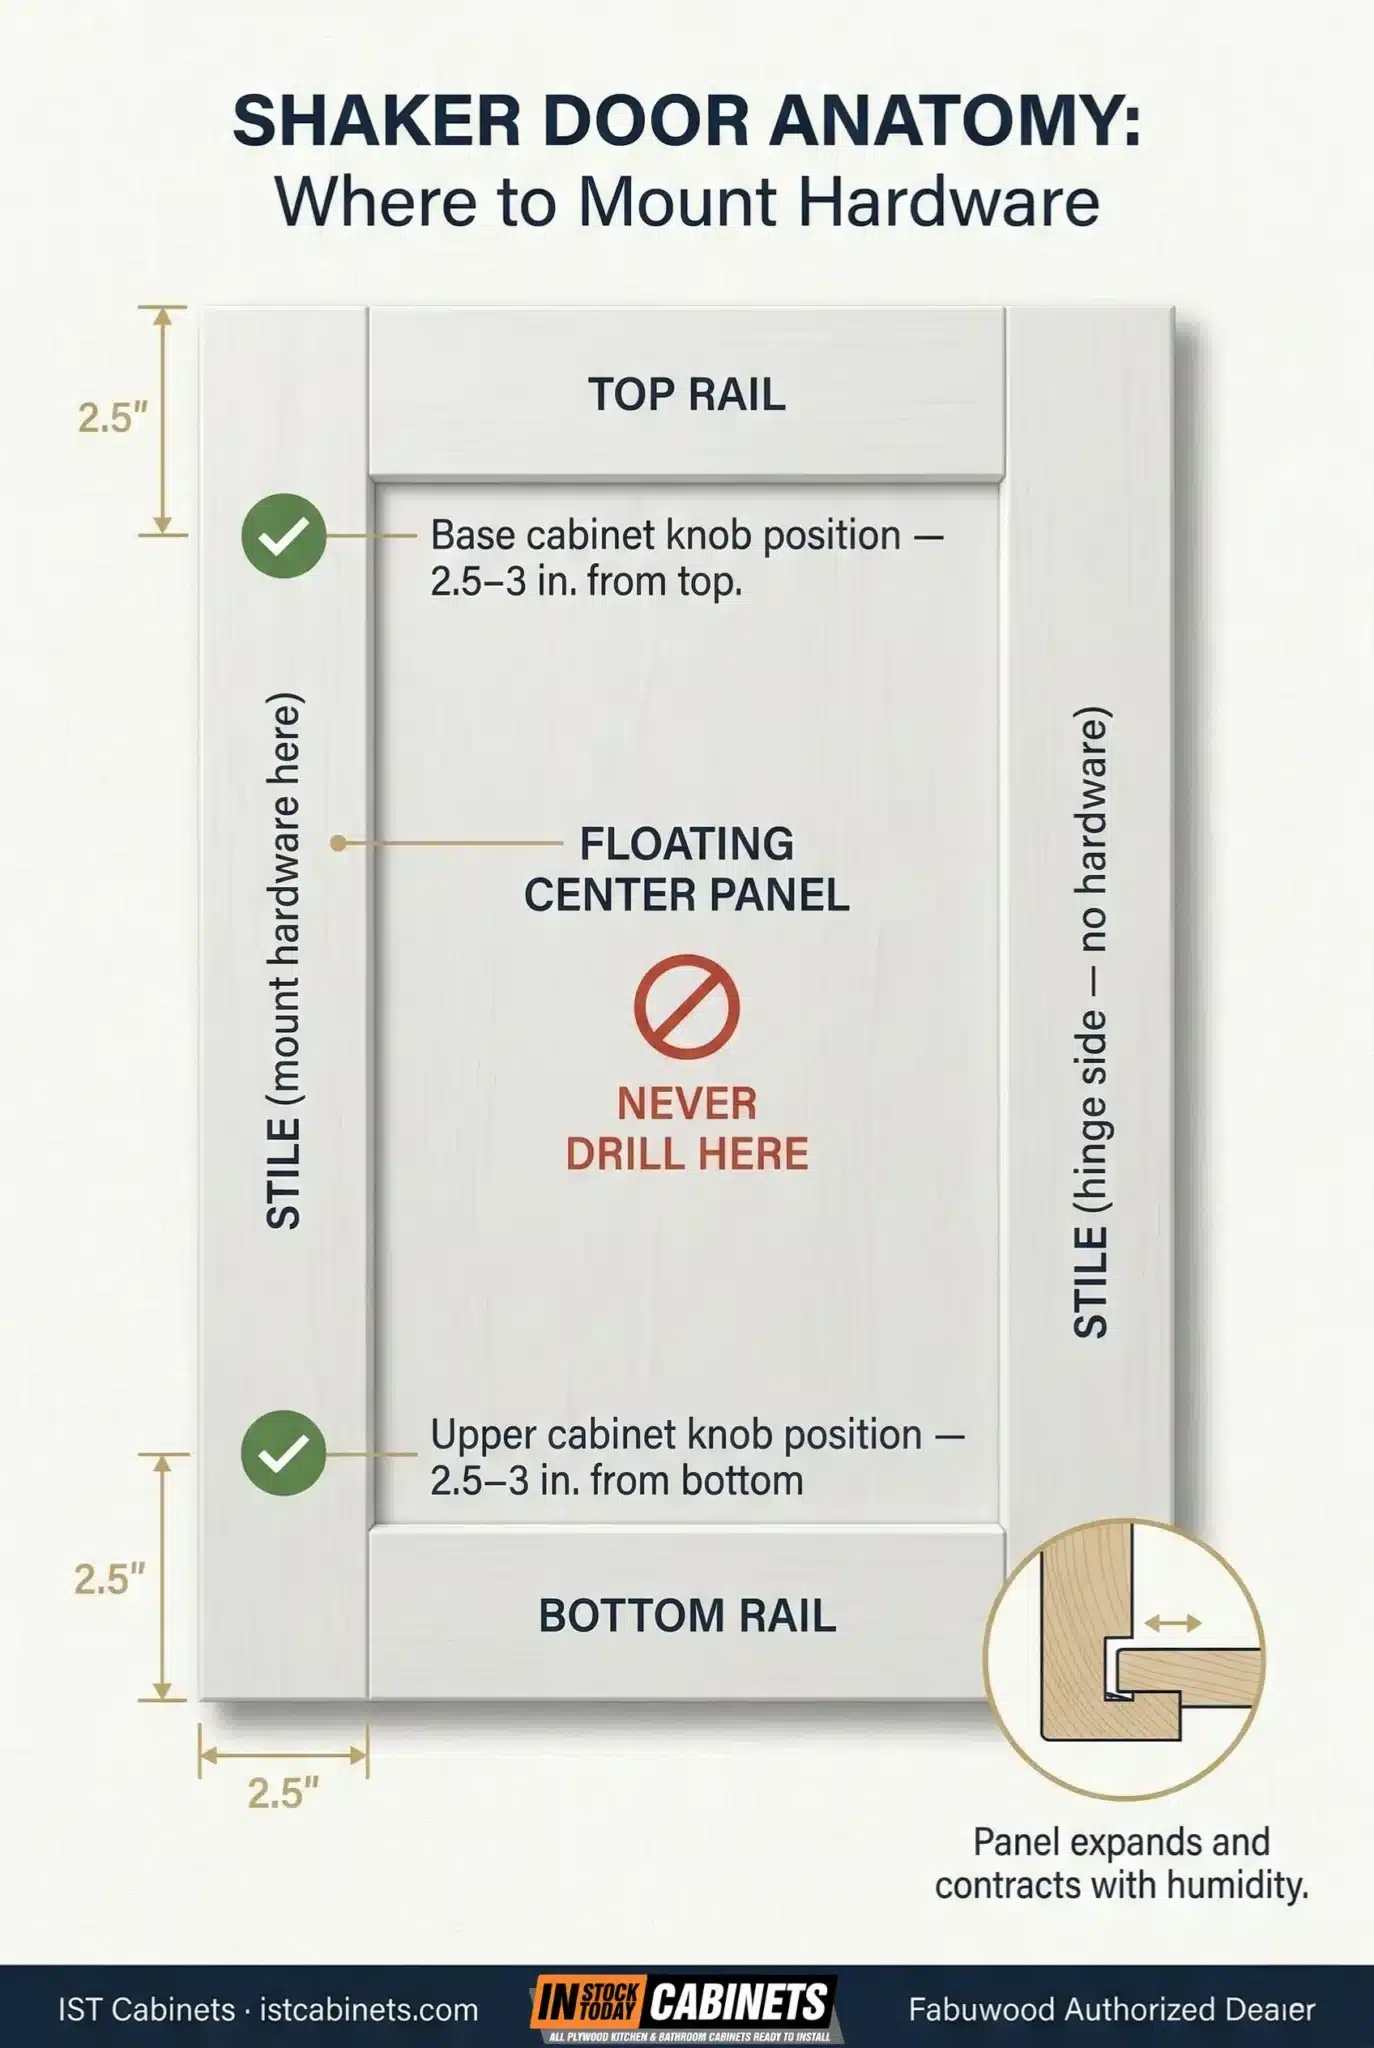
Before opening a catalog, understand what makes Shaker doors structurally different from everything else. A Shaker-style door features five-piece construction — two vertical stiles, two horizontal rails, and a flat recessed center panel. Those elements create the clean geometric frame that is the style’s signature.
The design traces its roots to Shaker furniture, developed by the United Society of Believers in Christ’s Second Appearing (the Shakers). Their philosophy prioritized function over ornament — a principle that still defines the cabinet style today. Every knob and pull you choose either honors or contradicts that founding idea.
Frame width sets the style direction. Narrower stiles (3/4″ to 1-1/2″ on slim Shaker profiles) read modern. Wider stiles (2″ to 2-1/4″ on traditional Shaker) read classic or transitional. Your fittings should reinforce whichever direction the frame width establishes — sleeker pulls for narrow frames, more substantial silhouettes for wider ones.
One structural rule is non-negotiable. The center panel in a Shaker door is designed to float within the stile and rail grooves, allowing for seasonal wood expansion. As covered in our detailed guide on integration mistakes, drilling through or into the center panel pins that floating mechanism. The result is finish cracks, witness lines, or warping — damage that’s usually irreversible on painted surfaces. Knobs and pulls must mount exclusively on the solid wood stiles and rails.
Inset vs. Overlay — Why It Changes Your Plan
Shaker cabinets come in two setups, and the difference affects almost every fitting decision.
Overlay doors sit on top of the face frame. They’re the most common and use concealed European hinges. Pulls and knobs are optional from a functional standpoint — you can grip the door edge — but most homeowners add them for ergonomics and aesthetics.
Inset doors sit flush within the face frame. They require pulls or knobs because there’s no edge to grip. Inset hinges (either concealed or decorative exposed) change the visual rhythm of the cabinet. Exposed hinges pair naturally with traditional or farmhouse styles. Concealed inset hinges keep things clean for modern or transitional directions.
Inset construction also tightens alignment tolerances. The gaps between inset doors are visible from across the room, so placement must be precise to the millimeter. A jig isn’t optional here. It’s mandatory.
Step 1: Define Your Style Direction
Shaker cabinets are a blank canvas. That versatility is their greatest asset, but it means your fittings carry the burden of declaring where the kitchen goes. Three directions work.
Traditional Shaker
Cup pulls (bin pulls) on drawers paired with simple round knobs on doors. Oil-rubbed bronze, antique brass, and unlacquered brass are the anchoring tones. Shapes are heritage-inspired but minimal — no filigree, no scrollwork. For taller pantry doors, cabinet latches add verticality and architectural charm that feels collected rather than coordinated.
Transitional Shaker
The largest market segment and the most forgiving. Arced bar pulls, tubular barrel pulls, D-pulls, and mixed knob-and-pull combinations all belong. Champagne bronze, satin brass, and satin nickel bridge classic Shaker joinery and cleaner contemporary spaces. 2026 trend reports point toward aged brass and bronze as standout metals in this category — valued for the warmth and character they develop over time.
Modern Shaker
Flat bar pulls, edge pulls, and integrated finger pulls define this direction. Flat bars mirror the door frame’s linear geometry. Edge pulls keep the cabinet face completely uninterrupted. Matte black, brushed nickel, and stainless steel dominate. Longer pulls (12–18″) on wide drawers emphasize horizontal lines. Flush-mount and finger pulls are trending in 2026 for their minimal profile.
Handleless / Push-to-Open
A fourth option gaining ground in 2026 — push-to-open and touch-activated systems eliminate visible fittings entirely. Mechanical springs or magnetic latches open the door with a gentle push. The result is an ultra-clean facade with zero touch wear on the cabinet surface. This works well in high-traffic zones near the stove or sink, where greasy or wet hands would otherwise degrade metal coatings over time.
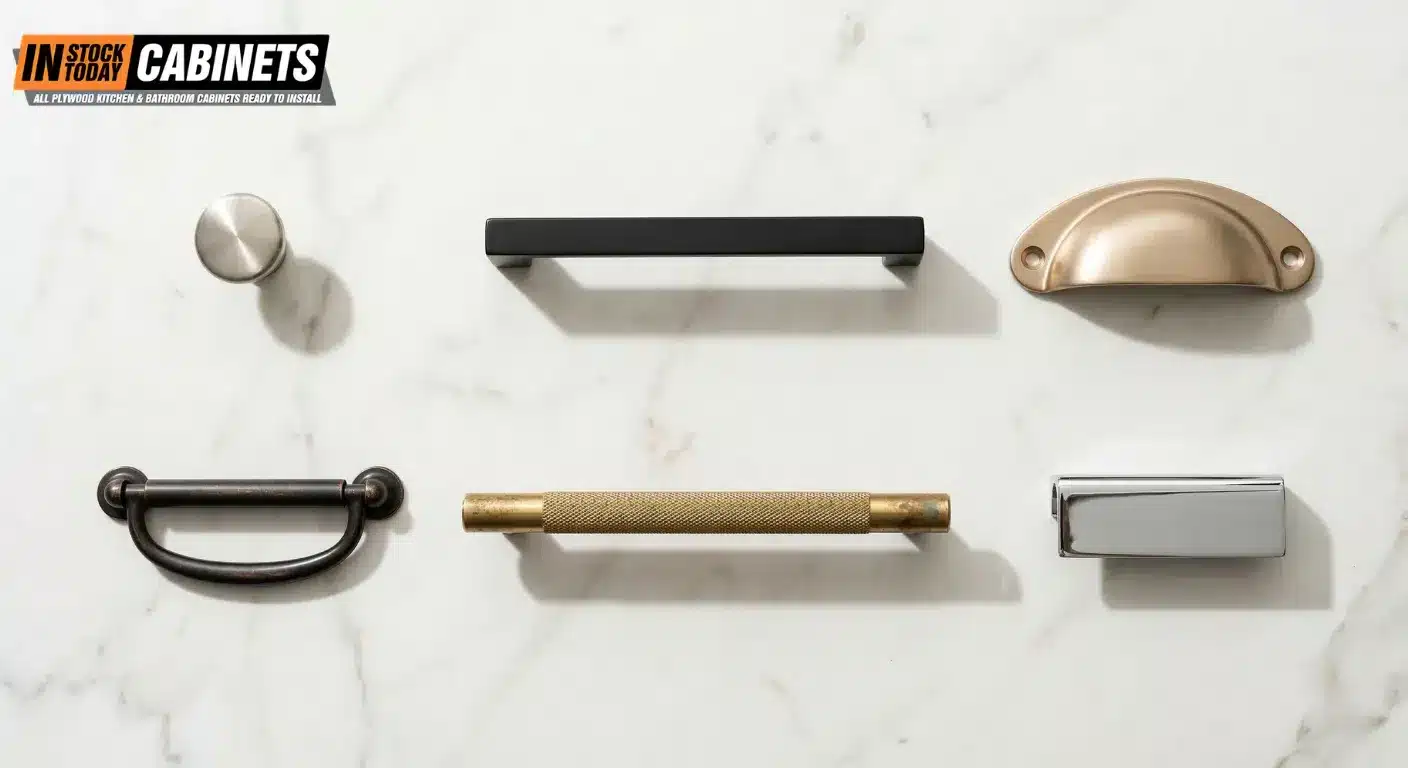
Step 2: Choose Knobs, Pulls, or Both
This is one of the first practical decisions. It shapes both aesthetics and daily usability.
| Feature | Knobs | Pulls |
| Best for | Lighter doors, upper cabinets, small drawers | Heavier drawers, base cabinets, larger doors |
| Grip | Single-finger pinch grip | Full-hand grip with better pulling force |
| Install | One screw, simpler alignment | Two screws, requires precise C-C measurement |
| Cost | $2–15/piece typical | $4–50/piece typical |
| Accessibility | Can be difficult for arthritis or limited dexterity | Preferred for universal design — operable with one hand, no tight grasping |
The most popular combination among designers — knobs on upper cabinet doors, pulls on lower drawers and base cabinets. Upper doors are lighter and swing easily with a knob. Lower drawers and heavy base cabinets benefit from the grip and pulling power a pull provides. Pulls also pair particularly well with Shaker-style cabinets and are easier on older hands.
Mixing knobs and pulls is absolutely fine — most high-end kitchens do it. The rule is to keep a common design thread across both types, whether that’s a shared coating, a consistent shape family, or a matching alignment height. Knobs on all doors, pulls on all drawers. One metal tone throughout. That formula reads intentional rather than indecisive.
For universal design and ADA compliance, pulls are the safer default. Accessibility guidance specifies fittings operable with one hand, without tight grasping or pinching, and with no more than 5 lbf of force. D-shaped and bar pulls meet all three criteria. NKBA planning guidelines reference ICC/ANSI A117.1 accessibility standards as a basis for residential kitchen design, and those standards consistently favor pull-type handles over small round knobs.
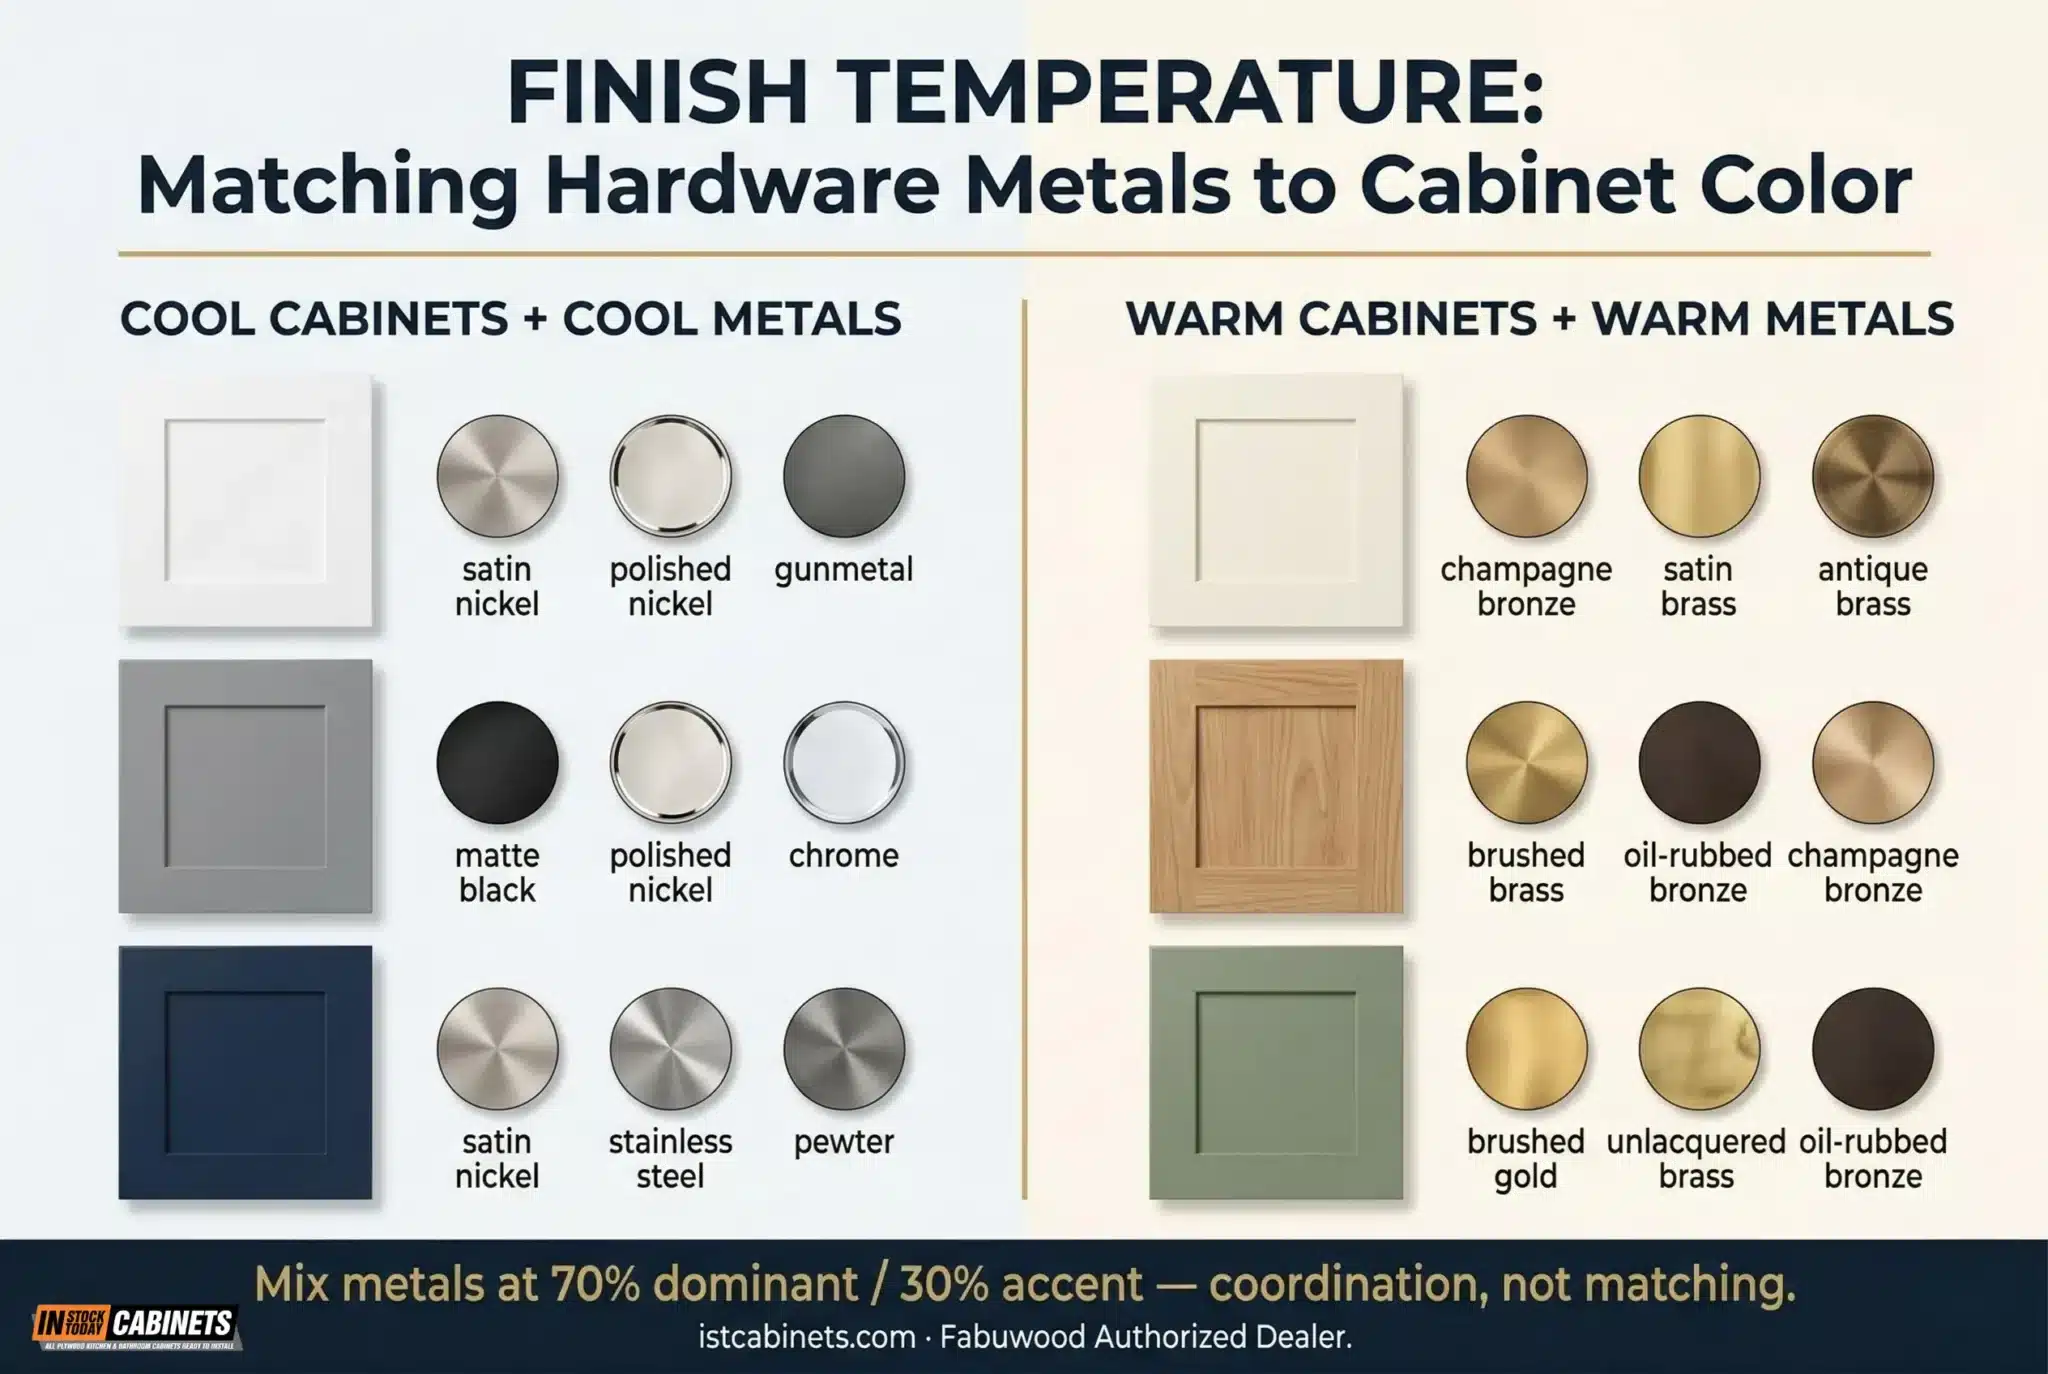
Step 3: Match the Metal Tone to Your Cabinet Color
The metal coating sets the kitchen’s temperature — warm or cool, bold or quiet, modern or classic. A well-chosen champagne bronze pull elevates the same white cabinet that a generic polished chrome knob makes forgettable.
White Shaker Cabinets
Brushed nickel and chrome feel timeless in contemporary or minimalist spaces. Matte black creates crisp contrast that makes white cabinets read sharper. Brass and gold add warmth and a custom-quality appearance. White is the most forgiving canvas — almost any metal works if the undertones align.
Gray Shaker Cabinets
Gray splits into two camps. Light grays pair with silver, nickel, chrome, and stainless steel for a sleek result. Polished brass or copper can create striking contrast. Darker grays take matte or glossy black fittings beautifully. Gold on near-black grays feels unexpectedly elegant.
Navy and Deep-Toned Shaker Cabinets
Polished nickel is the classic pairing for navy — it gives a nautical-luxe feel. Aged brass as a secondary accent adds depth. For forest green or deep emerald, antique brass reads organic and earthy. Rocky Mountain’s color-pairing guide maps 18 kitchen colors to specific metal recommendations.
Wood-Tone and Stained Shaker Cabinets
Warm metals — brass, bronze, copper — complement natural wood tones. Bronze is being called the standout metal for 2026 because it carries warmth and bridges classic Shaker joinery with contemporary cabinetry. Oil-rubbed bronze remains the reliable traditional choice.
Pairing Quick Reference
| Cabinet Color | Primary Metal | Secondary Accent | Direction |
| White (Frost) | Matte Black | Satin Brass | Modern, high-contrast |
| Navy / Inky Blue | Polished Nickel | Aged Brass | Classic, nautical-luxe |
| Forest / Deep Green | Antique Brass | Matte Black | Organic, earthy |
| Natural / Stained Wood | Oil-Rubbed Bronze | Brushed Nickel | Warm, heritage |
| Greige / Warm Gray | Champagne Bronze | Pewter | Contemporary-softened |
The 70/30 Rule for Mixing Metals
One tone throughout is the safest path. But if you’re mixing, the 70/30 rule keeps it cohesive. One dominant metal (70%) covers most cabinet pulls, knobs, and the faucet. A secondary metal (30%) appears as an accent on the island, lighting, or pantry doors. This adds depth without visual chaos.
Coordinate beyond cabinets. Match your dominant metal to the faucet and sink fixtures. Let the secondary tone echo in pendant lights or the range hood. Designers call this the “top/middle/bottom” metals framework — lighting up top, cabinet fittings in the middle, plumbing at the bottom, all pulling from the same two-metal palette.
Step 4: Get the Size and Proportion Right
Incorrect sizing is one of the most visible mistakes on Shaker cabinets. The geometric grid of the stile-and-rail frame amplifies any proportional misstep. A pull that’s too small for a wide drawer looks timid. An oversized knob on a narrow door overwhelms the frame.
Pull Sizing and the Rule of Thirds
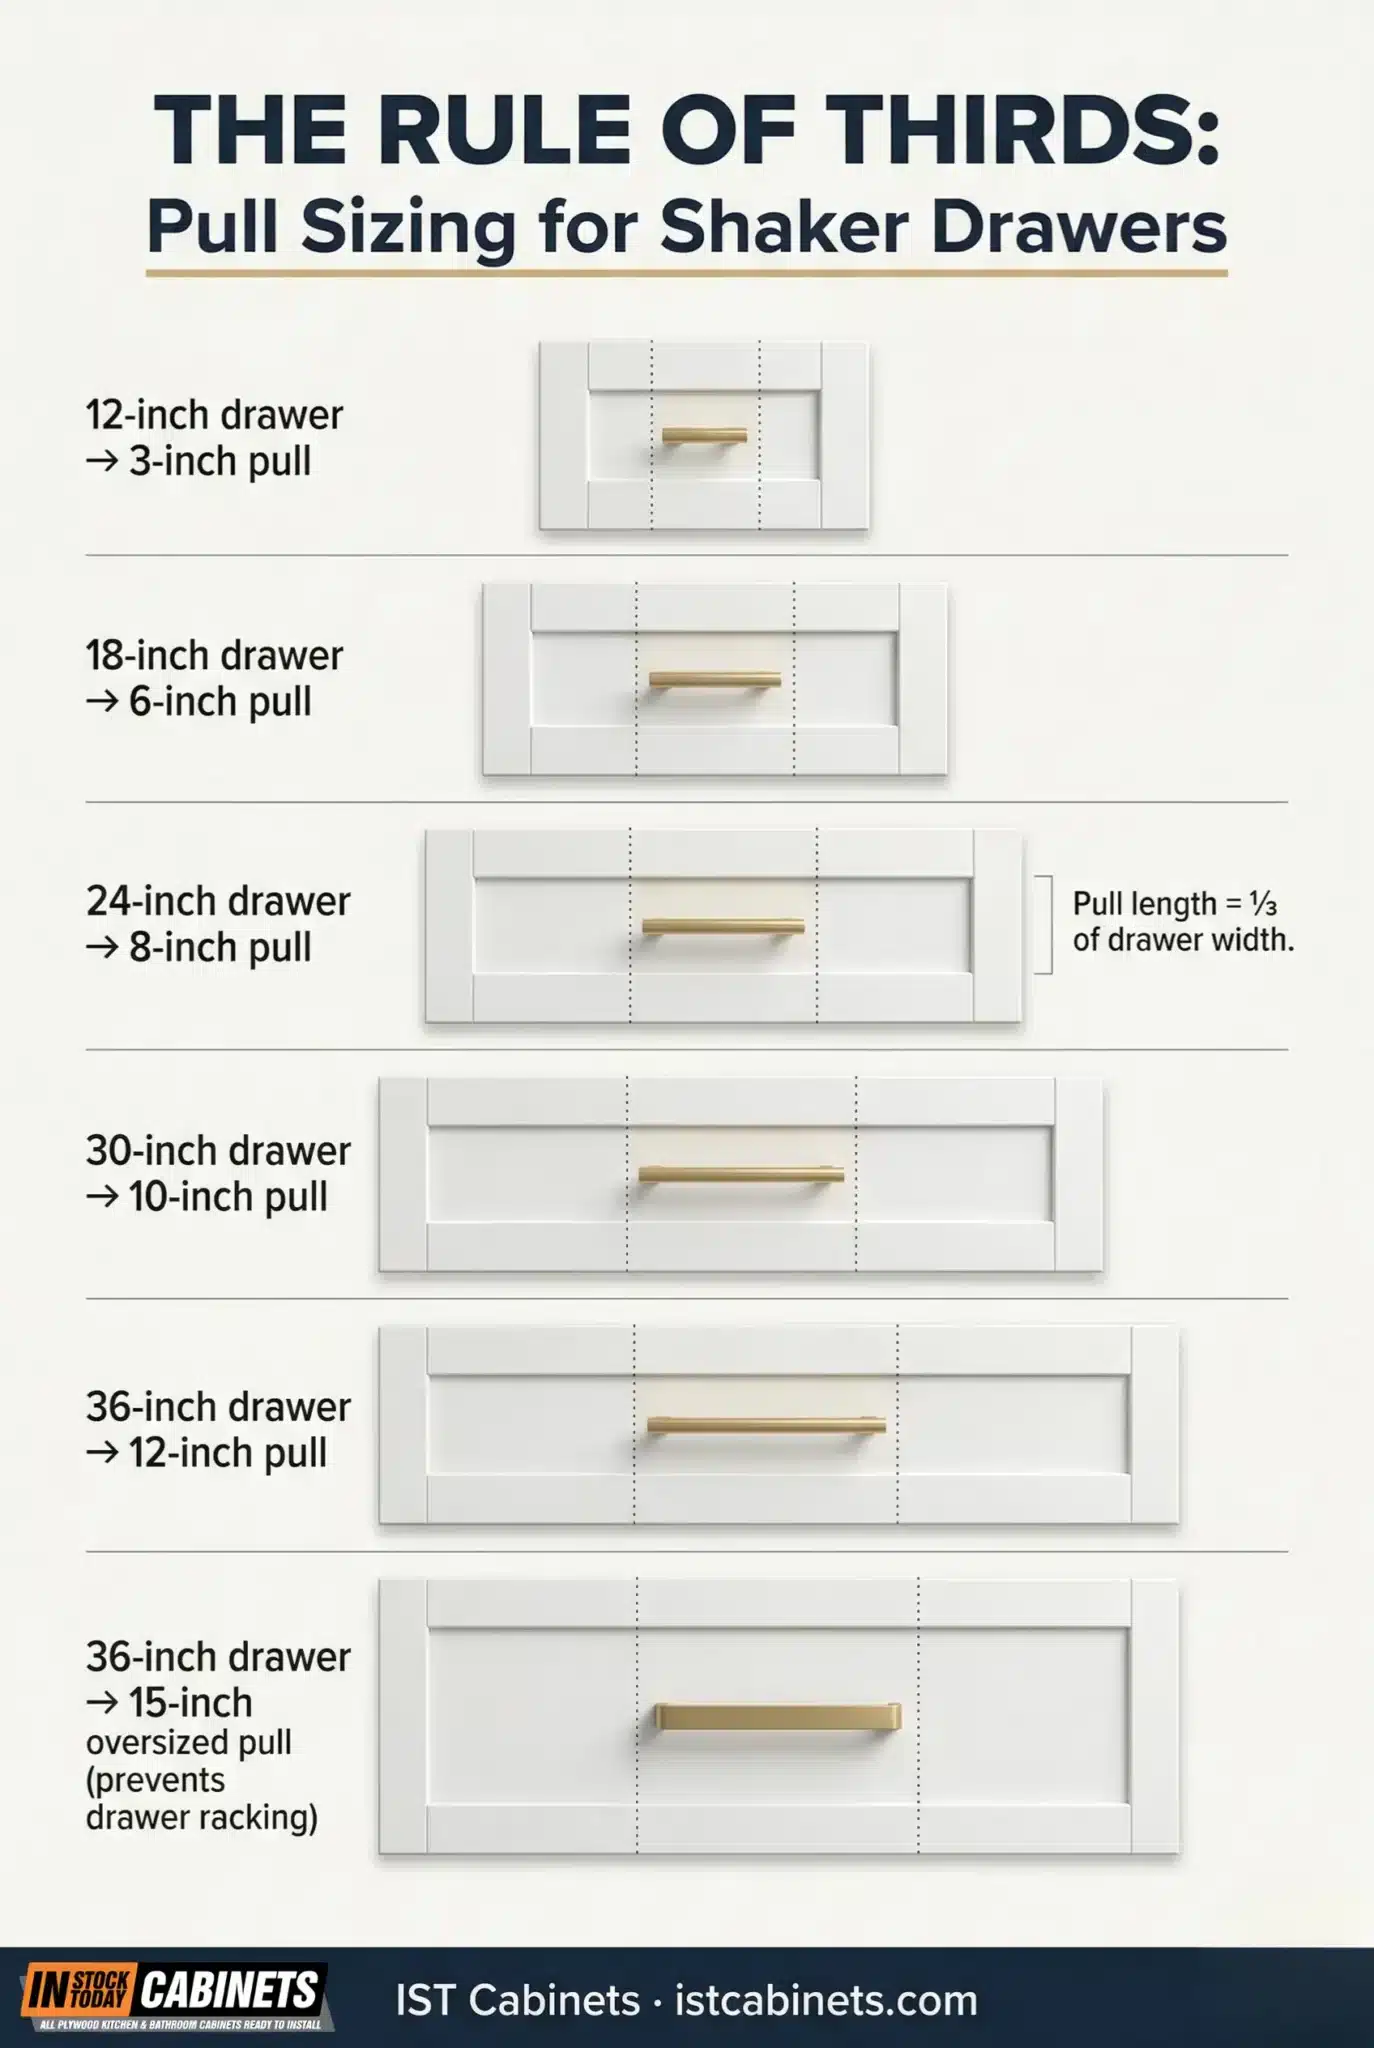
The rule of thirds is the industry standard. A pull’s length should equal roughly one-third of the drawer width or the door height. A standard 18″ drawer gets a 6″ pull. A 30″ drawer calls for a 10″ pull. The same principle applies vertically — a 36″-tall pantry door works well with a 12″ pull.
One distinction worth noting — overall length vs. center-to-center (C-C) measurement. Overall length is the full pull end-to-end. C-C is the distance between the two screw holes. When shopping, C-C is the spec that determines whether a pull fits your existing holes or a standard jig template. The Hardware Resources selection guide breaks down this distinction clearly.
| Drawer Width | Ideal Pull Length | Pull C-C | Count |
| 12″ or less | 4″–5″ | 3″ | 1 knob or 1 small pull |
| 12″–18″ | 4″–6″ | 3″–5″ | 1 pull |
| 18″–24″ | 6″–9″ | 5″–8″ | 1 pull |
| 24″–30″ | 9″–11″ | 8″–10″ | 1 large pull or 2 knobs |
| 30″–36″ | 11″–14″ | 10″–12″ | 1 oversized pull |
| 36″+ | 14″+ | Appliance / oversized | 1 pull (structural preference) |
Knob Sizing
Standard knobs range between 1–2″ in diameter and work on cabinet doors of any size. For drawers under 16″, one centered knob is enough. Wider drawers benefit from two knobs placed in the center of each outer third.
Wide Drawers — Why a Single Centered Pull Usually Wins
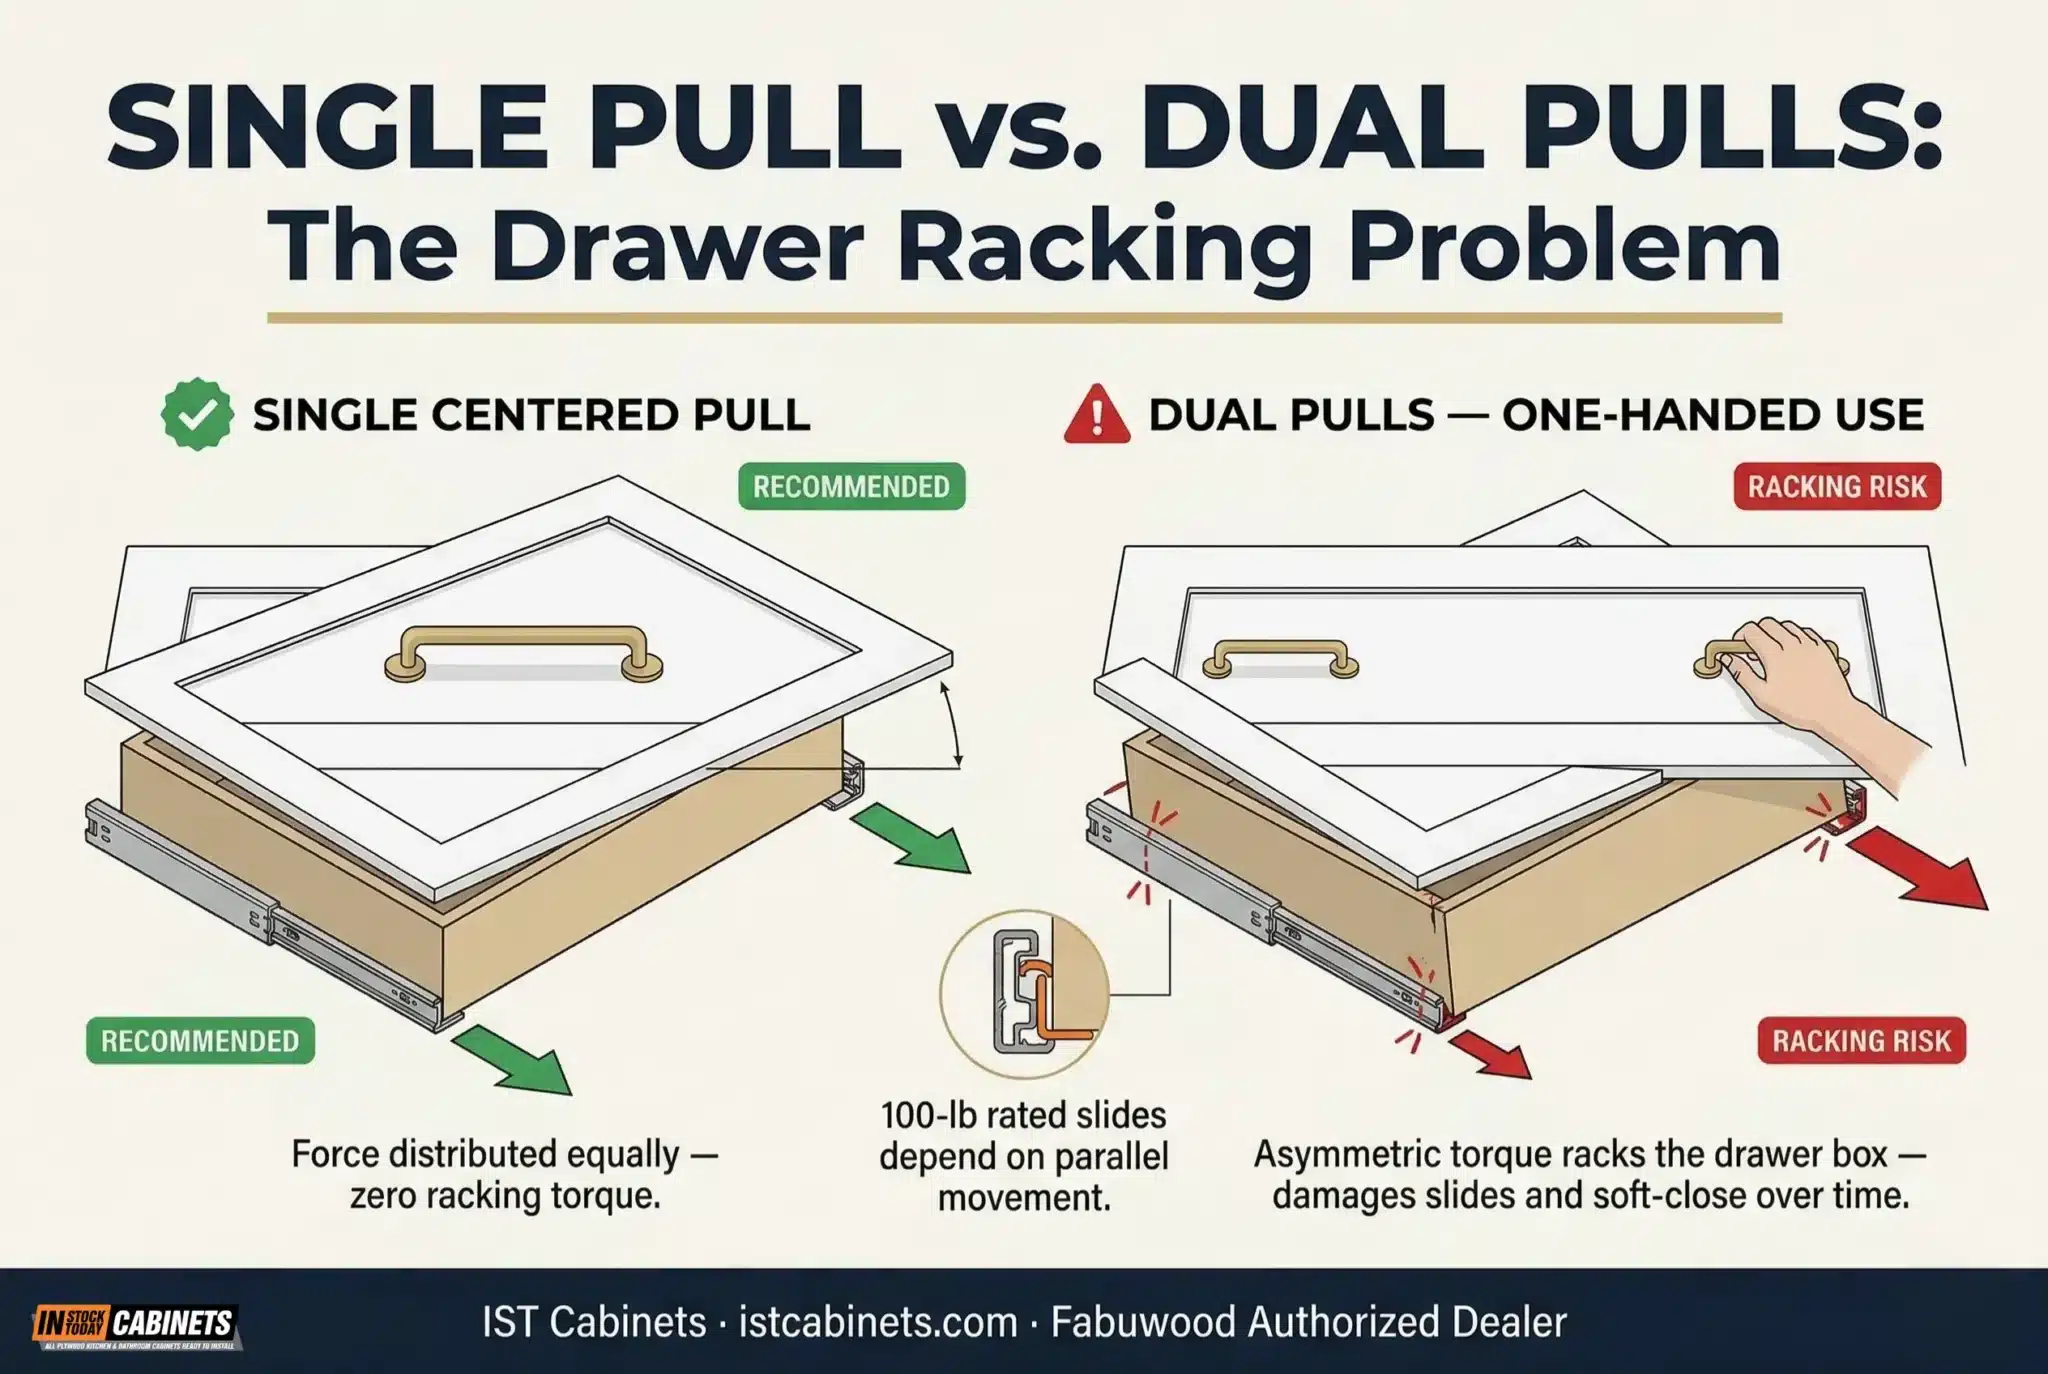
There’s a structural reason to prefer one centered pull on wide drawers (24″+) over two smaller ones. Users frequently pull from only one side when opening with one hand. This creates asymmetric torque — called drawer racking — which wears out undermount soft-close slides early and eventually misaligns the drawer box. One centered pull distributes force evenly.
If two pulls are needed for aesthetic reasons, use the “Divide by Six” rule. Divide the drawer width by six, and center each pull at that distance from the left and right edges.
Standard Hole Spacing
Common center-to-center measurements for standard pulls are 3″ (small drawers), 5″ (the most popular mid-size), and 128mm / 5-1/16″ (the European standard found in many product lines). Choosing standard sizes protects you when swapping handles later — new pulls reuse existing screw holes.
Step 5: Nail the Placement
Shaker cabinets are unforgiving about placement errors. The geometric grid makes even a 1/8″ misalignment visible across an entire wall of cabinetry. Olive & Barr’s full placement guide has good visual references, but here are the fundamentals.
The Non-Negotiable Rule
Handles and knobs must mount on stiles or rails — never on the recessed center panel. The stile-and-rail frame is the structural and visual anchor of Shaker design. Mounting on the center panel, as detailed in IST Cabinets’ installation guide, pins the floating panel and leads to cracking as the wood expands against the fixed screw.
Door Placement
- Wall cabinets — Position the fitting on the stile 5–3″ from the bottom edge of the door, on the side opposite the hinges. Accessible for multiple heights.
- Base cabinets — Same 2.5–3″ offset but measured from the top edge. Reduces bending and back strain.
- Tall pantry doors — Vertical mid-stile placement, aligned with user elbow height (roughly 40–42″ from the finished floor). This creates the most natural, effortless opening motion.
Drawer Placement
Center the pull or knob horizontally on the drawer front. For recessed-panel Shaker drawers, center it on the recessed panel — this is the most common and visually balanced position. Always measure and mark exact positions using a cabinet jig before drilling. Tape fittings in place first and step back to visually confirm alignment.
Specialty Cabinet Considerations
- Corner cabinets — Place the handle on the door that opens first (the one that clears the adjacent door). This prevents the daily frustration of grabbing the wrong one.
- Glass-front uppers — Choose smaller, more discreet fittings. The glass panel is the visual focus. Oversized pulls compete with the display inside.
- Appliance panels — Use appliance pulls (thicker diameter, deeper projection) that provide the grip strength needed to pull open a heavy refrigerator or dishwasher panel.
- Lazy Susan corners — A single pull centered on the door is enough. Two pulls create the racking problem described above.
Slim Shaker Profiles — A Special Case
Slim Shaker stiles can be as narrow as 3/4″ to 1-1/2″. On these profiles, standard bases often overhang the bevel — the angled transition from the flat stile to the recessed panel. The overhang creates a wobbly, unstable handle that grinds the coating every time the door opens. For slim profiles, specify fittings with small footprints (micro-knobs or edge pulls) and drill holes exactly 1″ from the inside frame edge.
Step 6: Pick the Right Shaker Cabinet Hardware Brand for Your Budget
Pricing varies wildly — from $2/piece to over $200/piece. For a typical kitchen with 30–40 handles and knobs, that’s anywhere from $80 to $6,000+. Here’s where the major brands land.
| Tier | Brand | Price/Piece | Known For | Shaker Sweet Spot |
| Budget | Liberty | $2–$8 | Value range, big-box availability (Home Depot, Lowe’s) | Basic bar pulls and knobs for rental or flip kitchens |
| Budget | Franklin Brass | $2–$6 | Bulk packs, Amazon and Wayfair | Simple round knobs and slim pulls |
| Mid-Range | Amerock | $5–$20 | 10+ coatings, 100-year heritage, KCMA-adjacent quality tier | Transitional bar pulls, cup pulls in champagne bronze |
| Mid-Range | Hickory | $8–$18 | Cup pulls, dual-drilling options | Farmhouse and traditional Shaker pairings |
| Premium | Top Knobs | $10–$35 | Designer favorite, 30+ collections, clean lines | Edge Pull Collection for slim Shaker; Aspen line for transitional |
| Premium | Emtek (Fortune Brands) | $15–$50 | 20+ coatings, modern/transitional strength | Urban Modern geometric knobs; Select line bar pulls |
| Luxury | Rejuvenation | $20–$80 | Portland-made, Williams-Sonoma brand, unlacquered brass specialty | Ideal for the unlacquered brass / living patina direction |
| Luxury | Armac Martin | $100–$300+ | British-made, solid brass, bespoke surface options | High-end traditional and transitional Shaker |
Our guidance from the showroom — spend the most on fittings you touch the most. Allocate premium budget to the primary work zone (sink area, range drawers, fridge adjacent), where you open and close doors 20–40 times a day. Budget options are perfectly fine for upper cabinets that open once or twice daily.
Step 7: Solid Brass vs. Zinc Alloy vs. Stainless Steel
The material inside the fitting matters as much as the coating on the outside. This is the most important quality differentiator — and the one most homeowners overlook.
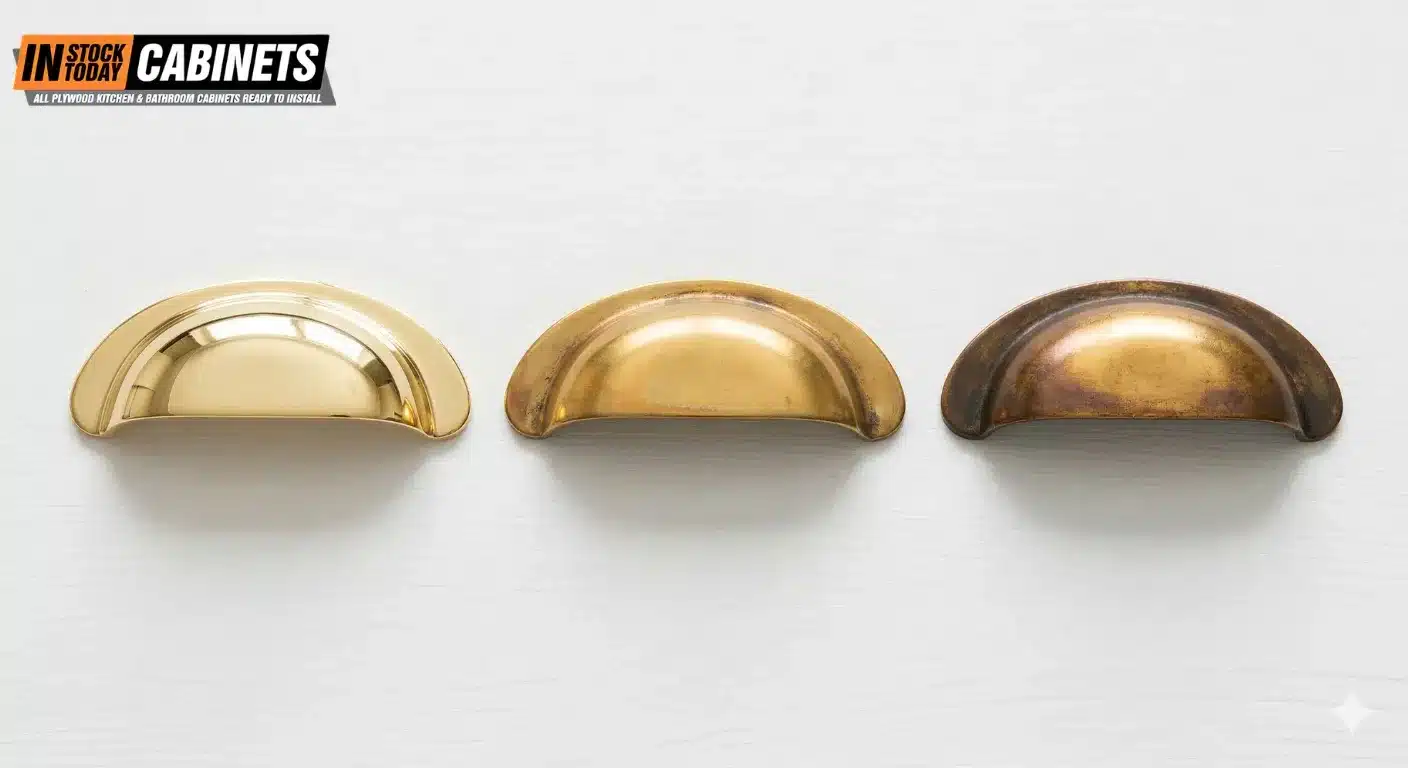
Solid brass is the gold standard. It resists corrosion, holds its shape under years of daily use, and feels substantial in the hand. Unlacquered brass develops a living patina over time. Lacquered brass maintains its original sheen. Solid brass typically starts at $15–$20/piece and can exceed $100+ for artisan or bespoke options.
Zinc alloy (Zamak) is the industry’s workhorse material. The vast majority of pulls and knobs in the $5–$25 range are die-cast zinc with electroplated or PVD (Physical Vapor Deposition) coatings. Quality varies enormously. Look for brands that specify ANSI/BHMA certification — this means the product has been tested for pull resistance, surface durability, and cycle life.
Stainless steel resists fingerprints and corrosion, making it excellent near sinks and dishwashers. The weight and feel are solid. Stainless is most common in bar pull and edge pull formats.
Quick test at the store — pick up the piece. If it feels hollow, light, or tinny, it’s low-quality die-cast that will wobble within months. If it has weight and density, you’re in the right territory.
Step 8: Handle the Technical Installation Details
Screw Length and Pilot Holes
Most pulls and knobs ship with standard 1″, 8-32 machine screws designed for a 3/4″ door. These don’t account for varied Shaker construction. Always verify screw length against your actual door thickness. Drill pilot holes 1/64″ larger than the screw shank to prevent splitting the stile or rail. A 3/16″ drill bit works for most fittings. Use 1/4″ for pulls with stud-type mounts.
Overtightening is a silent killer. On five-piece drawer fronts, a microscopic air gap between the decorative frame and the drawer box means overtightening flexes the thin panel and cracks the factory surface. Tighten firmly. Stop before the coating protests.
Post-Installation Hinge Recalibration
Adding fittings changes the mass distribution and swing behavior of the door. Modern concealed hinges — like the Blum CLIP top BLUMOTION used in Fabuwood Shaker lines through IST Cabinets — offer six-way post-installation adjustment. Vertical adjustment corrects sag. Lateral adjustment maintains consistent reveals between adjacent doors. Depth adjustment ensures the door sits flush for proper soft-close dampening.
Step 9: Plan for Maintenance by Metal Type
Different coatings age differently. Choosing one without understanding its care requirements leads to buyer’s regret within a year.
- Brushed nickel and satin nickel — The lowest-maintenance option. Hides fingerprints, wipes clean with a damp cloth, resists water spots. Best choice for families with young children.
- Matte black — Shows fingerprints and minor scratches more than you’d expect. Wipe with a soft cloth and mild soap. Avoid abrasive cleaners that strip the coating. PVD-coated matte black holds up much better than powder-coated versions.
- Polished chrome — Shows every water spot and fingerprint. Requires frequent wiping near sinks. The upside: scratches can often be buffed out.
- Unlacquered brass (living patina) — The prestige choice — and the highest-maintenance one. It develops a natural patina that many homeowners love. To slow the patina, apply a thin coat of Carnauba wax every 6–12 months. To restore the original shine, a brass-specific polish and soft cloth bring it back. Not ideal for households that want zero upkeep.
- Oil-rubbed bronze — Moderate maintenance. The dark surface hides daily wear well. Clean with a damp cloth. Avoid vinegar-based or acidic cleaners that strip the oil layer.
- Champagne bronze — Most versions are PVD-coated, which means strong scratch resistance and minimal maintenance. Wipe with a soft cloth. One of the best balances of warmth, durability, and low effort.
The magnet test reveals whether a fitting is real brass or plated over steel. A magnet sticks to steel-core plated pieces but won’t stick to solid brass or zinc alloy. Useful for verifying quality at the store.
Shaker Cabinet Hardware Trends for 2026
The 2026 design cycle is shifting away from the manicured “show home” look. Plank’s trend report describes the movement as curated collections that feel assembled over time rather than ordered from one catalog. Several specific shifts stand out.
- Unlacquered brass and living patinas remain the most sought-after direction. The patina tells a story of use that aligns with the original Shaker philosophy of longevity.
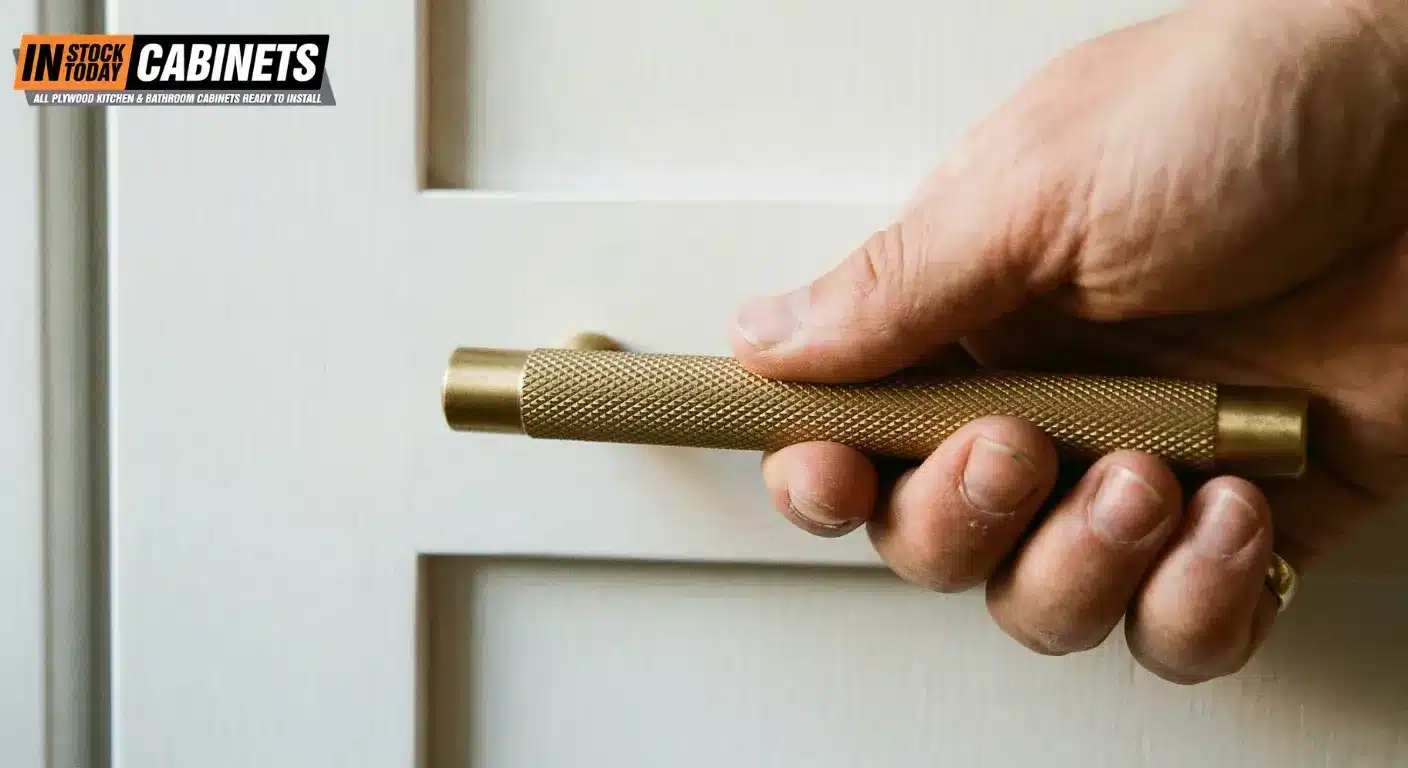
- Knurled and textured surfaces add a tactile, haptic dimension. The cross-hatched knurled texture provides a secure grip while contrasting against flat Shaker panels.
- Sculptural, oversized pulls are moving from niche to mainstream. Handles are becoming functional art — soft curves, etched details, silhouettes that invite touch.
- Sustainable and artisan materials reflect a consumer shift toward ethical, small-batch production. Hand-forged pulls, leather wraps, and reclaimed metal add warmth that factory-produced options can’t.
- Backplates are returning as both protective and decorative elements. They shield the cabinet surface from ring wear at touch points and cover old holes when swapping sizes.
- Colored accents in muted tones — deep green, clay red, or soft charcoal ceramic knobs — are emerging as unexpected personality touches. Small doses only.
How to Make Shaker Cabinets Look High End
Upgrading your fittings is the single fastest path. But it’s not the only one. If you’re chasing a custom-kitchen look from stock or semi-custom Fabuwood Shaker cabinets, stack these five moves.
- Swap to premium pulls and knobs. Replace builder-grade knobs with solid brass pulls in a tone that coordinates with your fixtures. This alone transforms perceived quality.
- Add crown molding. Crown molding along the top of wall cabinets closes the gap between cabinets and ceiling. One of the most cost-effective upgrades for visual impact.
- Install under-cabinet lighting. LED strip lighting below wall cabinets illuminates the countertop, adds depth, and highlights the shadow line of Shaker door profiles.
- Add glass inserts to select upper doors. Two or four glass-front doors in a kitchen — flanking a range hood or framing a window — break up visual monotony and signal a custom build.
- Choose inset construction. If budget allows, inset Shaker cabinets with face-frame reveals look higher-end than standard overlay. The precision required signals craftsmanship.
The fitting swap is the fastest because it requires no cabinet replacement, no new doors, and typically costs $200–$800 for a full kitchen. Everything else on this list involves construction or custom orders.
Checklist for Shaker Cabinets with the Right Hardware FAQs
What goes best with Shaker cabinets?
Bar pulls, cup pulls, and simple round knobs are the three most popular types for Shaker cabinets. The best choice depends on your style direction. Modern Shaker kitchens work well with flat bar pulls or edge pulls in matte black or brushed nickel. Traditional Shaker pairs naturally with cup pulls and round knobs in oil-rubbed bronze or unlacquered brass. Transitional Shaker — the largest market segment — is most flexible, working with D-pulls, arced bar pulls, and mixed combinations in champagne bronze or satin nickel. Inspire’s Shaker collection and Houzz’s top 8 styles guide both offer strong visual references.
What is the 1/3 rule for cabinet pulls and knobs?
A pull’s overall length should be roughly one-third of the drawer width or door height. A 15″-wide drawer gets a 5″ pull. A 30″-wide drawer gets a 10″ pull. A 36″-tall pantry door works with a 12″ pull. The same proportion applies both horizontally (drawers) and vertically (doors). This guideline prevents fittings from looking either too small or too large for the cabinet face. The one-third rule guide from Hardware Resources has a printable reference chart.
Where should you place knobs and pulls on Shaker cabinets?
On wall cabinets, position them on the stile 2.5–3″ from the bottom edge. On base cabinets, 2.5–3″ from the top edge. Always mount on the solid wood stile or rail — never on the recessed center panel, which is designed to float and will crack if pinned by a screw. For drawers, center fittings horizontally on the drawer front. True Position Tools’ placement guide has detailed measurement diagrams for every setup. Use a jig for consistency — Shaker’s geometric grid makes even small misalignments visible across a wall of cabinets.
How do I match cabinet fittings to my cabinets?
Match by temperature first. Warm cabinet tones (cream, wood, warm gray) pair with warm metals (brass, bronze, copper). Cool tones (white, navy, cool gray) pair with cool metals (nickel, chrome, stainless). After temperature, coordinate with your faucet and lighting fixtures using the 70/30 rule — 70% dominant metal, 30% secondary accent. Make sure the scale fits door proportions (rule of thirds for pulls, 1–2″ diameter for knobs). Order physical samples and test them under your actual kitchen lighting, because metal tones shift dramatically between showroom fluorescent and home LED.
What is the trend in cabinet fittings for 2026?
Unlacquered brass, knurled textures, sculptural oversized pulls, and sustainable artisan materials are the biggest 2026 shifts. Unlacquered brass develops a natural patina over time, aligning with the “living surface” movement. Knurled (cross-hatched) textures add tactile interest that contrasts against flat Shaker panels. Oversized pulls that span beyond the traditional rule of thirds are becoming acceptable for bold, architectural statements. Push-to-open handleless systems are gaining ground in high-traffic zones. Homes & Gardens’ trend report and Kitchen Tune-Up’s 2026 forecast cover these shifts in detail.
How do you make Shaker cabinets look high end?
Five upgrades, ranked by cost-effectiveness:
- Swap to premium pulls and knobs ($200–$800 for a full kitchen)
- Add crown molding between wall cabinets and ceiling
- Install under-cabinet LED strip lighting
- Add glass inserts on 2–4 upper doors
- Choose inset construction if budget allows
The fitting swap is the fastest and cheapest because it requires no new doors or cabinet replacement. Fabuwood’s Shaker lines already include dovetail joinery, all-plywood boxes, and Blum soft-close hinges — a quality foundation that supports any upgrade.
What is the current trend in kitchen cabinet fittings?
Mixed metals (using the 70/30 rule), matte black, brushed gold, satin brass, and integrated push-to-open systems dominate the 2025–2026 cycle. The broader direction is away from perfectly matched, same-tone-everywhere kitchens and toward curated collections that feel assembled over time. Texture is growing — knurled, hand-forged, and hammered surfaces are replacing smooth, mass-produced options. Sustainability is a rising factor, with demand for small-batch artisan pieces and reclaimed materials increasing year over year.
Is it okay to mix knobs and pulls on kitchen cabinets?
Yes — most designer kitchens do it intentionally. Here’s the standard framework:
| Cabinet Zone | Fitting Type | Why |
|---|---|---|
| Upper doors | Knobs | Lighter doors, easy single-finger open |
| Lower drawers | Pulls | Heavier loads, better grip |
| Base cabinet doors | Pulls | Ergonomic, reduces bending strain |
| Pantry / tall doors | Long pull or latch | Proportional to door height |
Keep all pieces in the same metal family. If mixing two tones, apply the 70/30 rule. Avoid mixing more than two shapes — one knob style and one pull style is the ceiling for cohesion. Dowsing & Reynolds’ guide has good visual examples of successful combinations.
How should you style pulls and knobs on kitchen cabinets?
Start with the kitchen’s style direction, choose a fitting type that matches, select a metal tone that coordinates with cabinet color and fixtures, size using the rule of thirds, and place consistently across all doors and drawers. Style fittings as you’d style jewelry — one or two metals maximum, scale proportional to what it’s worn on, and cohesion across the whole ensemble. The single biggest styling mistake is inconsistency: mixed placement heights, varied pull lengths, or random tone changes from cabinet to cabinet. Pick a system and repeat it.
Ready to Choose Your Shaker Cabinet Hardware?
Fabuwood Shaker cabinets, available through IST Cabinets, ship with premium Blum soft-close hinges, full-extension Blumotion drawer glides, dovetail joinery, and all-plywood cabinet boxes. The craftsmanship in the construction — including durable materials and oven-cured coatings — means the foundation is built for whatever direction you choose.
For help selecting the right fittings for your project, IST Cabinets offers complimentary design consultations at our showrooms in Virginia, Maryland, Delaware, Texas, Illinois, and Washington DC. Our team reviews project scope, discusses functional requirements, and provides tailored recommendations based on your cabinet color, kitchen layout, and budget.
Avoid These Mistakes When Integrating Hardware with Shaker Cabinets
Shaker cabinets punish sloppy hardware work. Their five-piece door construction — two vertical stiles, two horizontal rails, and a recessed center panel — creates a rigid visual grid that exposes every crooked pull, every misaligned knob, and every poorly matched finish. Where a raised-panel or slab door might forgive a 1/8-inch deviation, the Shaker profile amplifies it.
For designers and contractors, that means hardware integration on Shaker cabinets isn’t a finishing touch. It’s a precision task that intersects with door engineering, material science, and the ergonomics of daily kitchen use. The mistakes below cost real money — in callbacks, replacement doors, and damaged reputations. Every one of them is preventable.
10 Takeaways for Contractors and Designers
- Hardware mounts on stiles and rails — never the center panel. The recessed panel floats inside a dado groove to absorb seasonal wood movement. Drilling into it pins the panel in place, generates shear stress, and cracks the finish within a few humidity cycles. On premium Shaker lines with catalyzed conversion varnish, a misplaced hole means a full door replacement.
- Drawer fronts are not doors — treat them differently. Screws on a five-piece drawer front must pass through the thin center panel and the drawer box wall behind it. Any micro-gap between those surfaces causes flex and finish cracking under torque. For heavy pull-outs (trash, recycling, appliance panels), mount hardware on the solid top rail to bypass the fragile panel entirely.
- The rule of thirds prevents every proportion mistake. Pull length should equal roughly one-third of the drawer width. A 6-inch pull for an 18-inch drawer. A 10-inch pull for a 30-inch drawer. A 12- to 15-inch pull for a 36-inch pot drawer. Buying one pull size in bulk for an entire kitchen is the fastest path to visual imbalance.
- A single centered pull on wide drawers is structurally superior to dual pulls. Central placement eliminates drawer racking — the asymmetric torque that degrades undermount slide mechanisms when users pull from one side. Dual pulls invite one-handed use, which racks the drawer box diagonally and wears out soft-close dampening over thousands of cycles.
- Measure slim Shaker stiles before specifying hardware. On profiles with 1.5-inch or narrower frames, standard hardware bases overhang the bevel where the flat stile meets the recessed panel. That overhang creates wobble, finish grinding, and permanent indentation damage. Edge pulls, finger pulls, and micro-knobs solve this on frames down to 3/4 inch.
- Match finish temperature to cabinet undertone, not to the faucet. Cool-toned cabinets (white, gray, navy) pair with cool metals (satin nickel, chrome, gunmetal). Warm-toned cabinets (cream, wood, green) pair with warm metals (brass, bronze, champagne bronze). Mix metals intentionally at a 70/30 dominant-to-accent ratio. Matching hardware to the faucet is an outdated constraint that narrows your design options.
- A calibrated jig eliminates the compounding error that ruins entire cabinet runs. Hand-measuring with a tape and pencil introduces 1/16-inch drift that compounds door-to-door. A hardware jig (Kreg KHI-PULL, True Position Tools Pro) locks edge offsets and hole spacing, guaranteeing millimeter-perfect repeatability across every door and drawer in the kitchen.
- Pilot holes are non-negotiable on dense hardwood. Hard maple (1,450 Janka) and birch frames split along the grain when screws are driven without a pilot hole. Drill 1/64 inch larger than the screw’s non-threaded shank. Test on scrap first. Apply masking tape over the drill point on finished surfaces to prevent entry-side splintering.
- Recalibrate European concealed hinges after installing hardware. Added hardware weight shifts the door’s mass distribution and can cause imperceptible sagging that ruins reveal consistency across a wall of Shaker cabinets. The six-way adjustment on Blum CLIP top BLUMOTION hinges (vertical, lateral, depth) exists specifically for this post-installation tuning.
- Select hardware during the design phase — not after installation. Choosing hardware as a last-minute afterthought leads to proportion mismatches, finish conflicts with already-installed fixtures, and settling for whatever’s in stock. Order samples early, test them on actual cabinet doors, and confirm clearances against countertops, backsplashes, appliance handles, and adjacent door swings before any drilling begins.
Mistake #1: Drilling Into the Recessed Center Panel
This is the most structurally destructive error in Shaker hardware installation, and it happens more often than it should.
The center panel of a Shaker door is engineered as a floating panel — it sits inside a channeled groove (dado) cut into the inner edges of the stiles and rails. That floating panel design exists for one reason: wood moves. As kitchen humidity fluctuates across seasons, the center panel expands and contracts within its frame. The mortise-and-tenon joinery at the corners stays rigid while the panel breathes freely.
When an installer drills through the stile and into the center panel — or worse, drives a screw that pins the panel to an internal shelf or drawer box — they lock that panel in place. The expansion forces that would normally dissipate harmlessly now become shear stress concentrated at the fastener point. Within a few humidity cycles, hairline fractures appear in the catalyzed conversion varnish finish. Finishers call these “witness lines.” On painted MDF or HDF center panels, the drilled hole also creates a moisture ingress point that risks swelling, bubbling, and permanent delamination.
The rule is absolute: hardware mounts exclusively on the solid stiles or rails. No exceptions. On premium Shaker lines with 3/4-inch solid wood frames and mortise-and-tenon joinery — like Fabuwood’s Allure collections distributed through IST Cabinets — a misplaced hole on the center panel means a full door replacement. That’s hundreds of dollars per incident before labor.
Mistake #2: Ignoring Drawer Front Mechanics
Cabinet doors and drawer fronts are not the same substrate, and they don’t tolerate the same hardware approach.
On a Shaker drawer front, centering hardware on the recessed panel looks clean — but it introduces a mechanical problem most homeowner guides never mention. The screws must pass through two distinct layers: the thin center panel (typically 1/4 inch on a five-piece drawer front) and the front wall of the dovetail drawer box behind it (typically 5/8-inch solid hardwood on quality cabinetry). If the drawer box wall doesn’t sit perfectly flush against the back of the recessed panel — and a microscopic gap is common — tightening the screw flexes the thin panel inward. That flexion cracks the rigid finish instantly.
For standard drawers, this risk is manageable with careful screw selection and controlled torque. For heavy pull-outs — trash receptacles, recycling bins, appliance panels — it’s a structural concern. These applications place maximum pulling strain on the fasteners, and thin center panels can’t sustain that load over thousands of cycles.
The professional fix: Mount handles on the solid top rail of heavy pull-out drawer fronts. The screw passes through the thickest, most structurally sound portion of the hardwood frame (3/4 inch), completely bypassing the fragile center panel. Rail mounting also distributes pulling force more effectively for heavy vertical loads, preventing screw stripping that commonly plagues center-panel-mounted hardware.
Mistake #3: Wrong Scale and Proportion
Proportion errors are the number-one aesthetic mistake designers identify on Shaker kitchens. Hardware that’s too small disappears against the flat planes of the door frame, creating a visual void where punctuation should be. Hardware that’s too large overwhelms the recessed panel geometry and competes with the clean lines that make Shaker appealing.
The most common version of this mistake: buying one pull size in bulk for the entire kitchen. A 5-inch pull looks proportionate on a standard 18-inch drawer. On a 36-inch pot drawer, it looks stunted. On a 12-inch spice pull-out, it dominates.
The rule of thirds provides the proportional framework professionals rely on. Pull length should equal approximately one-third of the drawer width. An 18-inch drawer gets a 6-inch pull. A 30-inch drawer calls for a 10-inch pull. A massive 36-inch drawer warrants a 12-inch pull — or even a 15-inch statement pull, which is the direction current design trends are heading for wide Shaker drawers.
For tall pantry doors (60–84 inches), 12- to 18-inch appliance-style pulls mounted vertically on the stile provide both proper proportion and the pulling force needed to open heavy doors. Standard 5-inch pulls on a full-height pantry look like an afterthought.
Pro tip: Use elevation drawings to evaluate hardware scale across the full cabinet run before ordering. Hardware that looks perfect held against a single door may look wildly inconsistent when installed across a wall of varied cabinet sizes.
Mistake #4: Hardware That Fights Shaker’s Design DNA
Shaker design emerged from a philosophy of restraint — function over decoration, simplicity over ornamentation. Installing ornate, heavily detailed hardware on a Shaker door creates a stylistic contradiction that experienced designers spot immediately.
The mismatch works in both directions. Scrollwork and filigree pulls on a simple Shaker frame look fussy and confused. But flat, ultra-modern slab-style pulls — the kind designed for frameless European cabinets — look equally wrong on a traditional Shaker profile. They belong on flat-panel doors, not on five-piece construction with visible stile-and-rail geometry.
The style matrix for Shaker hardware:
Traditional Shaker — Cup pulls on drawers, simple round knobs on doors, oil-rubbed bronze or antique brass. Bin pulls in particular reinforce Shaker’s heritage craft aesthetic. For drawers 30 inches and wider, two cup pulls (placed using the rule of thirds) is the traditional approach.
Transitional Shaker — Arced or footed bar pulls, tubular barrel pulls, mixed knob-and-pull combinations. This is the largest market segment. Keep a common design thread across mixed hardware — same finish, related shape family, or shared material. Champagne bronze and satin brass paired with matte black accents define this space right now.
Modern Shaker — Flat bar pulls, edge pulls, integrated finger pulls. Flat bars work because they mirror the door frame’s linear geometry. Edge pulls create a minimal profile that keeps the cabinet face clean. Longer pulls (12–18 inches) on wide drawers emphasize horizontal lines. Matte black, brushed nickel, and stainless steel are the standard finishes here.
Mistake #5: Ignoring Stile Width on Slim Shaker Profiles
This mistake has become significantly more common as slim and skinny Shaker profiles have surged in popularity. Traditional Shaker stiles measure 2.25 to 3 inches wide — plenty of surface for standard hardware bases. Slim Shaker variants narrow the frame to 1.5 inches, 1 inch, or even 3/4 inch.
The problem is geometric. A standard Shaker stile transitions from its flat outer face into the recessed panel via an angled drop-off — the bevel. If the base of a knob or the rosette of a pull is wider than the flat surface of the slim stile, it overhangs that bevel. The hardware can’t sit flush. The fastener can’t be properly torqued. The result is a wobbly, unstable connection that grinds against the finish every time it’s pulled, leaving permanent indentation and scratch damage on the stile.
The fix for narrow profiles: Measure the exact flat dimension of the stile before the bevel drop-off using digital calipers. If standard 1.25-inch knob bases are too wide, switch strategies entirely. Edge pulls and finger pulls bypass the narrow front face completely — they mount to the top or side edge of the door and wrap slightly over the back. Micro-knobs with small-footprint bases prevent bevel overhang on frames down to 3/4 inch.
For skinny Shaker uppers with frames as narrow as 3/4 inch, TaylorCraft’s placement guidelines recommend positioning the hardware hole 1 inch from the inside of the frame edge — ensuring the screw anchors into solid wood rather than the bevel transition zone.
Mistake #6: One Centered Pull on Heavy Wide Drawers vs. Two — Without Understanding the Physics
The single-pull versus dual-pull debate on wide drawers (30 inches and above) is one of the most contested topics in cabinet hardware installation. Most sources treat it as purely aesthetic. It’s actually a structural engineering decision.
When a heavy drawer has two separate pulls, users frequently open it one-handed — grabbing whichever pull is closest while the other hand holds a plate or utensil. That off-center force generates asymmetrical torque on the drawer box — a destructive phenomenon known as drawer racking. The side closest to the pulled handle advances faster than the opposite side, racking the box diagonally within the cabinet cavity.
Premium cabinetry uses full-extension undermount drawer slides — Blum Tandem Plus systems carry a verified 100-pound load rating and depend on perfectly parallel movement. Repeated racking grinds the internal bearings laterally against their steel tracks, degrades the hydraulic soft-close dampening, and eventually causes the drawer to bind or refuse to close properly.
A single oversized pull, centered on the drawer front, eliminates racking entirely. Regardless of pull length — 6 inches or 15 inches — central placement distributes human pulling force equally to both slides. This is the mechanically superior solution for heavy drawers.
If a client’s design vision demands dual pulls, place them using the rule of thirds (dividing the drawer into three equal segments, centering each pull in the outer thirds). This minimizes the torque moment arm. But it still relies on the user consciously pulling with both hands — which they often won’t.
Mistake #7: Finish Mismatches and the Temperature Rule
Hardware finish is high-contrast jewelry on Shaker’s flat planes. A poorly coordinated finish doesn’t just look wrong — it actively undermines the design intent of the entire kitchen.
The foundational coordination principle is undertone temperature. Cool-undertone cabinets (crisp white, gray, navy blue) pair with cool-toned hardware: chrome, stainless steel, satin nickel, gunmetal, pewter. Warm-undertone cabinets (cream, off-white, natural wood tones, warm greens) pair with warm-toned hardware: brass, bronze, copper, champagne bronze.
Specific pairings that work in 2026:
White Shaker — Matte black for high contrast. Brushed brass or satin gold for warmth. Satin nickel for subtle coordination. White is the most versatile canvas — it pairs with almost any finish.
Navy or dark blue Shaker — Satin brass or brushed gold. This is the signature “designer-approved” combination. Avoid matte black, which disappears against dark cabinets.
Gray Shaker — Matte black, polished nickel, or gunmetal. Avoid antique brass, which creates an undertone clash with cool gray tones.
Natural wood Shaker — Follow the wood’s undertones. Oak (warm/golden) pairs with champagne bronze. Walnut (rich brown) with oil-rubbed bronze or antique brass. Maple (neutral) with satin nickel.
On mixed metals: Coordination, not matching, is the current standard. The 70/30 rule works: 70% dominant finish across primary hardware, 30% accent finish on selected knobs or specialty pulls. Hardware does not need to match the faucet — that outdated rule narrows options without improving design cohesion. But any accent finish must appear at least twice in the space to read as intentional rather than accidental.
One finish caution gaining traction among designers: all-black hardware is becoming overused as a singular approach. It can read as flat and one-dimensional when applied uniformly across every cabinet. Matte black works best as part of a layered finish strategy — paired with warm metals for depth and visual tension.
Mistake #8: Skipping the Jig (and Why Hand-Measuring Compounds Errors)
A single misdrilled hole on a Shaker cabinet is permanent. Wood filler and touch-up paint cannot replicate the texture of a catalyzed finish under kitchen lighting. The only clean fix is a replacement door — typically $150–$300+ per door on premium lines.
The root cause of most drilling errors isn’t carelessness. It’s methodology. Measuring placement with a tape measure and pencil, door by door, introduces compounding error. If the first door is off by 1/16 inch, and the installer uses that door’s visual position as a reference for the next, the deviation grows down the entire cabinet run. Standard tape measures are also prone to parallax — the perceived position of a pencil mark shifts based on viewing angle.
A calibrated hardware jig eliminates all of this. Professional jigs (Kreg KHI-PULL, True Position Tools Pro) use hardened-steel drill guides and adjustable sliding stops that lock against the door edges. Set the precise offset on the first door, then replicate it identically across every cabinet in the kitchen. No measuring. No parallax. No compounding drift.
For oversized pulls (12–15 inches) that exceed standard jig capacity, the painter’s tape template method is the professional field technique. Apply low-tack painter’s tape to the backside of the hardware itself. Mark the exact mounting hole positions with an awl or sharp pencil through the tape. Peel the tape off and apply it directly to the drawer face — it’s a 1:1 scale drilling template with mathematically exact hole spacing. Level it with a bubble level before drilling.
Before drilling anything, tape hardware in position on one upper and one lower cabinet. Step back. Evaluate from across the room. Confirm alignment, proportion, and visual weight. This five-minute test prevents permanent mistakes.
Mistake #9: Wrong Screws, Missing Pilot Holes, and Fastener Failures
Most decorative cabinet hardware ships with standard 1-inch, 8-32 machine screws. Those screws assume a standard 3/4-inch door thickness. They don’t account for the realities of varied Shaker construction.
Screw length problems: On drawer fronts — where screws must pass through the drawer face and engage the drawer box behind it — 1-inch screws are almost always too short. Measure the combined thickness (typically 1.25–1.5 inches) and source the correct length. Screws that are too short strip out within weeks of daily use. Screws that are too long poke through the back of the door or puncture the drawer box interior.
On slim Shaker doors where the panel is recessed approximately 1/8 inch below the face frame, screw length may also need adjustment to account for the thinner panel depth if mounting hardware on the recessed section of a drawer front.
Pilot holes are non-negotiable on hardwood. Premium Shaker frames use hard maple (Janka hardness: 1,450 lbf) or dense birch. Forcing a threaded screw into this material without a pilot hole generates massive outward radial pressure against the surrounding wood fibers. The stile splits along the grain line. Once a stile splits, the mortise-and-tenon joint is compromised, the crack telegraphs through the finish, and the entire door requires replacement.
The professional standard: drill a pilot hole exactly 1/64 inch larger than the screw’s non-threaded shank diameter. This allows the threads to bite securely while the core passes through without generating splitting pressure. Test on scrap material first. Apply masking tape over the drill point on painted or finished surfaces to prevent splintering at the entry hole.
Mistake #10: Skipping Post-Installation Hinge Recalibration
This mistake happens at the very end of the job — when the installer assumes factory hinge settings are final and walks away.
Adding solid brass or steel hardware physically changes the mass distribution and swing behavior of the cabinet door. Even small decorative knobs add enough weight to cause imperceptible sagging over time. On Shaker cabinets, where the geometric grid makes 1/8-inch reveal margins visible across an entire wall of cabinetry, that sag is devastating.
Modern European concealed hinges — such as the Blum CLIP top BLUMOTION standard across IST Cabinets’ Fabuwood Shaker lines — offer six-way post-installation adjustment specifically for this purpose. Whether the project uses full overlay doors (where the door face covers nearly the entire cabinet frame) or inset doors (where the door sits flush within the frame), these adjustments are critical:
Vertical adjustment corrects for hardware-induced sag, ensuring the top and bottom edges of adjacent doors form unbroken horizontal lines.
Lateral (side-to-side) adjustment maintains consistent reveals — the gaps between adjacent doors. On Shaker cabinets, uneven reveals instantly telegraph poor craftsmanship.
Depth (in-and-out) adjustment ensures the door face sits flush against the cabinet frame, allowing soft-close dampening to actuate smoothly without binding.
These Blum hinges are rated for 200,000+ cycles — eight times the KCMA minimum of 25,000 cycles. But they only perform at that level when properly adjusted after hardware is installed. Skipping this final calibration is the difference between a kitchen that looks perfect on day one and one that still looks perfect two years later.
Mistake #11: Ignoring Clearances and Ergonomics
A hardware position that looks correct on a closed cabinet may fail completely in use. Common clearance problems that don’t surface until installation is complete: a knob that collides with the countertop backsplash when the base cabinet door swings open, a pull that clips an adjacent drawer front during simultaneous operation, or hardware that interferes with an appliance handle.
Before committing to any position, physically test it. Open the door fully with hardware held in place. Check contact with countertops, backsplashes, adjacent doors, neighboring drawers, and appliance handles. Pay specific attention to corner cabinets where door swings overlap.
For base cabinets, placing hardware 2–3 inches from the top edge provides both ergonomic comfort and countertop collision clearance. For upper cabinets, 2–3 inches from the bottom edge minimizes shoulder reach strain — placing hardware higher forces users to extend their rotator cuff unnaturally over years of repeated use.
On accessibility: round knobs require a pinch-and-twist grip that creates difficulty for users with arthritis, limited hand strength, or reduced dexterity. D-shaped pulls and lever-style handles can be operated with a closed fist, a single finger, or an elbow when hands are wet or full. For ADA-compliant kitchens, hardware should be operable between 15 and 48 inches from the floor with no sharp corners or pinch points.
Mistake #12: Chasing Trends That Fight Shaker’s Timelessness
Hardware is the easiest and cheapest kitchen element to swap — it’s the right place to be slightly trend-forward since it can be changed in an afternoon. But certain trends contradict Shaker’s core principle of simplicity, and they date a kitchen faster than they elevate it.
Trends to approach with caution in 2026: ultra-polished high-sheen finishes (read as flashy rather than refined against Shaker’s matte planes), industrial-style hardware (pipe fittings and raw metal conflict with Shaker’s craft tradition), and overly ornate cup handles on every surface (the trend has peaked and now reads as dated on modern Shaker kitchens).
What’s working now: Brushed and satin finishes dominate — matte textures over polished shine. Unlacquered brass is the prestige choice, developing a living patina over time. Textured hardware — hammered, ribbed, knurled surfaces — adds tactile dimension without visual clutter. Mixed-material pulls (wood caps on metal bodies, leather-wrapped handles) emerged strongly from KBIS 2025 and align naturally with Shaker’s craft-forward heritage. Wooden knobs are a notable 2026 trend, adding warmth and authenticity that resonates with Shaker’s original material philosophy.
The guiding principle: choose materials and finishes that age gracefully rather than degrade. Hardware that develops character over time — rather than chipping, peeling, or looking tired — matches Shaker’s built-to-last ethos.
Quick Reference: Shaker Hardware Placement Guide
| Cabinet Type | Hardware Position | Standard Measurement |
|---|---|---|
| Upper doors | Lower corner, stile opposite hinges | 2.5–3 inches from bottom edge, centered on stile |
| Base doors | Upper corner, stile opposite hinges | 2.5–3 inches from top edge, centered on stile |
| Standard drawers | Centered on drawer front | Horizontally and vertically centered on recessed panel |
| Heavy pull-out drawers | Top rail | Centered horizontally on the solid rail |
| Wide drawers (30″+) | Single oversized pull, centered | Or dual pulls placed at the rule-of-thirds positions |
| Tall pantry doors | Center of stile, vertical orientation | Centered vertically or slightly above center for ergonomic reach |
| Slim Shaker uppers (<1″ frame) | 1 inch from inside frame edge | Use narrow-footprint hardware only |
Pull Sizing by Drawer Width
| Drawer Width | Recommended Pull Length (CTC) |
|---|---|
| Under 12″ | 3″ center-to-center |
| 12″–18″ | 3″–5″ center-to-center |
| 18″–24″ | 5″–6″ |
| 24″–30″ | 6″–8″ |
| 30″–36″ | 8″–12″ |
| Over 36″ | 12″–15″ (single pull) or two 5″–6″ pulls at thirds |
2026 Hardware Trends for Shaker Cabinets
| Trend | Details |
|---|---|
| Leading finishes | Brushed brass, satin brass, champagne bronze, matte black (as accent, not sole finish) |
| Prestige finish | Unlacquered brass (develops living patina over time) |
| Declining finishes | Polished chrome, high-gloss metals, uniform matte black |
| Emerging styles | Knurled/textured pulls, wooden knobs, mixed-material hardware, oversized statement pulls |
| Mixed metals | 70/30 dominant-to-accent ratio; warm + cool pairing for visual tension |
| Surface direction | Matte, brushed, and satin finishes over polished and high-sheen |
The 12 Rules, Condensed
- Never drill into the floating center panel on cabinet doors. Hardware mounts on solid stiles and rails only — the recessed panel must stay free to expand and contract with humidity changes.
- Treat drawer fronts differently than doors. The dual-substrate construction (thin panel + drawer box wall) creates flex and cracking risks. Mount heavy pull-out hardware on the solid top rail, not the center panel.
- Scale hardware to each cabinet size. Follow the rule of thirds — pull length equals roughly one-third of the drawer width. One pull size across an entire kitchen creates visual imbalance.
- Match hardware personality to Shaker’s simplicity. Ornate scrollwork and ultra-modern slab pulls both clash with five-piece door geometry. Choose hardware that respects the stile-and-rail frame without competing with it.
- Measure slim Shaker stiles before ordering hardware. If the flat face of the stile is narrower than the hardware base, you’ll get bevel overhang, wobble, and finish damage. Use edge pulls, finger pulls, or micro-knobs on narrow profiles.
- Use a single centered pull on heavy wide drawers. Central placement eliminates drawer racking — the asymmetric torque that destroys undermount slides when users pull from one side. Dual pulls are aesthetically valid but structurally riskier.
- Coordinate finish temperature to cabinet undertone. Cool cabinets (white, gray, navy) pair with cool metals. Warm cabinets (cream, wood, green) pair with warm metals. Mix metals intentionally with a 70/30 dominant-to-accent ratio.
- Use a calibrated jig for every hole. Hand-measuring compounds errors door to door. A hardware jig guarantees millimeter-perfect repeatability across the entire kitchen. For oversized pulls that exceed jig capacity, use the painter’s tape template method.
- Drill pilot holes and verify screw length. Dense hardwood frames (hard maple at 1,450 Janka) split without pilot holes. Standard 1-inch hardware screws are too short for most drawer fronts. Measure, test on scrap, then drill.
- Recalibrate hinges after installing hardware. Added hardware weight shifts door mass and can cause sag. Use the six-way adjustment on European concealed hinges (vertical, lateral, depth) to restore reveal consistency.
- Test clearances before committing. Open every door and drawer fully with hardware held in position. Check for collisions with countertops, backsplashes, adjacent doors, and appliance handles — especially at corner cabinets.
- Choose finishes that age well, not just trend well. Hardware is the cheapest element to swap. Use it to stay current — but pick materials that develop character (patina, warmth) rather than degrade (peeling, chipping).
Frequently Asked Questions about Mistakes When Integrating Hardware with Shaker Cabinets
What style hardware goes with Shaker cabinets?
Shaker cabinets pair with hardware that respects their five-piece door geometry — clean lines, minimal ornamentation, and functional forms. The strongest matches by style direction: Traditional Shaker works with cup pulls (bin pulls) on drawers, simple round knobs on doors, and finishes like oil-rubbed bronze or antique brass. Transitional Shaker — the largest market segment — pairs with arced bar pulls, tubular barrel pulls, and mixed knob-and-pull combinations in champagne bronze, satin brass, or satin nickel. Modern Shaker calls for flat bar pulls, edge pulls, or integrated finger pulls in matte black, brushed nickel, or stainless steel. The common thread across all three: hardware should complement the stile-and-rail frame without competing with it. Ornate scrollwork, heavy filigree, and ultra-modern slab-style pulls (designed for frameless European cabinets) all clash with Shaker’s foundational simplicity.
What is the 1/3 rule for cabinet hardware?
The rule of thirds is the proportional sizing guideline professionals use for cabinet pulls. The pull length should equal approximately one-third of the drawer width. A standard 18-inch drawer gets a 6-inch pull. A 30-inch pot drawer calls for a 10-inch pull. A wide 36-inch drawer warrants a 12-inch pull — or even a 15-inch oversized statement pull, which is trending strongly in 2026. For very wide drawers where a single pull would exceed visual comfort, the rule of thirds also governs dual-pull placement: divide the drawer face into three equal horizontal segments and center each pull within the left and right outer thirds. This proportional logic prevents the two most common scale mistakes — pulls that look stunted on large drawers, and oversized hardware that overwhelms small cabinet faces.
What is the trend in cabinet hardware in 2026?
The defining shift in 2026 is texture and warmth replacing polish and uniformity. Brushed brass, satin brass, and champagne bronze are the leading warm finishes. Unlacquered brass — which develops a living patina over time — is the prestige choice for high-end Shaker kitchens. Matte black remains popular but is evolving from a standalone finish to an accent role, paired with warm metals for layered depth rather than applied uniformly across every cabinet. Polished chrome and high-gloss metals are declining.
On the shape and material side: knurled and textured pulls (hammered, ribbed surfaces) add tactile interest without visual clutter. Wooden knobs are a notable emerging trend that pairs naturally with Shaker’s craft heritage. Mixed-material hardware — wood caps on metal pulls, leather-wrapped handles, marble knobs with brass bases — gained strong momentum at KBIS 2025. Oversized pulls (12–18 inches) on wide drawers serve both aesthetic and aging-in-place accessibility purposes. The guiding philosophy: choose finishes and materials that age gracefully rather than degrade.
How do you avoid the 5 worst kitchen design mistakes?
The five hardware-related design mistakes that cost contractors and designers the most in callbacks and client dissatisfaction:
1. Wrong proportion. A single pull size across an entire kitchen creates visual chaos — 5-inch pulls look adequate on an 18-inch drawer but stunted on a 36-inch pot drawer. Follow the rule of thirds and spec different pull lengths by cabinet size.
2. Drilling without a jig. Hand-measuring compounds error door-to-door. A single misdrilled hole on a premium Shaker door means a $150–$300+ replacement. A calibrated hardware jig (Kreg KHI-PULL or True Position Tools Pro) eliminates this entirely.
3. Finish mismatch. Selecting hardware in isolation — without testing against the actual cabinet color, countertop, and faucet — creates jarring disconnects. Match finish “temperature” to cabinet undertone: cool metals for cool-toned cabinets, warm metals for warm-toned cabinets.
4. Skipping clearance testing. A pull that hits the backsplash, clips an adjacent drawer, or collides with an appliance handle doesn’t reveal itself until installation is complete. Physically test every hardware position with the door fully open before drilling.
5. Ignoring ergonomics. Round knobs require a pinch-and-twist grip that creates difficulty for users with arthritis or limited dexterity. D-shaped pulls and lever handles operate with a closed fist or single finger. Hardware positioned outside the 15- to 48-inch ADA reach zone forces unnatural body mechanics over years of daily use.
What’s outdated in the kitchen?
Several hardware and cabinet choices that were popular as recently as 2023–2024 are now reading as dated in 2026 kitchen design:
All-polished-chrome hardware has lost ground to brushed, satin, and matte finishes. Chrome reads cold and sterile against the warm, natural materials dominating current kitchen trends. Uniform matte black on every surface — once the go-to modern choice — now looks flat and one-dimensional when applied without contrast. Matte black works best as part of a mixed-finish strategy, not a monolithic one.
Industrial-style hardware (pipe fittings, raw metal, exposed fasteners) conflicts with the craft-forward warmth that defines 2026 kitchens. Ultra-polished high-sheen finishes in general are giving way to textured, lived-in surfaces. Cup pulls on every drawer — a farmhouse staple from the 2018–2022 wave — has peaked and now reads as formulaic rather than intentional on modern Shaker cabinets.
On the cabinet side: all-white kitchens with matching white hardware are fading. The movement is toward warm neutrals, nature-inspired tones, two-tone color combinations, and natural wood finishes that bring depth and personality. Fabuwood’s 2025 Designer Collection — including finishes like Forest Green and Cabernet Red — reflects this shift.
What is the 3 kitchen rule?
The kitchen work triangle — the “three kitchen rule” — is a spatial planning principle that connects the three primary work stations in a kitchen: the sink, the refrigerator, and the cooking surface (stove/range). The concept dates to 1940s efficiency research and dictates that the three stations should form a rough triangle, with each leg measuring between 4 and 9 feet, and the total perimeter staying under 26 feet. No major obstacle (island, table, peninsula) should cross any leg of the triangle.
For hardware selection, the work triangle matters because it dictates which cabinets and drawers get the heaviest daily use. Cabinets within the triangle — especially base cabinets flanking the sink and cooktop — need hardware optimized for ergonomic grip and durability, not just aesthetics. These are the locations where D-shaped pulls outperform round knobs, where heavy-duty drawer slides justify single oversized pulls (to prevent drawer racking), and where high-cycle soft-close hinges like the Blum CLIP top BLUMOTION earn their investment over the life of the kitchen.
How to make Shaker cabinets look expensive?
Five moves that elevate Shaker cabinets from builder-grade to custom-quality appearance:
1. Upgrade the hardware finish. Brushed brass, satin brass, or unlacquered brass reads substantially more expensive than standard chrome or basic satin nickel. A $12 pull in champagne bronze transforms the same cabinet that a $4 pull in polished chrome makes look cheap.
2. Scale hardware properly. Oversized pulls (8–15 inches) on wide drawers and tall pantry doors signal intentional design. Uniform small knobs everywhere signal budget constraints.
3. Mix knobs and pulls by cabinet zone. Knobs on uppers, pulls on lowers, cup pulls on specialty drawers — this layered approach reads as curated rather than bulk-ordered.
4. Choose quality construction underneath. The hardware is the visible detail, but what sells the “expensive” impression is consistent reveals (the gaps between adjacent doors), smooth soft-close action, and full-extension drawer glides. IST Cabinets’ Fabuwood Shaker lines include Blum soft-close hinges rated for 200,000+ cycles and full-extension Tandem Plus drawer slides standard — these are the features that make a kitchen feel premium every time a door or drawer is opened.
5. Coordinate — don’t match — metals across the kitchen. Intentionally pairing two complementary finishes (70% dominant, 30% accent) using the mixed-metal approach looks more expensive than rigidly matching every fixture. It signals design confidence.
What color hardware never goes out of style?
Satin nickel is the safest long-term choice across all design styles. It’s warm enough to avoid chrome’s coldness, cool enough to avoid brass’s trendiness risk, and neutral enough to pair with virtually any cabinet color — white, gray, navy, green, or natural wood. It doesn’t show fingerprints or water spots the way polished finishes do, and its brushed surface ages gracefully without visible wear.
Oil-rubbed bronze is the other perennial. It’s been a staple of traditional and transitional kitchens for decades and shows no signs of dating. The dark, warm tone creates gentle contrast on light cabinets and quiet sophistication on darker finishes.
For designers who want something with more current energy that still won’t date quickly: champagne bronze sits at the intersection of classic and contemporary. It’s warmer than satin nickel but more restrained than polished brass — a finish that reads as timeless rather than trend-driven.
The finishes most likely to feel dated within 5 years: high-polish gold, polished chrome, and uniform matte black applied without any secondary finish for contrast.
What color cabinets are in style for 2026?
The all-white kitchen still accounts for the largest share of installations, but the trend line is clearly moving toward warmer, more expressive colors. Warm whites and creamy off-whites are overtaking blue-white and bright-white tones. Greige (gray-beige blends) and warm gray with brown undertones are the dominant neutral choices.
Nature-inspired colors are the fastest-growing segment: sage green, olive, forest green, and deep navy blue are all strong. Fabuwood’s 2025 Designer Collection added Forest Green, Cabernet Red, Mint Green, Orchid Purple, and Macadamia Beige — reflecting the industry’s movement toward bolder, more personal color choices.
Natural wood finishes — particularly white oak and walnut — are surging as the biophilic design movement gains momentum. These work beautifully with Shaker’s five-piece door construction because the visible stile-and-rail frame showcases wood grain in a structured way that slab doors can’t match.
Two-tone kitchens remain a defining 2026 trend: a light or neutral color on perimeter cabinets paired with a contrasting island (dark green, navy, or stained wood). For hardware on two-tone kitchens, choose one finish that bridges both cabinet colors — champagne bronze and satin brass are the most versatile bridge finishes — rather than introducing a different hardware finish for each color zone.
Getting Hardware Right from the Start
On Shaker cabinets, there is nowhere to hide. Every hardware decision — material, scale, placement, fastener, and finish — is amplified by the door’s clean geometry. The margin for error is effectively zero on premium cabinetry.
Every mistake in this guide is preventable with upfront planning, a calibrated jig, sample testing on real doors, and the discipline to measure once and template forever.
IST Cabinets’ design team works directly with contractors and designers to spec the right hardware for every Fabuwood Shaker collection — from the Galaxy and Nexus lines to Fusion, Luna, and the frameless Illume series. With showroom locations in Alexandria and Fairfax, Virginia; Columbia, Maryland; Bear, Delaware; and Houston, Texas, you can evaluate hardware options on actual Shaker doors before making a commitment.
Ready to get your next project’s hardware right the first time? Visit istcabinets.com or schedule a design consultation at any IST showroom.
What Actually Makes a Shaker Cabinet Quality Last?
A Trade Professional’s Field Guide to Separating Quality from Marketing
Most Shaker cabinets look the same in a showroom. The differences show up 36 months later—warped doors, drawer bottoms pulling free, finishes yellowing where the morning sun hits the uppers. By then, somebody’s reputation is on the line. Usually yours.
Whether you’re a contractor pricing a kitchen gut-reno, a designer specifying for a builder-grade project, or a dealer vetting a new product line, you need to know which details separate cabinets that hold up for 20 years from cabinets that fall apart in five. Most of those details are invisible at first glance: the thickness of a back panel, the type of joint hiding inside a drawer box, the chemistry of the finish coat.
This guide walks through twelve quality indicators that matter in the field. Where possible, we’ve tied each one to third-party standards—KCMA A161.1, AWI Premium Grade, CARB Phase 2—so you’re working from independently verified benchmarks rather than manufacturer marketing. Where a claim comes from a proprietary framework (like Fabuwood’s Q12 system), we’ve labeled it as such.
10 Things That Actually Matter for Shaker Cabinet Quality
- All-plywood boxes outlast particleboard by 2–3×. Plywood cabinets deliver 25–30 years of service versus 5–15 for particleboard, with far superior moisture resistance and screw-holding power. (Sources: Nelson Cabinetry, Blue Ridge Cabinet Connection)
- Dovetail drawer joints are the professional standard. 5/8-inch solid hardwood dovetail drawers with plywood bottoms captured in dado grooves significantly outlast stapled or doweled alternatives. All three Fabuwood tiers (Allure, Quest, Hallmark) include them standard.
- Avoid mitered corners on painted Shaker doors. Mitered joints expand at 45° to the grain line, causing hairline paint cracks (“witness lines”) that are well-documented across the industry. Specify mortise-and-tenon or cope-and-stick joinery instead.
- Conversion varnish beats lacquer on every KCMA test. Catalyzed CV (30–60% solids) resists alcohol, heat, acids, and yellowing. Standard lacquer (15–25% solids) dissolves under 100-proof alcohol in 24 hours.
- Blum hinges last 8× the KCMA minimum. Blum’s CLIP top BLUMOTION carries a verified 200,000+ cycle rating versus the 25,000-cycle KCMA A161.1 minimum. Mid-tier options from Hettich, Grass, and Salice run 80,000–150,000 cycles at lower cost.
- Specify 100-lb minimum drawer slides for kitchens. Standard 75-lb side-mount slides can fail under loaded pots-and-pans drawers. Undermount options from Blum (Tandem Plus, 90–100 lbs) and Salice (Progressa, 120 lbs) offer full extension with integrated soft-close.
- KCMA and AWI certifications are independently verified; Q12 is not. ANSI/KCMA A161.1 and AWI Premium Grade are third-party standards. Fabuwood’s Q12™ is proprietary branding—useful as a checklist, but not a substitute for independent testing.
- CARB Phase 2 / TSCA Title VI compliance is non-negotiable. These federal and state standards limit formaldehyde in hardwood plywood to < 0.05 ppm—the toughest globally. Critical for LEED projects and health-sensitive clients.
- Hard Maple (1,450 lbf Janka) is the top pick for painted cabinets. White Oak (1,360 lbf) leads for stained work near water. Birch species vary hugely—Paper Birch rates 910 lbf, but cabinet-grade Yellow Birch hits 1,260 lbf. Always confirm which species you’re getting.
- Premium cabinets cost just 14% more over 30 years. A $22,000 all-plywood kitchen with a $3,000 refinish at year 20 totals $25,000 over three decades. Budget particleboard requiring two full replacements exceeds $13,500+. The premium option delivers 2–3× the service life.
Box Construction: What’s Holding Everything Together
The cabinet box—the carcass—is the foundation. It’s also the component manufacturers cut corners on first, because buyers rarely look inside.
Substrate Material
All-plywood construction is the professional standard for structural longevity. Plywood’s cross-grain lamination—each veneer layer alternating grain direction—creates superior dimensional stability, moisture resistance, and screw-holding power compared to particleboard or MDF. That matters most in kitchens and bathrooms, where particleboard swells irreversibly once water finds an edge.
Industry sources consistently place plywood cabinet lifespans in the 25–30 year range, versus roughly 5–15 years for particleboard depending on the environment and build quality. In flood-prone or high-humidity climates, that gap widens fast.
Substrate Performance Comparison for Kitchen Environments
| Metric | Solid Hardwood | Plywood | MDF / HDF | Particleboard |
|---|---|---|---|---|
| Durability Rating | Highest (50+ yrs) | Very High (25–30 yrs) | Moderate (10–15 yrs) | Low (5–15 yrs) |
| Moisture Resistance | Moderate | High | Poor | Very Poor |
| Screw Holding | Excellent | Very Good | Moderate | Poor |
| Load Capacity | 150+ lbs | 100–150 lbs | 75–100 lbs | 35–50 lbs |
| Paint Surface Quality | Moderate (grain shows) | Good (veneered) | Excellent (smooth) | Poor |
| Material Comparison – IST Cabinets | ||||
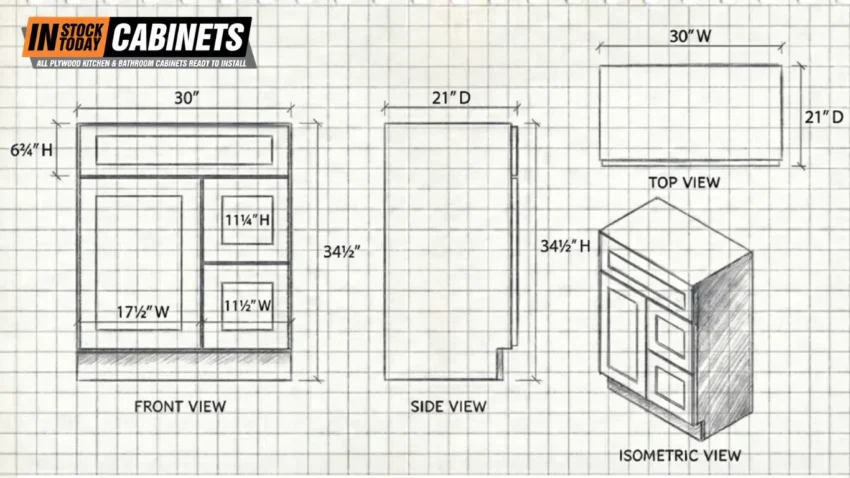
Panel Thickness
High-end Shaker lines use a minimum of 1/2-inch thick select veneered plywood for sides, tops, and bottoms. Frameless (European-style) cabinets—where there’s no face frame to add rigidity—need 3/4-inch sides as the minimum acceptable spec. Face-frame cabinets can get away with 1/2-inch sides, but premium builds run 3/4-inch throughout for better fastener retention and rigidity.
Back Panel: Where Corners Get Cut
The back panel is the single biggest tell. Premium construction uses a full, single-piece 1/2-inch veneered plywood back that acts as a structural diaphragm—it prevents the cabinet from racking (twisting during installation) and gives you a solid mounting surface for heavy wall-mounted units.
Budget cabinets substitute a thin 1/4-inch hardboard panel stapled to the rear edges, or a hanging rail system. Both compromise structural stability and load-bearing capacity. When sourcing, confirm that back panels sit in dado grooves on all four sides of the box. That dadoed-and-captured method creates inherent squareness during assembly and stiffens the cabinet far more than stapled alternatives.
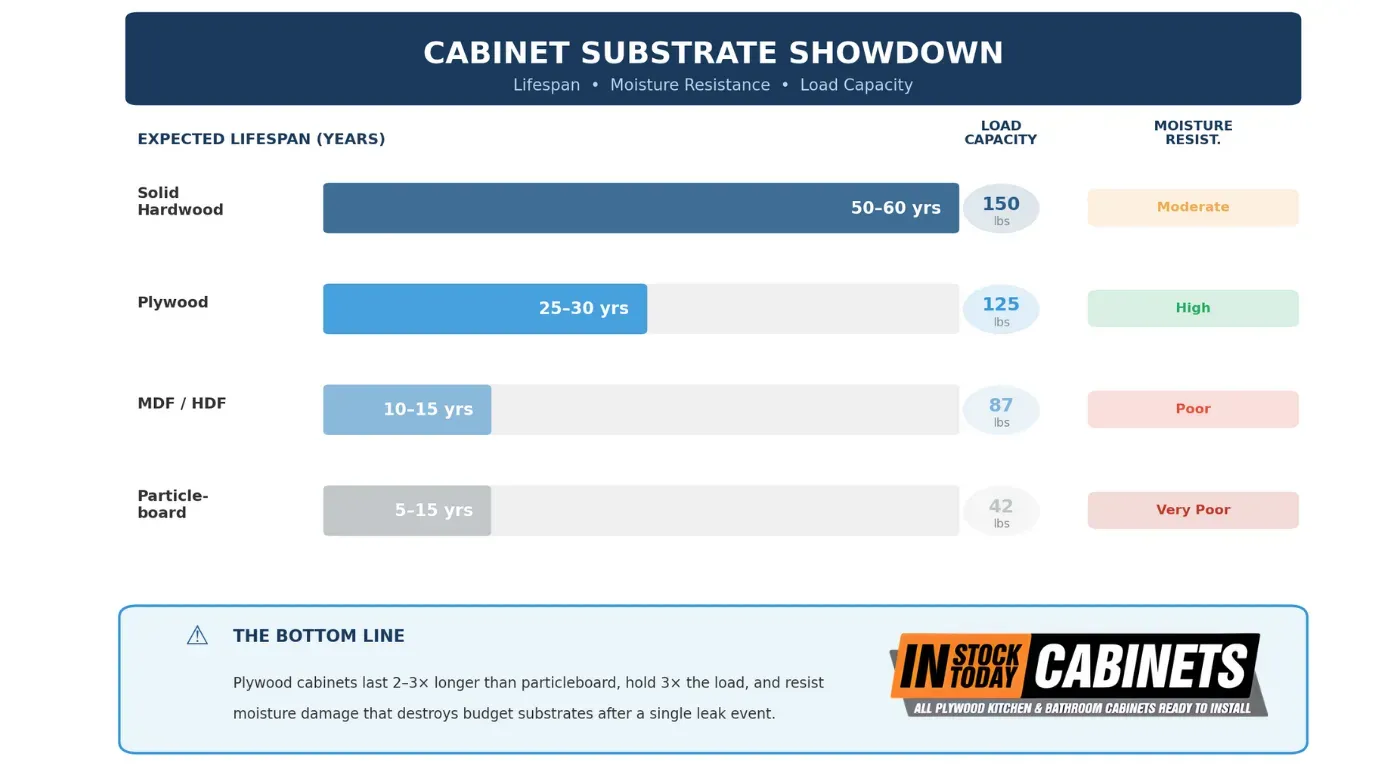
Drawer Box Construction
Drawers take the most mechanical abuse in daily use. Open, close, slam, overload—every day, for decades. The drawer box is where quality differences become obvious the fastest.
Dovetail Joinery
Dovetail construction in 5/8-inch solid hardwood (typically birch or maple) is the professional benchmark. Those interlocking wedge-shaped pins and tails distribute tensile loads across multiple contact points, creating a mechanical bond that actually gets tighter under pulling force.
Dovetail drawers significantly outlast doweled or stapled alternatives—the durability advantage is well-documented across the trade, though the exact multiplier depends on usage patterns and the quality of the competing joint. Look for half-blind dovetails at the front (hidden when viewing the drawer face) with through-dovetails at the rear.
Mid-grade construction substitutes doweled joints with plywood sides—serviceable, but less resilient under heavy loads. Stapled butt joints with melamine or particleboard sides are the first components to fail in high-use kitchens.
Drawer Bottom Integrity
Premium construction captures a 3/8-inch plywood bottom in a dado groove on all four sides, then pins and glues it for permanence. This distributes weight across the entire perimeter. Budget construction glues or staples a 1/4-inch panel to the bottom edges—a weak point that separates under heavy cookware.
Five-Piece Shaker Door Engineering
Two stiles. Two rails. One center panel. The Shaker door is deceptively simple—and the quality of the joinery connecting those five pieces determines how well the door handles “breathing” (the expansion and contraction caused by seasonal humidity changes).
Rail-and-Stile Joinery
Mortise-and-tenon joinery remains the gold standard. A rectangular tenon projecting from the rail fits into a corresponding mortise cavity in the stile, providing massive glue surface and mechanical interlock. The joint turns two separate pieces of wood into a unified structural component.
Cope-and-stick joinery is the modern production standard. Rail ends are machined with a cope (negative profile) that interlocks with the stick (positive profile) along the stile. When precisely machined, this method provides very good performance with more glue surface area than simple butt joints.
Mitered corners are the weakest option and should be avoided for painted Shaker doors. Both pieces expand perpendicular to the grain at 45 degrees to the joint line, which causes hairline cracks in the paint—sometimes called “witness lines.” Industry professionals and woodworking forums report this happening frequently, often within the first few years. It’s a well-documented issue across all painted mitered doors.
Joinery Strength Ratings and Professional Requirements
| Joint Type | Strength | Primary Application | Professional Requirement |
|---|---|---|---|
| Dovetail | Highest | Drawer boxes, side-to-frame | Solid hardwood pins & tails |
| Mortise & Tenon | Excellent | Door frames, face frames | Deep glue penetration, mechanical interlock |
| Cope & Stick | Very Good | Standard door assembly | Precise mirror-image profile machining |
| Dowel Joint | Very Good | Face frame stiles / rails | 3/8″ spiral dowels with glue |
| Pocket Screw | Good (Fast) | Hidden frame assembly | Must be combined with glue |
| Cabinet Joinery Comparison – IST Cabinets | |||
Center Panel: The Floating Panel Principle
The center panel should never be glued into the frame. It sits in a channel with intentional gaps that let the wood swell or shrink without cracking the frame or warping the door. For painted Shaker cabinets, MDF or HDF center panels are the engineering-preferred choice—their uniform density eliminates grain telegraphing and provides isotropic (equal in all directions) dimensional stability. This is precision engineering, not cost-cutting.
Standard stile and rail widths run 2-1/4 to 3 inches. Premium Shaker doors use 2-1/2 to 3-inch widths for better proportions and structural integrity on larger door sizes. The “slim shaker” trend (3/4 to 1-1/2-inch rails) offers a modern look but trades some durability.
Finish Chemistry and Durability
The finish protects everything underneath, and finish chemistry varies wildly between quality tiers. Understanding it helps you predict long-term performance and set accurate expectations for clients.
Conversion Varnish: The Industry Standard
Catalyzed conversion varnish (CV) is the professional benchmark for factory-finished cabinetry. This post-catalyzed, chemically cured system typically contains 30–60% solids (depending on the formulation) and undergoes a cross-linking process that creates hard, dense molecular bonds resistant to heat, solvents, acids, and alkalis. CV builds a substantially thicker dry film than standard lacquer, offering better scratch and wear resistance.
Despite its hardness, CV retains enough elasticity to move with natural wood expansion, preventing the “checking” or cracking that plagues brittle coatings. It must be applied in a factory with a precise catalyst ratio and cured in a controlled booth—impractical for field application, ideal for production cabinetry.
Finish System Performance Comparison
| Test / Property | Conversion Varnish | Lacquer | Polyurethane |
|---|---|---|---|
| Alcohol (100-proof, 24h) | No effect | Softens / dissolves | No effect |
| Mustard / Vinegar | No staining | Possible staining | Minimal staining |
| Heat (120°F) | No blistering | May soften | Resistant |
| Yellowing Resistance | Excellent | Poor (yellows) | Moderate (may amber) |
| Solids Content | 30–60% | 15–25% | 45–60% |
| Cure Time (85%) | 48 hours | 24 hours | 3–4 weeks |
| Cabinet Finish Performance Comparison – IST Cabinets | |||
For painted Shaker cabinets, ask whether the manufacturer applies an oven-cured topcoat—it provides better chip resistance than air-dried alternatives. Multi-coat systems (one or two primer coats followed by two topcoats, sanded between applications) deliver optimal protection at 3–4 mils dry film thickness. White and light-colored finishes should specify “water white” formulations to prevent yellowing.
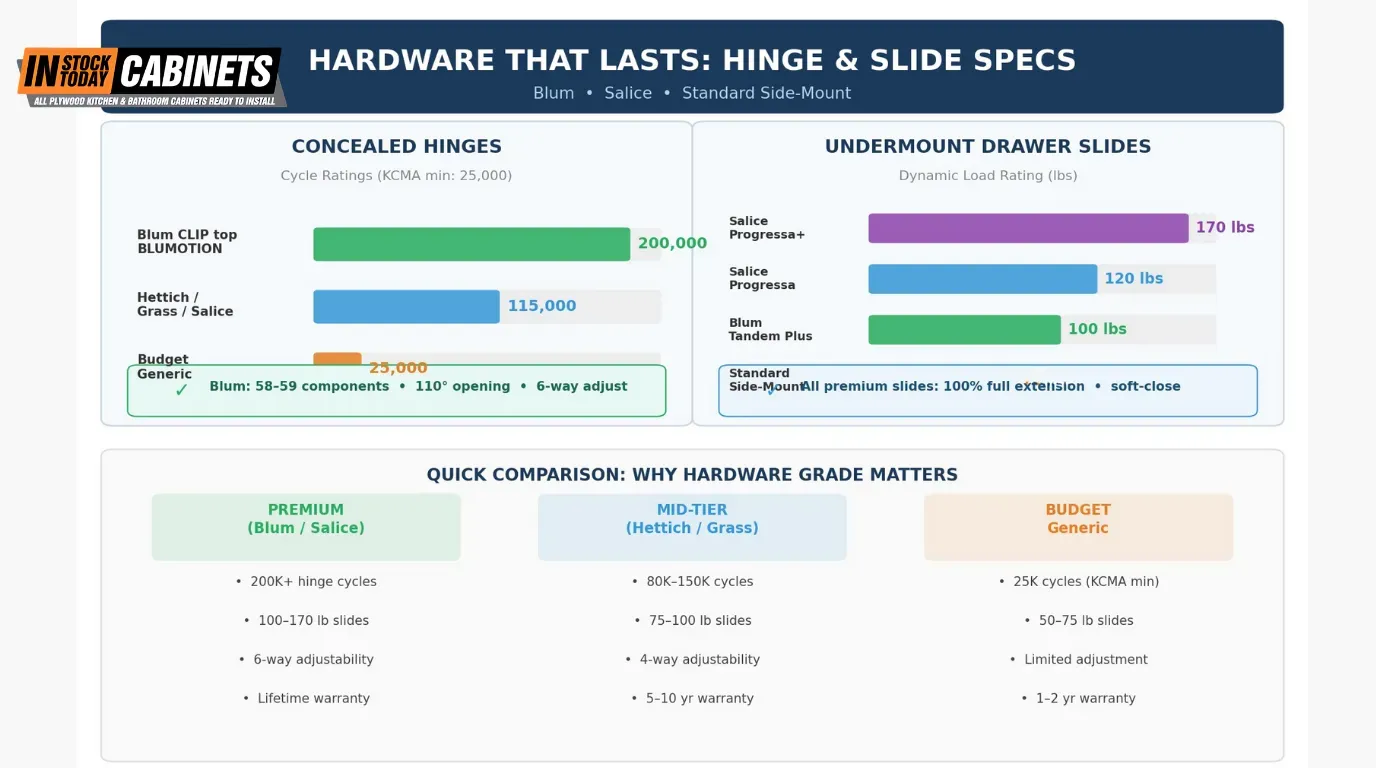
Hardware Performance Specifications
Hardware governs the daily user experience. It also governs your callback rate. Premium brands like Blum, Salice, and Grass have established benchmarks that far exceed industry minimums, and specifying them upfront saves you warranty headaches later.
Hinges: Cycle Ratings and Adjustability
Blum’s concealed hinges carry 200,000+ cycle ratings—verified on blum.com—which is eight times the KCMA A161.1 minimum of 25,000 cycles. That translates to 25+ years of heavy daily use. The CLIP top BLUMOTION hinge, Blum’s flagship, contains roughly 58–59 precision components (their smaller COMPACT BLUMOTION runs about 32). Mid-tier alternatives from Hettich, Grass, and Salice provide 80,000–150,000 cycle ratings at 20–40% lower cost, adequate for most residential applications.
Six-way adjustability is non-negotiable for professional installations: side-to-side, up-and-down, and in-and-out. It lets you achieve perfect door alignment even when boxes aren’t perfectly square or walls aren’t plumb. Also specify a minimum 110-degree opening angle and clip-on design for tool-free door removal.
Drawer Slides: Load Capacity and Extension
Modern high-end Shaker cabinetry has moved toward undermount concealed slides over side-mount ball-bearing slides. Undermounts provide a cleaner look, maximize interior drawer width, and integrate soft-close dampening. For kitchen applications, specify a minimum 100-pound dynamic load rating—standard 75-pound slides can fail under loaded pots-and-pans drawers.
Drawer Slide Specification Comparison
| Specification | Blum Tandem Plus | Salice Progressa | Standard Side-Mount |
|---|---|---|---|
| Mounting | Concealed undermount | Concealed undermount | Side-mount (visible) |
| Dynamic Load | 90–100 lbs | 120 lbs | 75 lbs |
| Adjustment | 4-way / 6-way | 6-way (tilt / height / side) | Limited |
| Soft-Close | Adaptive Blumotion | Smove integrated | Optional add-on |
| Extension | 100% full extension | 100% full extension | 75–80% typical |
| Drawer Slide System Comparison – IST Cabinets | |||
Calculate required slide capacity by adding the weight of stored items plus the drawer box itself, then add a 25% safety margin. A drawer holding 40 lbs of dishes in a 15 lb box has a static load of 55 lbs; with the margin, you need at least a 69 lb rating. Round up to 75 lb or 100 lb slides.
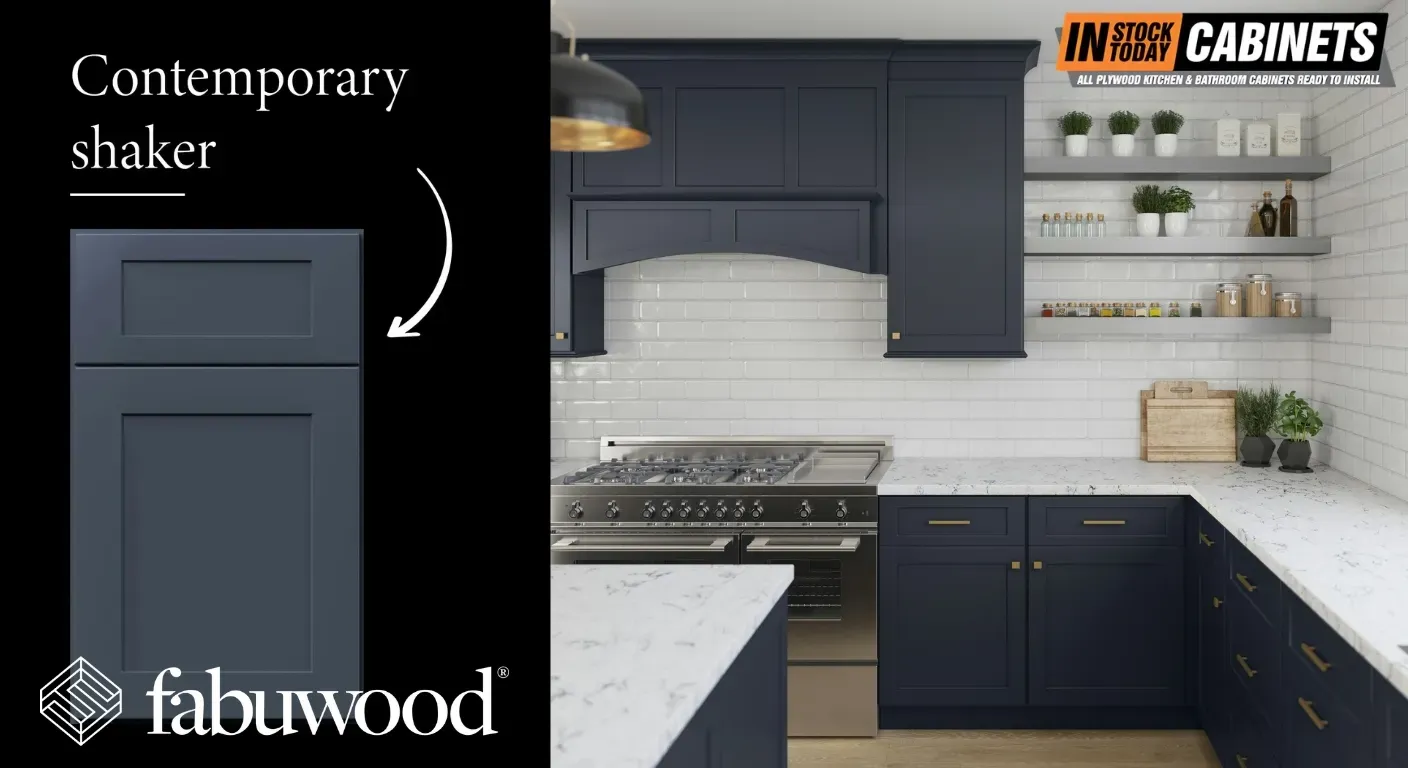
Fabuwood’s Q12 Quality Framework
Important context: The Q12 system is Fabuwood’s proprietary quality branding—not an independent industry standard. However, the individual criteria it covers are sound construction practices, and Fabuwood also holds genuinely independent certifications (KCMA A161.1 and AWI Premium Grade). We include Q12 here because it provides a useful checklist structure, but readers should understand it’s a manufacturer’s self-assessment framework, not third-party validation.
Pillars 1–4: Material Integrity and Joinery
- Q1 — Quality Sourced Lumber: Top-grade hardwoods free of irregularities, knots, or mineral streaks that compromise structural integrity or finish quality.
- Q2 — Pro Touch Finish: Factory-applied, multi-coat finishing with oven-cured topcoats for superior chip resistance and long-term durability.
- Q3 — Dovetail Construction: Plywood side panels interlock with solid wood face frames through corresponding dovetail grooves, creating mechanical bonds superior to stapled butt joints.
- Q4 — Anti-Warp Structures: Plywood reinforcement beams (21″ x 1/2″) fastened into grooves at the top of the cabinet via dovetail technique, keeping sides straight under heavy countertop loads.
Pillars 5–8: Structural Cohesion and Interior Finishing
- Q5 — Wooden Corner Blocks: Wood-to-wood corner blocks (not plastic gussets) maintain a unified build that resists cracking from dissimilar material expansion.
- Q6 — Solid Back Build: Full 1/2″ veneered plywood backs, both stapled and screwed, preventing racking and providing superior wall-mounting support.
- Q7 — Flush Fit Frames: Inner frames designed with flat-surface interior planes, creating a flush interior without protruding lips for practical use and ease of cleaning.
- Q8 — Finished Interior: UV-cured natural wood veneers on interior surfaces—resistant to peeling, bubbling, and chipping—rather than applied linings or adhesive-backed paper.
Pillars 9–12: Mechanical Precision and Quality Control
- Q9 — Soft-Closing Action: Blum Compact Clip Hinges with integrated Blumotion dampening for whisper-quiet door operation.
- Q10 — Fluid Full-Extension: Blum Tandem Plus runners with soft-close mechanisms providing 100% drawer extension for complete content access.
- Q11 — EZ Level Drawer Fronts: Circular disc adjustment system allowing 3/8″ movement in any direction, enabling perfectly consistent reveals between drawer faces.
- Q12 — Sealed Signature: Final quality assurance stamp issued after review at every manufacturing stage, backed by Limited Lifetime Warranty coverage.
Industry Certifications: Objective Verification
Third-party certifications move quality assessment from manufacturer claims to independently verified data. These are the certifications that carry real weight for trade professionals.
KCMA A161.1 Certification
The ANSI/KCMA A161.1 standard is the only nationally recognized performance standard for kitchen and bath cabinets. Certification requires passing rigorous third-party testing:
- Shelf load: must support 15 lbs per square foot for seven consecutive days without excessive deflection.
- Wall cabinet load: must withstand 600 lbs of gradually applied load without failure.
- Base cabinet front joint: 200–250 lbs applied against inside stiles (the specific figure depends on whether the cabinet has drawer rails).
- Door and drawer cycling: 25,000 open/close cycles under load plus impact testing.
- Finish durability: 24-hour exposure to vinegar, citrus, ketchup, coffee, olive oil, and 100-proof alcohol, plus heat resistance at 120°F and 70% humidity for 24 hours.
AWI Premium Grade Certification
The Architectural Woodwork Institute’s Premium Grade is the highest of three aesthetic and structural grades (Economy, Custom, Premium). Testing includes weight capacity validation across shelving and structural components using per-square-foot duty levels. Few semi-custom manufacturers achieve Premium grade—Fabuwood’s Allure line earned it in 2023, which is a meaningful differentiator.
CARB Phase 2 and TSCA Title VI Compliance
These environmental certifications limit formaldehyde emissions from composite wood panels to less than 0.05 ppm for hardwood plywood—the toughest production standard globally. TSCA Title VI effectively nationalized California’s CARB Phase 2 requirements. All materials should come from certified suppliers, with products clearly labeled demonstrating compliance. Increasingly important for clients pursuing LEED certification or with health sensitivities.
Material Durability: The Janka Hardness Factor
The Janka hardness scale measures how much force (in lbf) it takes to embed a 0.444-inch steel ball halfway into a wood surface. For Shaker cabinets serving active kitchens, hardness directly correlates with long-term appearance retention.
For painted applications, Hard Maple (1,450 lbf) is the preferred species—its fine, closed grain creates glass-smooth painted surfaces with minimal grain telegraphing and superior dent resistance. For stained applications, White Oak (1,360 lbf) offers natural water resistance through cellular structures called tyloses, making it ideal for base cabinets near sinks. Cherry (950 lbf) delivers rich tones that deepen naturally with UV exposure, but requires client education about that darkening.
Birch provides the best budget option for painted applications due to its fine grain and warp resistance. A note on species: Paper Birch rates 910 lbf, but the Yellow Birch commonly found in cabinet-grade plywood rates a much harder 1,260 lbf. Confirm which species your supplier is actually using—the difference in dent resistance is significant.
Request material samples before production, and confirm they represent actual production stock rather than showroom examples that may differ in quality.
Product Tier Stratification
Understanding how quality metrics shift between product tiers lets you match the right grade to each project’s requirements and budget.
Cabinet Product Tier Comparison
| Feature | Premium (Allure) | Mid-Tier (Quest) | Value (Hallmark) |
|---|---|---|---|
| Center Panel | 3/8″–5/8″ MDF | 5mm–1/2″ MDF | 1/2″ MDF |
| Drawer Extension | 100% full extension | 80% extension | Full extension |
| Hinges | Blum 110° soft-close | Blum soft-close | Blum 110° soft-close |
| Interior Finish | Natural finished veneer | Natural finished veneer | Natural finished veneer |
| Cabinet Box | 1/2″ plywood, full back | 1/2″ plywood, full back | 1/2″ plywood, full back |
| Drawer Box | 5/8″ solid wood dovetail | 5/8″ solid wood dovetail | 5/8″ solid wood dovetail |
| Cabinet Line Feature Comparison – IST Cabinets | |||
A telling sign of a quality-focused manufacturer: essential construction features—all-plywood boxes, dovetail drawers, soft-close hardware, full plywood backs—come standard across all tiers, not as costly upgrades. Even value-tier lines should prioritize structural essentials. “Value” doesn’t have to mean particleboard.
Warranty as a Quality Proxy
A manufacturer’s warranty tells you how much they trust their own work. Look past the headline.
Strong warranty signals: Limited Lifetime coverage for the original purchaser covering defects in material and workmanship under normal residential use. Unified policies that cover structural components, hardware, and finish under a single framework with clearly defined claim processes.
Red flags: Hardware warranted separately for just one year. Coverage limited to the original purchaser with no transferability. “At our discretion” replacement language without clear standards. Exclusion of all labor costs for warranty work.
Certain characteristics are universally excluded across all manufacturers and should be set as client expectations upfront: stress lines at joints on painted doors, wood warping up to 1/4 inch, panel movement during seasonal humidity changes, and paint micro-cracking at joints over time. These are properties of wood as a natural material—not defects—and educating your client on this point prevents warranty disputes.
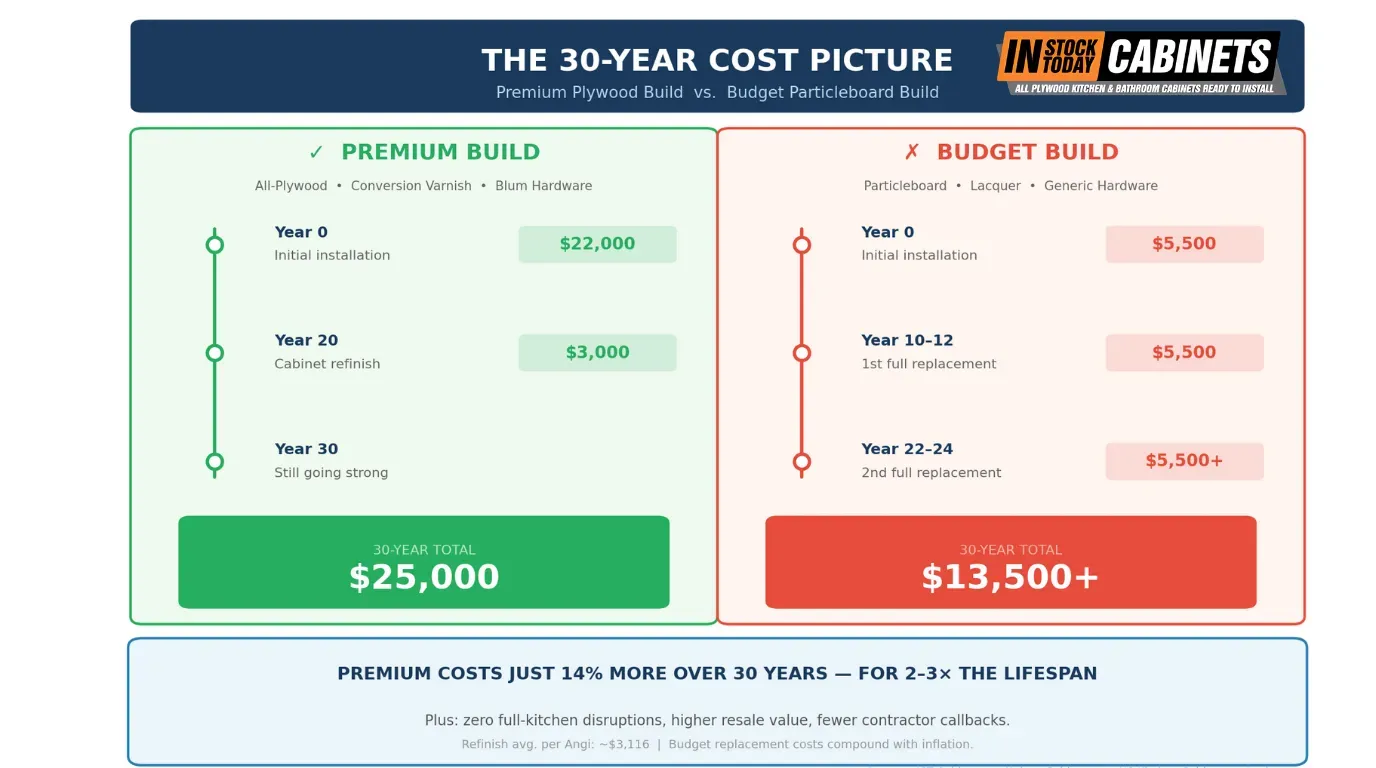
Supply Chain and Lead Time
For contractors and builders, project timelines are often the hardest metric to nail down. The cabinet industry’s supply chain varies enormously.
Stock and ready-to-assemble programs from well-inventoried dealers can ship in 5–7 business days. Semi-custom cabinets typically require 3–8 weeks. Fully custom work runs 8–14 weeks. The name “In Stock Today” reflects IST’s model of maintaining warehouse inventory of Fabuwood lines, which enables the shorter end of those timelines—but that’s specific to their business model, not a general industry norm.
Fast lead times should come from manufacturing automation and volume efficiency—not rushed craftsmanship. Verify that rapid production still adheres to third-party standards (AWI, KCMA). A manufacturer that delivers quickly and maintains certifications demonstrates genuine operational capability.
Long-Term Return on Investment
The upfront cost of all-plywood Shaker cabinets with conversion varnish and premium hardware is higher. The 30-year cost picture flips that calculation.
Cost-to-Value Comparison: 30-Year Lifecycle
| Factor | Premium Build | Budget Build | Implication |
|---|---|---|---|
| Replacement Cycle | 20–30+ years | 5–15 years | Budget builds may cost 2–3x over 30 years |
| Resale Impact | High (listed as feature) | Low (budget solution) | Premium materials drive higher sale prices |
| Moisture Failure Risk | Low (plywood / CV) | High (particleboard) | Kitchen leaks can destroy budget boxes |
| Hardware Warranty | Lifetime | 1–2 years | Premium hardware reduces repair labor |
| Long-Term Value Comparison – IST Cabinets | |||
A premium kitchen cabinet installation running approximately $22,000 initially, with a $3,000 refinish around year 20 (consistent with Angi’s national average of ~$3,116), totals $25,000 over three decades. Budget cabinets that need full replacement every 10–15 years can easily reach $13,500+ cumulative. The premium option delivers two to three times the service life while maintaining higher resale value throughout.
The Professional’s Quality Assessment Checklist
When evaluating Shaker cabinets for your next project, verify these specifications:
Box Construction
- All-plywood box with minimum 1/2″ sides (3/4″ for frameless)
- Full 1/2″ plywood back panel set into dado grooves (not stapled 1/4″ hardboard)
- Solid wood corner blocks or anti-warp reinforcement beams
- Flush-fit interior frames with finished interior surfaces
Drawer Boxes
- Full dovetail joints in 5/8″ solid hardwood (birch or maple)
- 3/8″ plywood bottom captured in dado grooves on all four sides
- Undermount full-extension slides with 100 lb minimum load rating
- Integrated soft-close mechanism (not bolt-on dampeners)
Door Construction
- Mortise-and-tenon or cope-and-stick joinery (avoid mitered corners for painted doors)
- 2-1/2″ or wider rail/stile widths for standard Shaker profiles
- MDF/HDF center panels for painted finishes; wood veneer for stained
- Floating center panel (not glued) to accommodate wood movement
Finish and Hardware
- Catalyzed conversion varnish or 2K polyurethane (not pre-catalyzed lacquer)
- Multi-coat system with sanding between applications
- KCMA-certified chemical and heat resistance
- 200,000+ cycle hinges with six-way adjustment (Blum, Grass, or equivalent)
Certifications and Compliance
- KCMA A161.1 certification (structural and finish performance)
- AWI Premium Grade (highest architectural woodwork standard)
- CARB Phase 2 / TSCA Title VI compliance (formaldehyde emission limits)
- Limited Lifetime Warranty covering materials and workmanship
Frequently Asked Questions for Shaker Cabinet Quality
Why does IST Cabinets recommend all-plywood construction over particleboard or MDF?
Plywood’s cross-grain lamination gives it far superior moisture resistance, screw-holding power, and dimensional stability compared to particleboard or MDF. In kitchen and bathroom environments—where humidity and the occasional leak are inevitable—particleboard swells irreversibly once water hits an exposed edge. Industry sources like Nelson Cabinetry and Blue Ridge Cabinet Connection consistently place plywood cabinet lifespans at 25–30 years, compared to 5–15 years for particleboard depending on environment and build quality. That’s not a marginal improvement. It’s the difference between cabinets that survive a dishwasher leak and cabinets that don’t.
What is dovetail joinery, and why does it matter for drawer boxes?
Dovetail joints are interlocking wedge-shaped cuts—pins on one side, tails on the other—that create a mechanical bond in 5/8-inch solid hardwood (typically birch or maple). The geometry distributes tensile loads across multiple contact points, so the joint actually gets tighter when you pull the drawer. Keystone Wood Specialties and woodworking industry sources consistently rank dovetails as the strongest drawer joint available. Budget drawers use stapled butt joints with melamine or particleboard sides—those are the first components to fail in high-use kitchens. All three Fabuwood tiers (Allure, Quest, and Hallmark) carried by IST Cabinets use 5/8″ solid wood dovetail drawer boxes as a standard feature, not an upgrade.
What’s the difference between mortise-and-tenon and cope-and-stick door joinery?
Mortise-and-tenon is the traditional gold standard: a rectangular tenon on the rail fits into a cavity (mortise) in the stile, creating a massive glue surface and mechanical interlock. Cope-and-stick is the modern production method—rail ends are machined with a negative profile (cope) that interlocks with the positive profile (stick) on the stile. Both outperform butt joints by a wide margin. The one to avoid on painted Shaker doors is mitered corners—both pieces expand at 45 degrees to the joint line, which causes hairline paint cracks (called “witness lines”) that are well-documented across woodworking forums like Houzz and WoodWeb.
What is conversion varnish, and why is it better than lacquer?
Catalyzed conversion varnish (CV) is a chemically cross-linked finish system containing 30–60% solids (depending on formulation—Mohawk’s Ultra Flo runs around 33%, while Sherwin-Williams KemVar Plus reaches ~60%). That cross-linking creates hard, dense molecular bonds resistant to heat, solvents, alcohol, and household acids. Standard lacquer only runs 15–25% solids and will soften or dissolve under 100-proof alcohol within 24 hours. CV passes every KCMA A161.1 finish test—including 24-hour exposure to vinegar, citrus, ketchup, coffee, olive oil, and alcohol. Cabinet Door Store and CabinetDoors.com both provide detailed comparisons confirming CV’s superiority for factory-finished cabinetry.
How do Blum hinges compare to Salice, Hettich, and Grass?
Blum’s CLIP top BLUMOTION hinges carry a verified 200,000+ cycle rating (per blum.com)—eight times the KCMA minimum of 25,000 cycles. Each hinge contains roughly 58–59 precision components. That’s the premium tier. Hettich (a German manufacturer with over 8,600 employees), Grass (part of the Würth Group, manufacturing in North Carolina), and Salice (Italian) offer mid-tier alternatives rated at 80,000–150,000 cycles—adequate for most residential kitchens at 20–40% lower cost. For drawer slides, Blum’s Tandem Plus undermount runs 90–100 lbs dynamic load, while Salice’s Progressa is rated at a flat 120 lbs (the Progressa+ handles 170 lbs). All of Fabuwood’s lines use Blum hardware as standard—including their value-tier Hallmark.
What does KCMA A161.1 certification actually test?
The ANSI/KCMA A161.1 standard is the only nationally recognized performance certification for kitchen and bath cabinets. It’s administered by the Kitchen Cabinet Manufacturers Association (KCMA) through independent third-party labs. Testing includes: shelf loads of 15 lbs per square foot sustained for seven days, wall cabinet loads up to 600 lbs applied gradually, base cabinet front joint tests at 200–250 lbs (depending on configuration), 25,000 open/close hinge cycles, and 24-hour chemical exposure to household substances including 100-proof alcohol, vinegar, and citrus at 120°F and 70% humidity. Republic Elite has published a useful guide on why KCMA certification matters for multifamily projects. Fabuwood holds KCMA certification, which IST Cabinets can verify for any product line you’re evaluating.
What is AWI Premium Grade, and why is it hard to get?
The Architectural Woodwork Institute (AWI) defines three quality grades: Economy, Custom, and Premium. Premium is the highest—it sets the tightest tolerances on joints, frames, doors, shelves, and structural components, with weight capacity validation using per-square-foot duty levels across multiple shelf and structural configurations. According to Woodworking Network, Fabuwood earned AWI Premium Grade certification for their Allure line in 2023. Few semi-custom manufacturers achieve this grade, which makes it a genuine differentiator rather than a marketing checkbox. AWI Premium Grade is independently verified—unlike proprietary frameworks.
Is Fabuwood’s Q12 system an industry standard?
No. Q12 is Fabuwood’s proprietary quality branding—trademarked as Q12™ on their q12cabinets.com website. It is not recognized by KCMA, AWI, ANSI, or any other third-party body. That said, the twelve individual criteria it covers—dovetail construction, plywood backs, Blum hardware, UV-cured interior veneers, solid wood corner blocks, and so on—are individually sound construction practices. Think of Q12 as Fabuwood’s internal checklist. Their genuinely independent certifications are KCMA A161.1 and AWI Premium Grade. IST Cabinets carries all Q12-certified Fabuwood lines but encourages clients to weigh Q12 alongside those third-party certifications.
What do CARB Phase 2 and TSCA Title VI compliance mean for my projects?
Both regulate formaldehyde emissions from composite wood panels. California’s CARB Phase 2 standard limits hardwood plywood emissions to less than 0.05 ppm—the toughest production standard globally. The federal TSCA Title VI (signed into law under the Toxic Substances Control Act) effectively nationalized that same California standard across all 50 states. Compliance means every composite panel in the cabinet—plywood, MDF, particleboard—has been tested and certified for low formaldehyde off-gassing. This matters increasingly for clients pursuing LEED certification, healthcare facilities, schools, or anyone with chemical sensitivities. All Fabuwood product lines available through IST Cabinets are CARB Phase 2 and TSCA Title VI compliant.
Which wood species works best for painted vs. stained Shaker cabinets?
For painted applications, Hard Maple (Janka rating: 1,450 lbf) is the professional’s first choice—its fine, closed grain produces glass-smooth painted surfaces with minimal grain telegraphing. For stained work, White Oak (1,360 lbf) offers natural water resistance through cellular structures called tyloses, making it ideal near sinks. Cherry (950 lbf) darkens beautifully with UV exposure but requires client education about that color shift. Birch is the budget pick for painted work, but verify which species: Paper Birch rates 910 lbf, while the Yellow Birch commonly found in cabinet-grade plywood rates a significantly harder 1,260 lbf. Ask your supplier to confirm which one you’re actually getting.
How fast can IST Cabinets deliver a full kitchen order?
IST Cabinets maintains warehouse inventory of Fabuwood product lines—that’s the “In Stock Today” in their name—which enables turnaround of 5–7 business days for full kitchen orders and 3–4 business days for vanities. For context, industry lead times vary widely: stock and ready-to-assemble programs ship in under a week, semi-custom cabinets typically run 3–8 weeks, and fully custom work takes 8–14 weeks. IST’s speed comes from their inventory model, not from cutting manufacturing corners—their Fabuwood lines still carry KCMA and AWI certifications. IST serves dealers, contractors, builders, and designers from showrooms in Alexandria VA, Fairfax VA, Columbia MD, Houston TX, Roselle IL, and Bear DE.
Do premium cabinets actually pay for themselves over time?
The math favors premium construction over a 30-year horizon. A well-built all-plywood kitchen with conversion varnish and Blum hardware running approximately $22,000 initially, plus a $3,000 refinish around year 20 (Angi’s national average for cabinet refinishing is ~$3,116), totals about $25,000 over three decades. Budget particleboard cabinets that need full replacement every 10–15 years can accumulate $13,500 or more in total spend—and you’re living through two full kitchen disruptions instead of one refinish. The premium option delivers two to three times the service life, better moisture resilience, and higher resale value throughout. For contractors and dealers, specifying quality upfront also means fewer callbacks and warranty claims—which protects your margin and your reputation.
What warranty red flags should I watch for when evaluating cabinet brands?
Strong warranties offer Limited Lifetime coverage for the original purchaser under a single unified policy covering structural components, hardware, and finish. Red flags include: hardware warranted separately for just one year (suggesting the manufacturer knows their hinges won’t last), coverage limited only to the original purchaser with no transferability, vague “at our discretion” replacement language, and blanket exclusion of labor costs. Also educate your clients upfront that stress lines at painted door joints, wood warping up to 1/4 inch, seasonal panel movement, and paint micro-cracking at joints are inherent properties of wood—every manufacturer excludes these, because they’re not defects. Setting that expectation early prevents warranty disputes later.
How do I contact IST Cabinets for samples or wholesale pricing?
IST Cabinets offers free design consultations and can provide material samples and specification sheets for any Fabuwood product line. Reach them at info@istcabinets.com or (703) 259-9030. Their website at istcabinets.com includes project galleries and product-line details. Walk-in showrooms are located in Alexandria VA, Fairfax VA, Columbia MD, Houston TX, Roselle IL, and Bear DE—all serving trade professionals with wholesale pricing on Fabuwood’s Allure, Quest, and Hallmark lines.
About IST Cabinets
In Stock Today Cabinets (IST Cabinets) is an authorized dealer specializing in premium and semi-custom cabinetry for dealers, contractors, builders, and interior designers across Virginia, Maryland, Delaware, Texas, and Illinois. As a source for Fabuwood’s AWI Premium Grade certified product lines, IST Cabinets combines technical expertise, competitive wholesale pricing, and inventory-based fulfillment with the philosophy: No Wait. No Hassle. Just Beautiful Cabinets.
🌐 istcabinets.com 📧 info@istcabinets.com 📞 (703) 259-9030
Showrooms: Alexandria, VA • Fairfax, VA • Columbia, MD • Houston, TX • Bear, DE
How to Enhance Joinery Techniques in Shaker Cabinet Construction?

Superior joinery separates cabinets that last decades from those that fail within years—and understanding these techniques gives contractors, dealers, and builders a critical competitive advantage. Fabuwood’s Q12 quality system establishes a benchmark for modern Shaker cabinet construction, combining traditional dovetail craftsmanship with precision manufacturing while meeting KCMA certification standards that require cabinets to withstand 25,000+ operational cycles. This guide provides the technical specifications, material standards, and professional methods needed to evaluate, select, and discuss premium Shaker cabinetry with confidence.
The difference between economy and premium cabinet construction often comes down to joinery choices that remain invisible to untrained eyes but determine structural longevity. Whether you’re specifying cabinets for clients, evaluating wholesale options, or simply deepening your trade expertise, mastering these construction fundamentals translates directly to better project outcomes and informed customer conversations.
10 Key Takeaways: Joinery Techniques in Shaker Cabinet Construction
- Dovetail drawer boxes deliver 2-3x longer lifespan than stapled construction—Fabuwood’s 5/8″ solid wood dovetail standard supports 100+ pounds through 100,000+ cycles versus 50-75 pounds at 25,000 cycles for economy alternatives.
- Mortise-and-tenon joints provide superior door frame strength—properly executed with 1/4″ tenons for 3/4″ material, these joints withstand 200,000+ opening cycles without loosening compared to pocket screws or dowels alone.
- 1/2″ plywood backs reduce cabinet racking by 40% versus 1/4″ alternatives—Fabuwood’s one-piece solid back construction prevents twisting and maintains square during installation and daily use.
- KCMA certification validates durability claims through independent testing—certified cabinets must survive 25,000 door/drawer cycles, 600-pound wall cabinet loading, and chemical resistance tests that eliminate marketing guesswork.
- Blum hardware rated for 200,000 cycles outlasts economy hinges by 4x—integrated BLUMOTION soft-close self-adjusts to door weight and eliminates the maintenance requirements of add-on dampers.
- Pocket screws work professionally when combined with glue—use 1-1/4″ screws for 3/4″ stock, space every 6-8″, always add wood glue, and position holes on concealed interior faces for commercial-grade strength.
- AWI Custom Grade specifications establish the professional baseline—requiring 1/2″ minimum back panels, dado/rabbet joinery, and color-matched edgebanding versus Premium Grade’s 3/4″ backs and dovetail drawer requirements.
- Face frame construction simplifies installation while frameless maximizes interior space—face frames add 1.5″ structure but reduce interior depth; frameless gains 1″ interior space but demands precision installation with robust box construction.
- Hard maple’s 1450 Janka hardness rating exceeds cherry by 50% making it ideal for painted Shaker cabinets requiring dent resistance, while cherry’s 950 rating suits stained applications where grain prominence matters more than hardness.
- CNC precision eliminates human error in joinery execution—modern manufacturing cuts mortises, tenons, and dovetails with repeatability measured in thousandths of inches, delivering furniture-grade quality at production speeds.
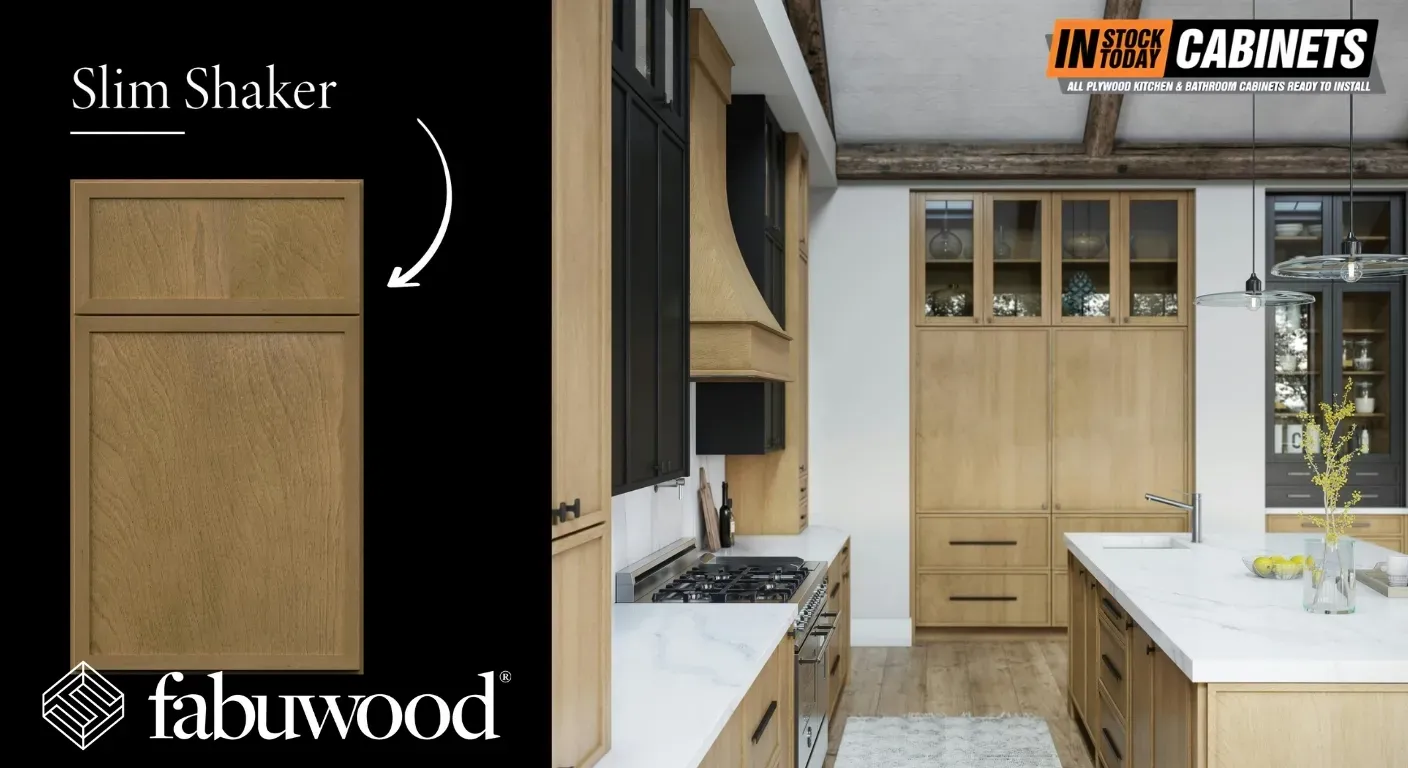
Fabuwood’s Q12 system defines modern quality benchmarks
Fabuwood’s proprietary Q12 Quality System consists of twelve distinct standards that establish measurable criteria for cabinet excellence. Understanding these specifications helps professionals evaluate quality claims and communicate value to clients.
Q12 Quality Standards Overview
| Standard | Specification | Professional Impact |
|---|---|---|
| Q1 | Grade-A Lumber Selection | Consistent grain, minimal defects |
| Q2 | Pro-Touch Finish Techniques | Durable, professional-grade finishes |
| Q3 | Advanced Construction | Dovetail (Allure) or Threespine® (Illume) |
| Q4 | Anti-Warp Structures | Eliminates humidity/temperature warping |
| Q5 | Metal Shelf Clips | Superior stability vs. plastic |
| Q6 | ½” Solid Plywood Backs | One-piece construction, prevents racking |
| Q7 | Flush Inner Frames | Smooth interior access |
| Q8 | Finished Interiors | Polished appearance inside and out |
| Q9 | Blum Compact Clip Hinges | Integrated soft-close, 110° opening |
| Q10 | Blum TANDEM Plus Runners | Full-extension, 100,000-cycle rating |
| Q11 | EZ Level Drawer Fronts | Precision 3/8″ increment adjustment |
| Q12 | Limited Lifetime Warranty | Comprehensive quality backing |
The first three standards address materials and construction fundamentals: Q1 (Carefully Selected Elements) requires Grade-A lumber with rigorous inspection; Q2 (Pro-Touch Techniques) ensures high-end, durable finishes; Q3 (Advanced Construction) specifies dovetail joinery for framed Allure cabinets or Threespine® Click Technology for frameless Illume products. These foundational elements determine whether a cabinet will maintain structural integrity through decades of daily use.
Standards Q4 through Q8 focus on structural engineering: anti-warp structures eliminate warping against humidity and temperature fluctuations; metal shelf clips provide superior stability compared to plastic alternatives; ½” solid plywood backs (one-piece construction, not stapled panels) resist racking forces; flush inner frames allow smooth interior access; and finished interiors deliver a polished appearance inside and out.
The final four standards address hardware and alignment: Blum Compact Clip hinges with integrated soft-close provide one-click installation and 110° opening angles; Blum TANDEM Plus runners deliver full-extension with soft-close technology rated for 100,000 cycles; EZ Level drawer fronts allow mechanical precision adjustment in 3/8″ increments; and a limited lifetime warranty backs the entire system. This comprehensive approach explains why industry analysts consistently rate Fabuwood framed cabinets Grade-A for quality while competing at Price Level 2—approximately 30% below comparable semi-custom brands like KraftMaid when upgraded to plywood construction.
💡 Professional Tip: IST Cabinets offers exclusive access to Fabuwood’s complete Q12-certified product line with specialized contractor pricing. Explore our Fabuwood collection →
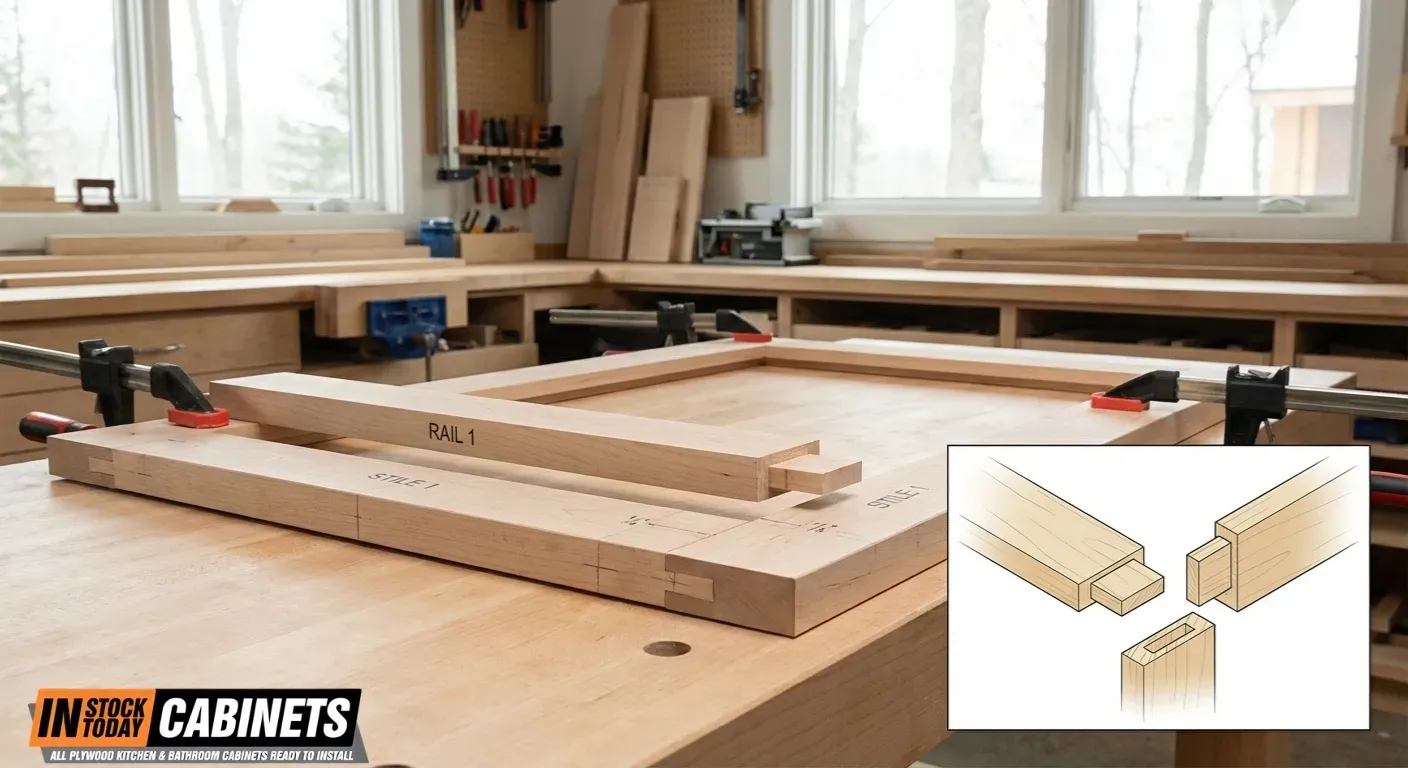
Traditional Shaker joinery methods remain the gold standard
The Shaker philosophy of “beauty rests on utility” produced joinery techniques that have survived 150+ years precisely because they work. Modern professional cabinet makers can learn from these time-tested methods while adapting them with contemporary tools.
Traditional Joinery Specifications Comparison
| Joint Type | Typical Application | Strength Rating | Skill Level | Production Speed |
|---|---|---|---|---|
| Mortise & Tenon | Door frames, face frames | Excellent | Advanced | Moderate |
| Dovetail | Drawer boxes, carcass corners | Excellent | Advanced | Slow (hand) / Fast (CNC) |
| Dowel | Face frames, carcass assembly | Very Good | Intermediate | Fast |
| Dado & Rabbet | Shelves, back panels | Good | Beginner | Very Fast |
| Pocket Screw | Face frames, quick assembly | Good | Beginner | Very Fast |
| Floating Tenon | Mid-panel, frame assembly | Excellent | Intermediate | Fast |
Mortise-and-tenon joints form the backbone of quality door and face frame construction. The fundamental specification: tenon thickness should equal approximately one-third of stock thickness—typically yielding 1/4″ tenons for standard 3/4″ material. Always cut the mortise first, then shape the tenon for a snug fit. Haunched tenons incorporate shoulders for added strength and glue surface, while drawbored tenons use offset holes with wooden pegs to draw joints mechanically tight without relying solely on adhesive. For maximum durability, historical Shaker craftsmen often drove nails through assembled mortise-and-tenon joints—the iron leached into surrounding wood, creating permanent connections.
Dovetail joints signal quality construction in drawer boxes, though their historical significance has evolved. Contrary to modern perception, early woodworkers considered dovetails a practical production technique rather than a premium feature—frequently hiding them beneath veneer or moldings. For drawer construction, half-blind dovetails at fronts (tails hidden in side panels) and through dovetails at backs provide optimal strength. Standard specifications include 5/8″ thick drawer sides, pin angles between 7-14 degrees (1:6 to 1:8 ratio), and typically 3-5 tails per corner depending on drawer width.
Dowel joinery offers excellent strength-to-speed ratio for face frames and European-style carcass construction. Professional specifications call for dowel diameter at one-third to one-half stock thickness (3/8″ most common for 3/4″ material), lengths of 1.5″-2″, and spacing of 3-4″ between dowels. Use fluted dowels to allow glue and air escape, and invest in a self-centering doweling jig for production consistency.
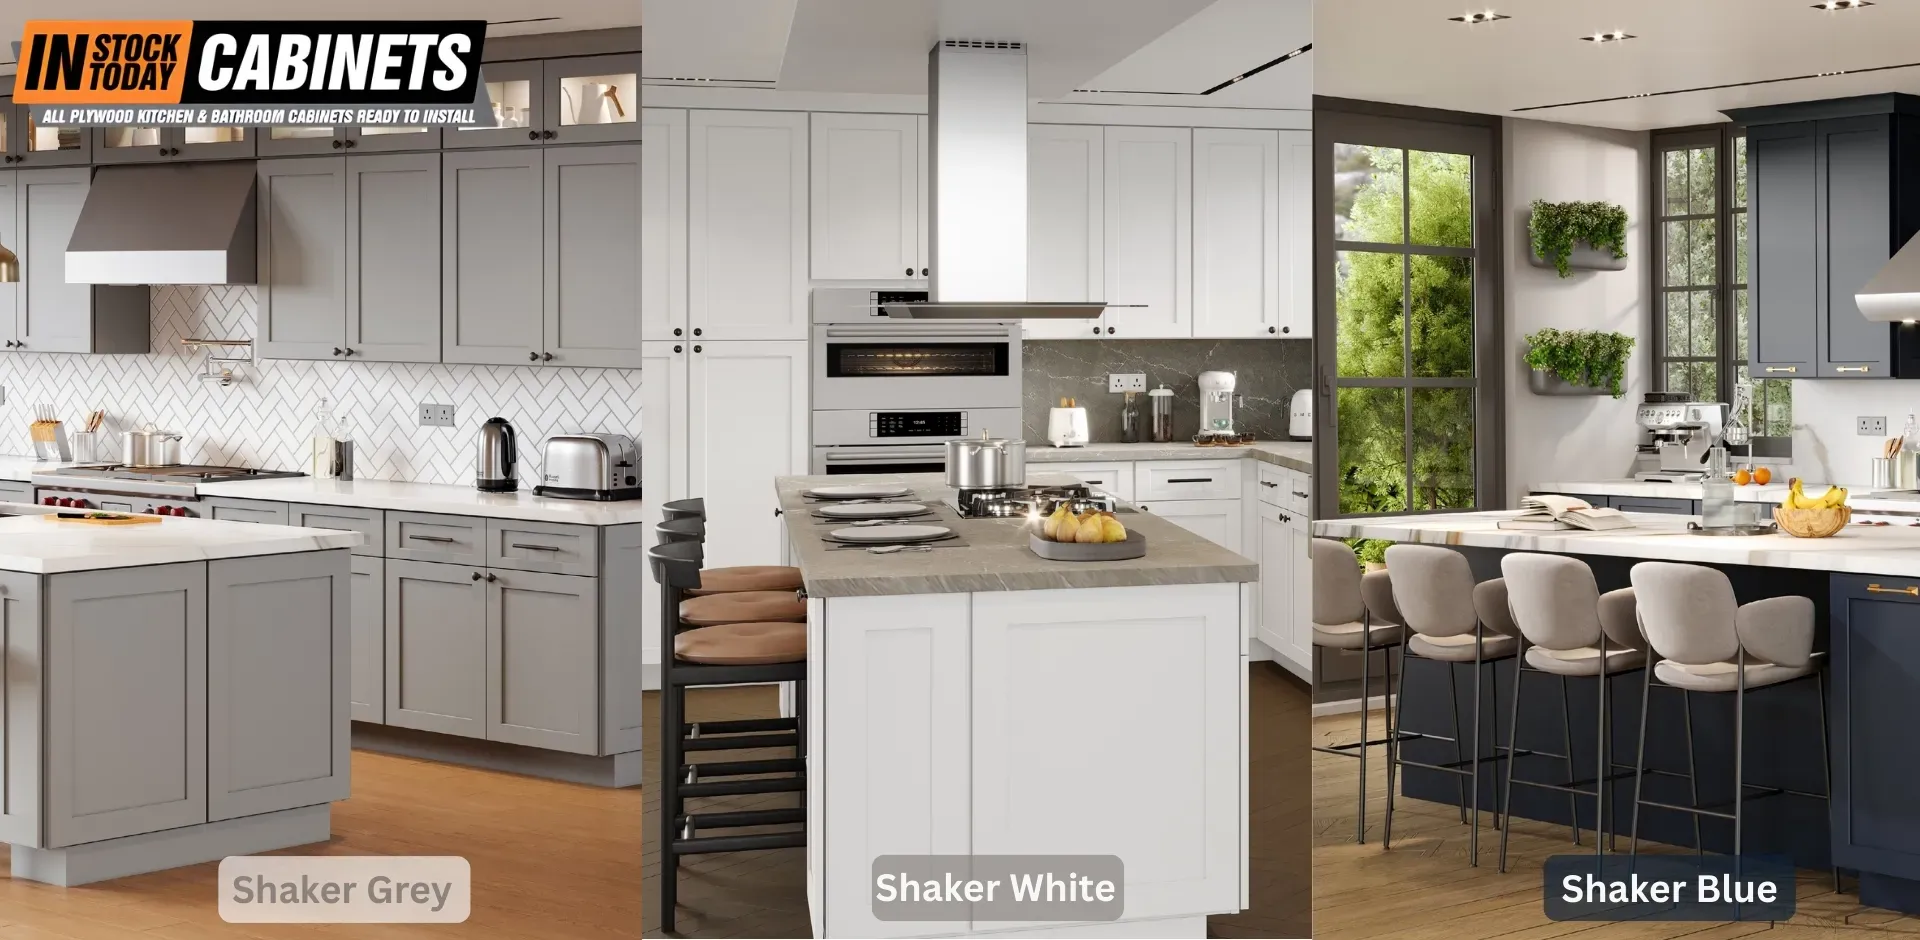
Modern systems accelerate traditional joinery without sacrificing quality
Contemporary tools enable professionals to achieve traditional joint strength at production speeds. Understanding these systems helps contractors and dealers evaluate construction claims and recommend appropriate solutions.
CNC machining delivers precision cuts exact to fractions of a millimeter with perfect repeatability. Once programmed, these machines produce hundreds of identical dovetails, mortises, or custom interlocking joints. For cabinet work, spiral up-cut bits create clean mortises while compression bits prevent tearout on veneered plywood. The key advantage: complex joinery that once required master craftsman skills becomes accessible to production shops while maintaining mechanical strength.
Festool Domino floating tenon systems have transformed mid-panel joinery for cabinet carcasses. The critical technical insight: the distance from the Domino base plate to cut center is always 10mm regardless of cutter size, enabling perfect alignment across different material thicknesses. For standard 18mm (3/4″) stock, use 8 x 40mm Dominos—the most common specification—with 15mm depth in side panels and 25mm depth in shelf edges. When cutting mid-panel joinery, layout lines should mark the top or bottom surface of shelves, not the centerline.
Modern Joinery System Comparison
| System | Best For | Initial Investment | Per-Joint Cost | Learning Curve | Production Speed |
|---|---|---|---|---|---|
| CNC Router | High-volume production | $$$$ | Lowest | Moderate | Fastest |
| Festool Domino | Custom / mid-volume | $$$ | Moderate | Low | Fast |
| Pocket Screw System | Face frames, quick assembly | $ | Lowest | Very Low | Very Fast |
| Traditional Hand Tools | Single pieces, repair | $ | None | High | Slow |
| Router Dovetail Jigs | Drawer boxes | $$ | Low | Moderate | Moderate |
Pocket screw systems (Kreg and similar) provide immediate strong connections ideal for face frame assembly. Professional specifications: for 3/4″ material, use 1-1/4″ screws with drill bit set to 3/4″; for 1/2″ material, use 1″ screws. Space pocket holes every 6-8″ along joints, with two holes minimum per face frame connection. The critical best practice: always combine pocket screws with wood glue for permanent joints—screws alone may loosen over time. Strategic placement hides holes on interior faces; use plugs when concealment isn’t possible.
🔧 Ready to Upgrade Your Cabinet Projects? Join IST Cabinets’ Professional Loyalty Program for exclusive contractor pricing, priority ordering, and dedicated technical support. Learn more about membership benefits →
Drawer box construction determines daily performance
Drawers endure more stress than any other cabinet component—opened and closed approximately 80 times daily in active kitchens. Construction method selection directly impacts longevity and client satisfaction.
Drawer Box Construction Quality Comparison
| Construction Type | Material | Corner Joint | Bottom Panel | Typical Thickness | Load Capacity | Expected Lifespan |
|---|---|---|---|---|---|---|
| Premium (Fabuwood Standard) | Solid hardwood | Dovetail (half-blind) | 3/8″ plywood dado | 5/8″ sides | 100+ lbs | 20+ years |
| Quality Mid-Range | Solid wood or plywood | Dowel (3–4 per corner) | 1/4″ plywood dado | 1/2″ sides | 75–100 lbs | 15–20 years |
| Standard Production | Hardwood plywood | Staple + glue | 1/4″ plywood stapled | 1/2″ sides | 50–75 lbs | 10–15 years |
| Economy | Particle board / MDF | Staple or cam lock | 1/8″ hardboard stapled | 1/2″ sides | 25–50 lbs | 5–10 years |
Dovetailed solid wood drawer boxes represent the premium standard. Fabuwood’s Allure series specifies 5/8″ thick solid hardwood with half-blind dovetail construction and 3/8″ plywood bottoms. This combination provides the mechanical strength to support heavy contents while resisting racking forces during operation. When evaluating drawer quality, look for consistent dovetail spacing, tight joint fit without gaps, and properly dadoed bottoms rather than stapled construction.
Dowel-constructed boxes offer acceptable quality at mid-range price points, using 3/8″ fluted dowels (2-3 per corner) combined with glue for permanent bonds. While offering less mechanical strength than dovetails, modern adhesives make these joints extremely durable for typical residential use. The construction speed advantage makes dowel boxes economical for volume projects.
Undermount soft-close slide integration has become the professional expectation. Blum TANDEM systems specify 90-150 lb load capacity depending on model, full-extension capability, and 100,000-cycle durability ratings. Drawer width must accommodate slides up to 2-1/4″ wide with 1/2″ reveal on each side. Bottom-mounted runners attach to drawer bottoms with rear brackets connecting to backs—four-dimensional front adjustment enables perfect alignment after installation.
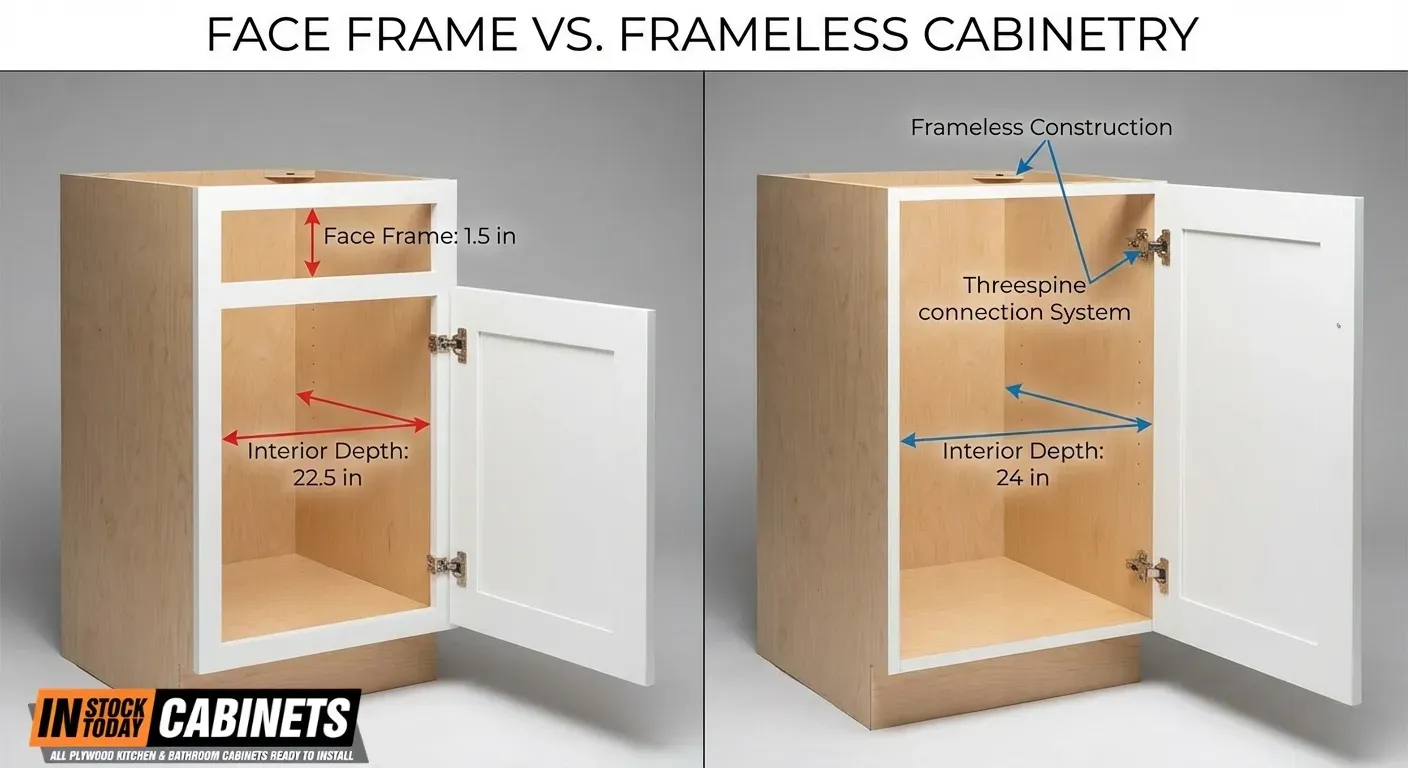
Cabinet box assembly techniques affect structural longevity
The choice between face frame and frameless construction influences interior accessibility, installation flexibility, and structural durability. Both approaches have legitimate professional applications.
Face Frame vs. Frameless Construction Comparison
| Feature | Face Frame (American) | Frameless (European) |
|---|---|---|
| Interior Depth | Standard (reduced by 1.5″) | +1″ more usable space |
| Installation Ease | Easier shimming / adjustment | Requires precision |
| Hardware System | Standard mounting | 32mm standardized system |
| Aesthetic | Traditional appearance | Contemporary / modern |
| Drawer Box Width | Standard | Up to 1″ wider possible |
| Exposed Sides | Requires skin panels | Direct finish visible |
| Structural Rigidity | Frame adds strength | Requires robust box construction |
| Fabuwood Example | Allure Series | Illume Series |
Face frame (American traditional) construction adds a solid wood frame—typically 1-1/2″ wide rails and stiles in 3/4″ thickness—to the cabinet box front. This frame adds rigidity, simplifies installation (easier shimming and adjustment), and allows three overlay options: partial overlay (doors partially cover frame), full overlay (modern appearance with maximum coverage), and inset (doors fit inside frame, requiring precision). The trade-off: frames reduce interior space by 1-1/2″ or more and require skin panels for exposed sides.
Frameless (European/32mm system) construction eliminates the face frame, providing approximately 1″ more interior depth and enabling wider drawer boxes. The 32mm system uses standardized hole spacing (32mm between mounting holes) for hardware installation. Fabuwood’s Illume series uses Threespine® Click Technology—a proprietary interlocking system that creates tight seams and rigid construction without traditional fasteners. This method requires more precise manufacturing but delivers seamless modern aesthetics and unobstructed interior access.
Dado and rabbet joints form the backbone of cabinet carcass assembly. For shelf support dadoes, cut width to match exact material thickness (often undersized in plywood—measure actual stock) with depth at 3/8″ for 3/4″ material, never exceeding half stock thickness. Back panel rabbets typically measure 3/8″ wide x 3/8″ deep for 3/8″ backs. AWI Premium Grade specifications require full 3/4″ backs with dovetail drawer construction, while Custom Grade permits 1/2″ backs with dado/rabbet joinery.
KCMA certification validates construction quality claims
The KCMA A161.1 Quality Certification represents the only performance-based cabinet testing standard in the industry, developed with ANSI to validate manufacturers’ quality claims through rigorous laboratory testing.
KCMA Testing Requirements Summary
| Test Category | Specification | Pass / Fail Criteria | Real-World Equivalent |
|---|---|---|---|
| Shelf Loading | 15 lbs / sq ft for 7 days | No excessive deflection | Heavy dishware storage |
| Wall Cabinet Mounting | Gradual load to 600 lbs | No visible failure | Worst-case overhead storage |
| Base Front Joint | 200–250 lbs force | No joint separation | Leaning / pulling on cabinet |
| Drop Impact | 3-lb steel ball from 6″ | No finish or structural damage | Dropped cookware |
| Drawer Cycle Test | 25,000 open / close cycles | Remains fully operable | ~7 years daily use |
| Door Cycle Test | 25,000 open / close cycles | No hinge damage | ~7 years daily use |
| Door Load Test | 65 lbs sustained | No sag or deflection | Heavy dishes on open door |
| Heat Exposure | 120°F / 70% RH for 24 hrs | No finish degradation | Near cooking surfaces |
| Cold Cycling | 120°F to −5°F cycles | No cracking or separation | Seasonal temperature swings |
| Chemical Resistance | 24-hour exposure | No visible damage | Kitchen spills & cleaners |
Structural tests evaluate real-world durability: shelf loading tests apply 15 lbs/sq ft for seven days without excessive deflection; wall cabinet mounting tests gradually load to 600 lbs without visible failure; base front joint strength tests apply 200-250 lbs without joint separation; and drop tests use 3-lb steel balls from 6″ height to simulate impact damage.
Operational tests simulate years of use: drawer weight tests maintain 15 lbs/sq ft loading through 25,000 cycles while remaining operable; door stress tests swing doors 90° for 25,000 cycles without hinge damage; and door load tests apply 65 lbs through 10 cycles plus sustained loading. These numbers matter—contractors can confidently specify KCMA-certified products knowing they’ve passed standardized performance validation.
Finish tests evaluate surface durability: heat exposure at 120°F/70% relative humidity for 24 hours; cold cycling between 120°F and -5°F; and chemical resistance to vinegar, citrus juices, ketchup, coffee, olive oil, and 100-proof alcohol for 24 hours without degradation. Mustard—surprisingly aggressive—requires only one-hour resistance.
📊 Specify With Confidence: IST Cabinets exclusively offers KCMA-certified Fabuwood products that meet or exceed all performance standards. Request technical specifications for your next project →
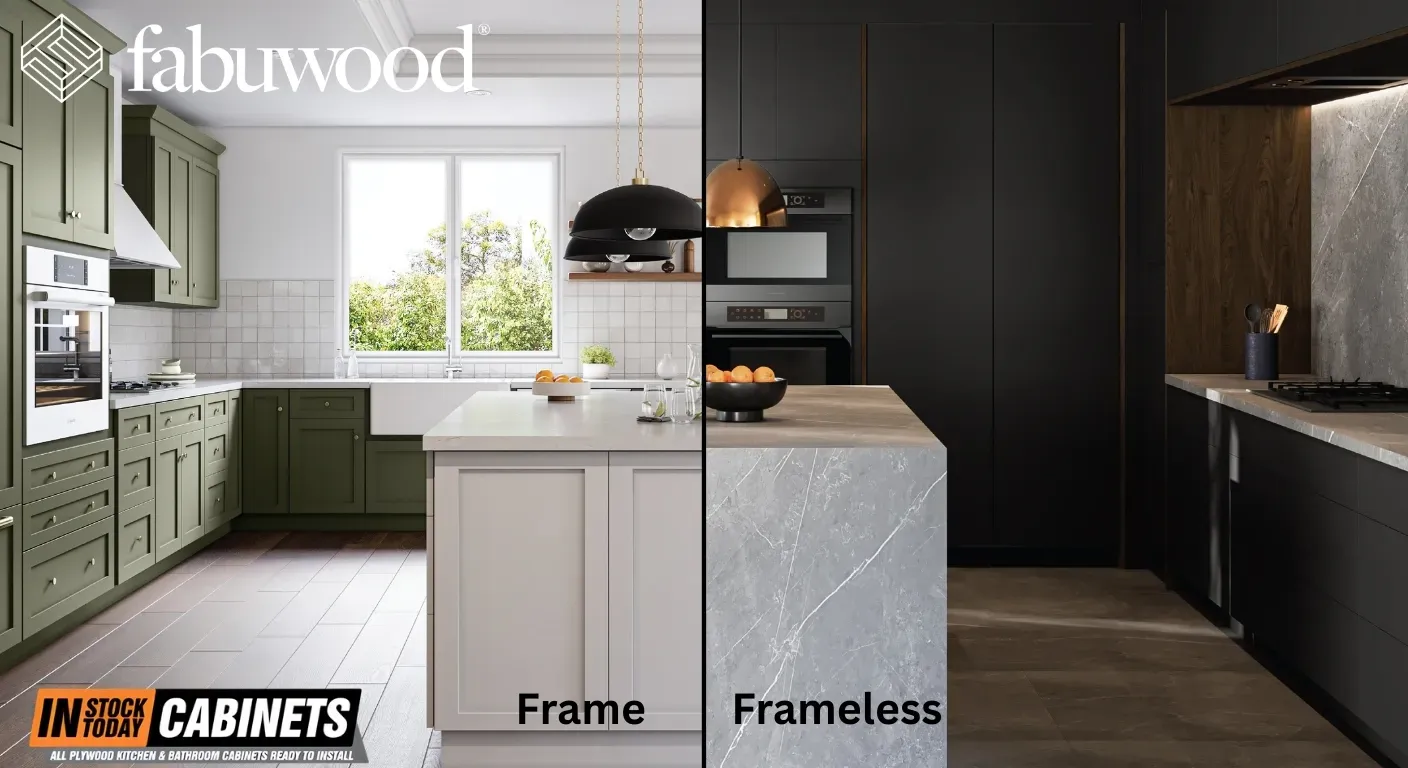
AWI grades establish hierarchy for specification writing
The Architectural Woodwork Institute’s three-grade system (ANSI/AWI 0641-2019) provides precise specifications that contractors can incorporate into project documents.
AWI Grade Specifications Comparison
| Specification | Premium Grade | Custom Grade | Economy Grade |
|---|---|---|---|
| Drawer Construction | Dovetail required | Melamine w/ 1/4″ dado bottom | Basic construction |
| Back Panels | 3/4″ minimum | 1/2″ minimum | 1/4″ minimum |
| Surface Repair Visibility | Indistinguishable at 24″ | Indistinguishable at 48″ | Visible acceptable |
| Shelf Edge Treatment | Laminate matching face | Color-matched PVC edgeband | Basic edge treatment |
| Grain Matching | Perfect match required | Reasonable match | No matching requirement |
| Gap Tolerances | Tightest (0.5mm typical) | Standard (1mm typical) | Relaxed (2mm+) |
| Typical Applications | High-end residential, hotels, boardrooms | Standard residential, commercial | Utility spaces, storage |
| QCP Licensing Eligible | Yes | Yes | No |
| Fabuwood Allure Alignment | Meets / Exceeds | Standard baseline | N/A |
Premium Grade represents the highest quality, appropriate for hotel lobbies, boardrooms, and high-end residential: drawer construction requires dovetail joinery; back panels must be full 3/4″ minimum; surface repairs must be indistinguishable at 24″; and all shelf edges require laminate matching face material. This grade demands perfect grain and color matching in veneers with the tightest gap tolerances.
Custom Grade serves as the default industry standard for most professional projects: drawer boxes may use melamine with 1/4″ dado bottoms; back panels require 1/2″ minimum; surface repairs must be indistinguishable at 48″; and edge treatment requires color-matched PVC edgeband. Most KCMA-certified products meet or exceed Custom Grade specifications.
Economy Grade applies only to utility applications not intended for public view—mechanical rooms and storage areas where minimum quality suffices. This grade permits 1/4″ backs, basic construction methods, and is not eligible for AWI Quality Certification Program (QCP) licensing.
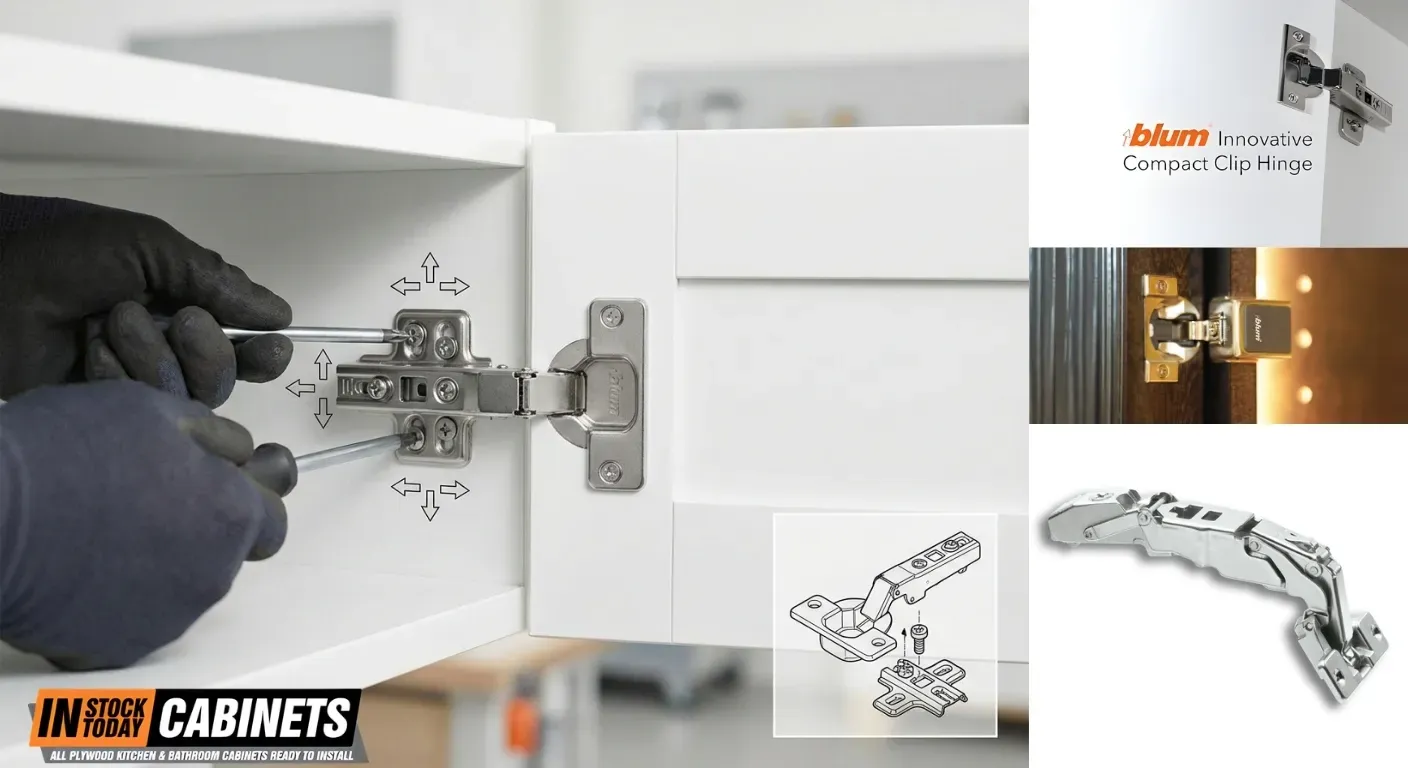
Hardware integration separates adequate from exceptional
Blum hardware has established itself as the professional benchmark—Fabuwood was the first cabinet company to utilize Blum clip-on hinges across an entire product line, signaling industry-wide acceptance of these specifications.
Premium Hardware Specifications
| Component | Specification | Key Feature | Durability Rating | Professional Value |
|---|---|---|---|---|
| Blum CLIP top BLUMOTION Hinge | 35mm bore, 45mm spacing | Integrated soft-close, 58 parts | 200,000 cycles | Tool-free mounting |
| Blum TANDEM Undermount Slide | 90–150 lb capacity | Full-extension + soft-close | 100,000 cycles | Concealed operation |
| Metal Shelf Clips | Standard 5mm pin | Superior to plastic | N/A | No breakage issues |
| Adjustable Leg Levelers | 4–6″ height range | Self-leveling base | N/A | Easier installation |
| Drawer Face Adjusters | 3/8″ increment precision | EZ Level system | N/A | Perfect alignment |
Blum CLIP top BLUMOTION hinges feature 35mm bore diameter, 45mm screw spacing, and integrated soft-close in the hinge cup that self-adjusts to door size and closing force. The 58 individual parts per hinge enable three-dimensional adjustment and tool-free door mounting via CLIP technology. Standard 110° opening angle accommodates most applications, with specialized models available from 95° to 170° for blind corners and wide-angle requirements. Durability testing: 200,000 opening/closing cycles, simulating 20+ years of daily kitchen use.
Blum TANDEM undermount drawer slides deliver 90-150 lb load capacity with concealed mounting—runners remain invisible during operation. Full-extension capability with integrated BLUMOTION soft-close has become the expected standard rather than a premium upgrade. The 100,000-cycle durability rating ensures mechanical longevity matching cabinet structure lifespan. For contractors, specifying Blum or equivalent-quality hardware demonstrates professional standards that clients recognize.
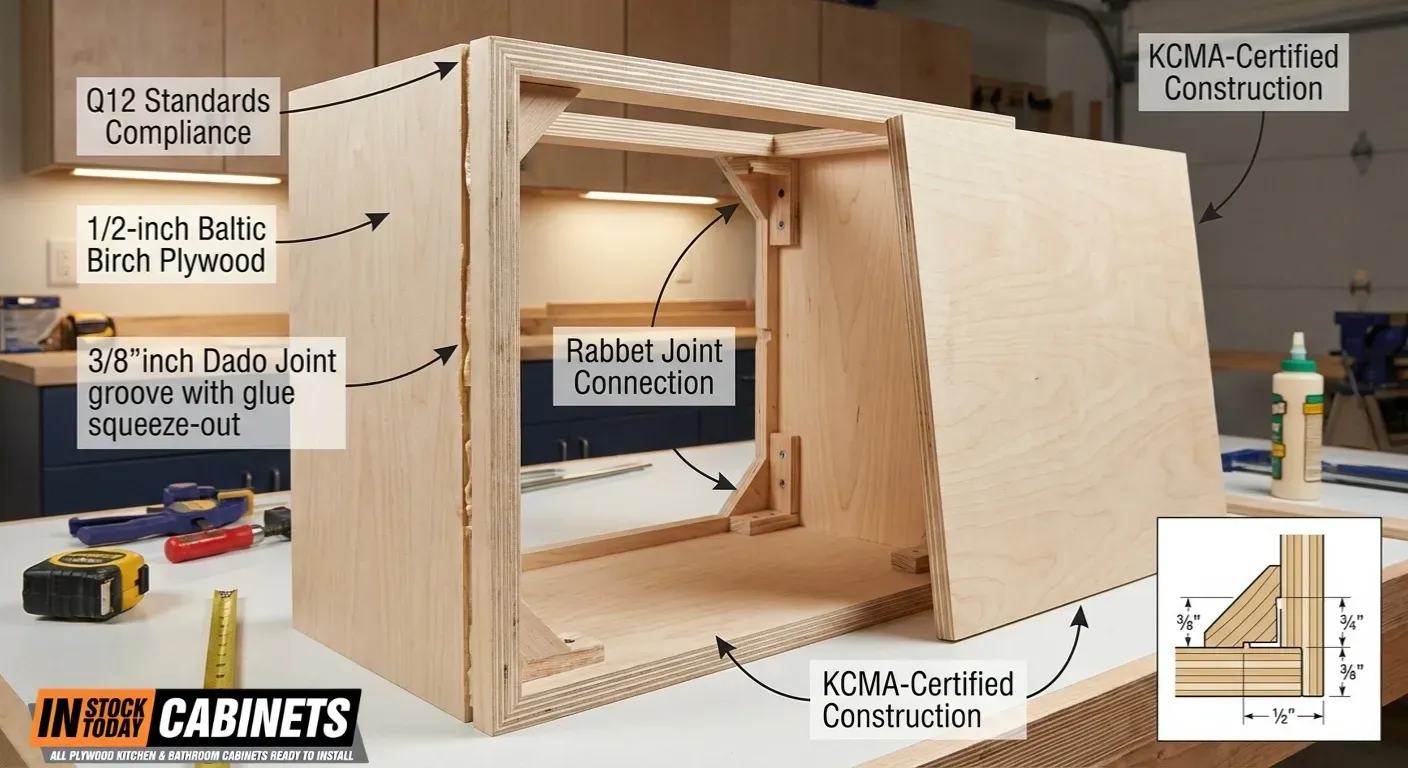
Material selection determines finish quality and longevity
Wood species and panel selection significantly impact both appearance and durability. Professional recommendations align material choices with intended finish and use case.
Wood Species Comparison for Shaker Cabinets
| Species | Janka Hardness | Grain Pattern | Best Finish | Workability | Stability | Price Point |
|---|---|---|---|---|---|---|
| Maple (Hard) | 1450 | Tight, uniform | Paint | Good | Excellent | $$$ |
| Maple (Soft) | 950 | Tight, uniform | Paint | Very Good | Excellent | $$ |
| Cherry | 950 | Prominent, rich | Stain / Natural | Good | Good | $$$$ |
| Oak (Red) | 1290 | Open, pronounced | Stain | Moderate | Good | $$ |
| Oak (White) | 1360 | Open, pronounced | Stain | Moderate | Excellent | $$$ |
| Hickory | 1820 | Dramatic variation | Stain / Natural | Moderate | Good | $$$ |
| Poplar | 540 | Minimal grain | Paint | Excellent | Good | $ |
| Alder | 590 | Subtle grain | Paint / Stain | Excellent | Good | $$ |
Maple offers excellent paint acceptance with uniform grain and minimal variation—ideal for painted Shaker cabinets. Janka hardness rating of 1450 exceeds cherry (950) and most domestic species, providing superior dent resistance. Soft maple provides similar appearance at lower cost, though slightly reduced hardness. For natural or stained finishes, maple’s light color can darken with age.
Cherry develops distinctive patina over time and features prominent, rich grain patterns. Premium pricing reflects both material cost and working characteristics—typically reserved for stained applications rather than paint. Cherry accepts dark stains exceptionally well but works less uniformly than maple for lighter finishes.
Plywood Specifications for Cabinet Construction
| Component | Standard Thickness | Premium Upgrade | Material Type | Core Construction |
|---|---|---|---|---|
| Cabinet Sides | 1/2″ (min) | 3/4″ | Hardwood plywood | Veneer core or combo |
| Cabinet Back | 1/4″ (economy) | 1/2″ – 3/4″ | Hardwood plywood | Veneer core |
| Cabinet Bottom | 1/2″ | 3/4″ | Hardwood plywood | Veneer core |
| Door Panels | 1/4″ | 3/8″ | Hardwood plywood or MDF | N/A |
| Drawer Bottoms | 1/4″ (min) | 3/8″ – 1/2″ | Hardwood plywood | Veneer core |
| Shelves (Fixed) | 3/4″ | 3/4″ | Hardwood plywood | Veneer core |
| Fabuwood Standard | 1/2″ back, 3/4″ sides | Full 1/2″ back (one-piece) | Grade-A hardwood plywood | Cross-laminated |
Plywood specifications matter more than many realize: cabinet boxes, doors, and shelves require 3/4″ thickness; backs need 1/2″ minimum (3/4″ for Premium Grade); and drawer sides typically use 1/2″ to 5/8″ material. Baltic birch plywood offers more plies than domestic alternatives, providing superior screw-holding and void-free construction—though metric sizing (18mm ≠ 3/4″) requires consideration when cutting dados. All materials should meet CARB Phase 2 / TSCA Title VI standards for formaldehyde emissions.
🌲 Material Questions? IST Cabinets’ technical team helps contractors select optimal wood species and panel specifications for every project requirement and budget. Schedule a consultation →
Frequently Asked Questions for Joinery Techniques in Shaker Cabinet Construction
General Joinery Questions
What’s the strongest joinery method for Shaker cabinet doors?
Mortise-and-tenon joints provide the strongest connection for Shaker door frames, offering superior resistance to racking forces compared to dowels or pocket screws. When properly executed with 1/4″ tenons (for 3/4″ material) and adequate glue surface, mortise-and-tenon joints can withstand decades of door operation without loosening. Fabuwood’s Allure series uses precision-machined mortise-and-tenon construction as standard, ensuring door frames maintain structural integrity through 200,000+ opening cycles. For contractors building custom doors, draw-bored mortise-and-tenon joints (using offset wooden pegs) create mechanical locks that don’t rely solely on adhesive and actually strengthen over time as wood fibers compress.
Are dovetail drawer boxes worth the extra cost?
Absolutely—for long-term value and client satisfaction, dovetail construction delivers measurable advantages. Testing shows dovetailed solid wood drawer boxes (like Fabuwood’s 5/8″ hardwood standard) support 100+ pound loads through 100,000+ operational cycles without joint failure. Compare this to stapled construction which typically fails between 50-75 pounds or shows joint separation after 25,000 cycles. The mechanical interlocking of dovetails means even if adhesive degrades over time, the joint geometry continues providing structural support. For contractors, dovetails reduce callback risk and serve as a visible quality indicator clients recognize—when they open a drawer and see dovetail craftsmanship, it reinforces their investment in premium cabinetry. The cost differential versus dowel construction typically runs 15-25%, but the longevity and perceived value far exceed this premium.
Can I use pocket screws for professional cabinet construction?
A: Yes, when used strategically and correctly. Pocket screws excel for face frame assembly, cabinet stretchers, and applications where holes can be concealed on interior surfaces. The critical requirements: always combine pocket screws with wood glue (screws provide clamping pressure while glue creates permanent bonds), use correct screw length for material thickness (1-1/4″ screws for 3/4″ stock), and space holes appropriately (6-8″ intervals with minimum two per joint). Where pocket screws fall short: primary structural joints under tension, visible surfaces requiring plugs, and applications where traditional joinery better serves the aesthetic (door frames should use mortise-and-tenon rather than pocket screws). Many professional cabinet makers use pocket screws extensively for face frames—positioned on the backside where invisible—achieving tight, flush joints faster than traditional methods while maintaining commercial-grade strength when properly glued.
Fabuwood-Specific Questions
What makes Fabuwood’s joinery different from other cabinet manufacturers?
Fabuwood’s Q12 Quality System standardizes construction methods typically offered as premium upgrades by competitors.
Key differentiators include:
(1) Dovetail drawer construction standard across all price points rather than reserved for luxury lines;
(2) Full 1/2″ solid plywood backs (one-piece, not stapled sections) providing superior racking resistance;
(3) Threespine® Click Technology in frameless Illume series creating tool-less assembly with mechanical interlocks;
(4) All-plywood box construction—sides, tops, bottoms—eliminating particle board common in competing mid-range products;
(5) Blum hardware integration throughout (not mixed-quality components), and
(6) KCMA certification validating 25,000-cycle durability claims through independent testing.
Industry analysis shows Fabuwood delivers AWI Custom Grade specifications at approximately 30% below comparable semi-custom brands when competitors’ plywood upgrades are factored. For contractors, this means specifying premium construction without premium pricing.
How does Fabuwood’s Q12 system compare to KCMA certification?
Q12 represents Fabuwood’s internal quality standards while KCMA provides independent third-party validation—they complement rather than compete. Q12 establishes specific construction specifications (dovetail joints, 1/2″ backs, Blum hardware, etc.) that define what Fabuwood builds into every cabinet. KCMA certification validates that these constructions perform under standardized testing: 25,000 door/drawer cycles, 600-pound wall cabinet loading, chemical resistance, and impact durability.
Think of Q12 as the manufacturing blueprint and KCMA as the independent audit confirming performance. Contractors benefit from both: Q12 specifications provide talking points for client discussions (explaining visible quality features), while KCMA certification offers documented proof that construction methods deliver measurable durability. When specifying cabinets, look for manufacturers offering both proprietary quality systems AND third-party validation—this combination indicates construction claims backed by verifiable testing rather than marketing assertions.
Does IST Cabinets offer contractor pricing on Fabuwood products?
Yes—IST Cabinets provides specialized contractor pricing, dealer programs, and professional loyalty benefits for qualified trade professionals. The Professional Loyalty Program includes volume-based pricing tiers, priority order processing, dedicated technical support, and access to Fabuwood’s complete product line including Allure (face frame) and Illume (frameless) series. Additional benefits include project planning assistance, specification writing support, and expedited delivery for time-sensitive installations. Contractors serving Virginia and the Mid-Atlantic region particularly benefit from IST Cabinets’ regional inventory positioning, reducing lead times compared to national distributors. To qualify, professionals typically need to provide contractor license verification, business insurance documentation, and complete a brief application. Learn more about professional membership benefits and pricing tiers at istcabinets.com.
Technical Specification Questions
What thickness plywood should I specify for quality cabinets?
Follow AWI specifications aligned with project grade: Custom Grade (standard residential): 1/2″ sides minimum, 1/2″ backs, 3/4″ shelves and bottoms; Premium Grade (high-end residential/commercial): 3/4″ sides, 3/4″ backs, 3/4″ shelves and bottoms. Economy cabinets using 1/4″ backs and 1/2″ sides with particleboard represent substandard construction unsuitable for professional installations. Fabuwood exceeds Custom Grade baseline with 1/2″ sides and full 1/2″ one-piece backs (not stapled sections) as standard, with 3/4″ upgrades available. The performance difference is measurable: testing shows 1/2″ backs reduce racking (twisting) by approximately 40% versus 1/4″ alternatives, while 3/4″ sides improve screw-holding by 60% compared to 1/2″ material. For drawer boxes, specify 1/2″ minimum sides (5/8″ optimal) with 1/4″ to 3/8″ bottoms captured in dados rather than stapled. All plywood should meet CARB Phase 2 formaldehyde emissions standards.
How do I evaluate cabinet joinery during a job site inspection?
Use this systematic approach:
(1) Drawer Inspection: Pull drawers completely—examine corner joints for dovetails (premium), dowels (acceptable), or staples (economy). Check bottom panel attachment: dadoed grooves indicate quality, stapled bottoms suggest cost-cutting. Test slides for smooth full-extension and soft-close operation.
(2) Door Frame Check: Open doors fully and examine frame corners where rails meet stiles. Tight, seamless joints indicate mortise-and-tenon or quality dowel construction; visible gaps or misalignment suggest inferior joinery. Feel corner edges—they should be flush without height differences.
(3) Cabinet Box Assessment: Look inside cabinets for back panel thickness (1/2″ minimum for quality), corner reinforcement (braces, blocks, or interlocking joints versus simple butt joints), and shelf support method (dado grooves better than plastic clips alone).
(4) Hardware Evaluation: Test hinges for smooth, quiet closing with integrated soft-close—cheap hinges slam or create noise. Check for brand markings (Blum indicates quality hardware).
(5) Material Verification: Examine cut edges to distinguish plywood (layered construction) from particle board (compressed chips). Quality cabinets use plywood for structural components.
What’s the difference between face frame and frameless construction quality?
Neither construction style is inherently superior—both can achieve excellent quality with proper execution, though they suit different applications.
Face frame construction (American traditional) adds structural rigidity through the front frame, simplifies installation with easier shimming, and provides traditional aesthetics. Quality face frame cabinets feature 3/4″ thick solid wood frames (1-1/2″ wide minimum) attached with dowels and glue to plywood boxes. The frame-to-box joint quality matters significantly—premium construction uses multiple dowels or biscuits with glue clamping, while economy approaches may use only staples or minimal fasteners.
Frameless construction (European/32mm system) maximizes interior space (approximately 1″ more depth), enables wider drawers, and delivers contemporary aesthetics. Quality depends on box construction strength since no front frame provides reinforcement—require 1/2″ minimum sides (3/4″ optimal), full backs, and corner interlocking or substantial bracing. Fabuwood’s Illume frameless series uses Threespine® Click Technology creating rigid mechanical joints without fasteners. For contractors: face frame suits traditional designs and forgiving installation conditions; frameless offers modern aesthetics and space efficiency but demands precision installation and robust box construction.
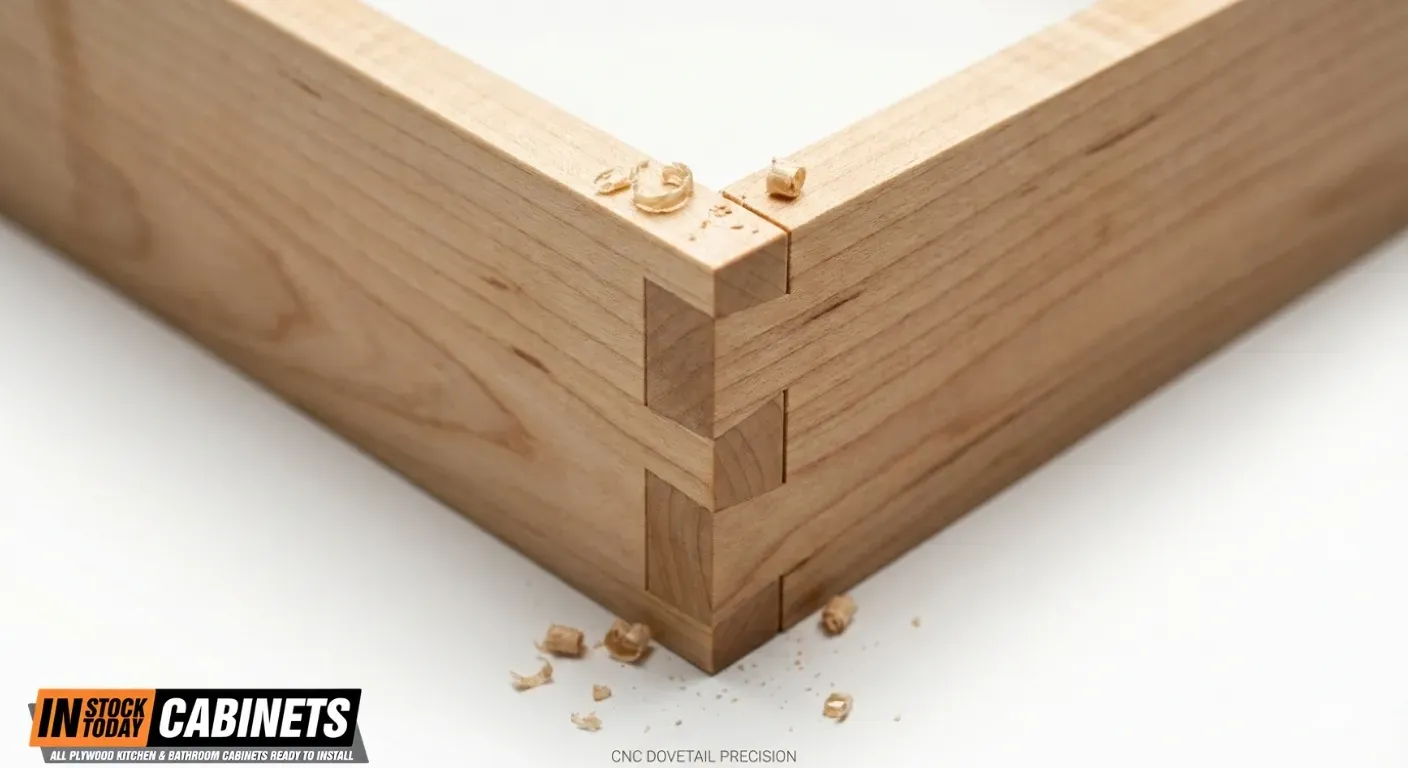
Installation & Hardware Questions
Why does Blum hardware cost more than alternatives?
A: Blum’s premium pricing reflects measurable performance advantages and long-term value:
(1) Durability Testing: Blum CLIP top hinges test to 200,000 cycles versus 50,000-100,000 for economy alternatives; TANDEM slides test to 100,000 cycles at 90-150 lb capacity while basic slides often fail under 75 pounds after 25,000 cycles.
(2) Integrated Soft-Close: Blum BLUMOTION self-adjusts to door/drawer weight and closing force, requiring no adjustment—cheap add-on soft-close mechanisms require calibration and often fail early.
(3) Tool-Free Adjustment: CLIP technology enables hinge mounting without screwdrivers; six-way adjustment compensates for out-of-plumb walls without replacement. Economy hinges typically offer limited adjustment requiring complete remounting.
(4) Warranty & Support: Blum offers extensive technical documentation, replacement parts availability, and responsive contractor support.
(5) Client Perception: Homeowners increasingly recognize Blum branding as quality indicator—just as they know premium appliance brands. For contractors, the 20-30% price premium over generic hardware translates to fewer callbacks, easier installation, and enhanced perceived project value. Calculate total cost including installation time and callback risk—Blum often proves economical long-term.
How do I properly adjust cabinet doors with Blum hinges?
Blum CLIP top hinges offer three-dimensional adjustment addressing common door issues:
(1) Height Adjustment (Vertical): Loosen mounting plate screws (2-3 on cabinet interior), shift door up or down, retighten. Typical range: ±2-3mm. Use for aligning door tops/bottoms with adjacent doors or drawer fronts.
(2) Lateral Adjustment (Side-to-Side): Use screws on hinge arm (visible when door open) to shift door left or right. Typical range: ±2-3mm. Use for centering doors in cabinet opening or adjusting reveals between adjacent doors.
(3) Depth Adjustment (In-and-Out): Turn adjustment screw at back of hinge arm (near door) to move door toward or away from cabinet face. Typical range: -2mm to +4mm. Use for flush alignment with face frame or adjacent cabinet doors.
Pro tip: Make incremental 1/8-turn adjustments and test operation—overcorrection requires reversal. For doors spanning multiple hinges, adjust all hinges equally to prevent binding. If adjustments reach maximum range without achieving proper fit, verify cabinet installation is plumb and level—hinge adjustment compensates for minor irregularities but cannot correct major installation issues.
Q: What drawer slide specifications should I require for quality installations?
A: Specify these minimum standards for professional installations:
(1) Load Capacity: 90-100 lbs for standard drawers, 100-150 lbs for heavy-use applications (pots/pans, dishes). Economy slides rated below 75 lbs are unsuitable for kitchen cabinets.
(2) Extension: Full-extension capability (drawer box extends completely beyond cabinet face) is now expected standard—3/4 extension slides indicate economy construction.
(3) Soft-Close Integration: Integrated soft-close mechanisms (like Blum BLUMOTION) self-adjust and require no maintenance—prefer these over add-on dampers requiring periodic adjustment.
(4) Mounting Style: Undermount slides (attached to drawer bottom) provide clean appearance and maximize drawer interior width; side-mount slides consume interior space but cost less.
(5) Cycle Rating: Minimum 50,000 cycles; 100,000+ cycles for premium installations.
(6) Installation Tolerance: Quality slides tolerate slight misalignment (±1mm); cheap alternatives bind if not perfectly positioned.
(7) Brand Verification: Blum TANDEM, Salice, Grass, Hettich represent quality manufacturers with documented specifications—generic unbranded slides lack verifiable performance data. For contractors, undermount full-extension soft-close slides rated 100 lbs with 100,000-cycle durability represent the current professional baseline—anything less positions the project as economy-grade.
Joinery Methods: When to Specify Each Type
| Application | First Choice | Alternative | Avoid |
|---|---|---|---|
| Door Frame Corners | Mortise & Tenon | Dowels (3+ per joint) | Pocket screws, staples |
| Drawer Box Corners | Dovetail | Dowels (quality glue) | Staples, butt joints |
| Face Frame Assembly | Dowels or Pocket Screws + Glue | Mortise & Tenon | Staples alone |
| Cabinet Box Shelves | Dado + Rabbet | Dado alone | Butt joints with brackets |
| Cabinet Box Corners | Dado + Corner Blocks | Rabbet joints | Simple butt joints |
| Mid-Panel Connections | Floating Tenon (Domino) | Dowels | Pocket screws |
Conclusion: Building Lasting Value Through Superior Joinery
Mastering joinery techniques in Shaker cabinet construction requires understanding the interconnection between traditional craftsmanship principles, modern manufacturing technology, and industry certification standards. The specifications detailed throughout this guide—from Fabuwood’s Q12 system requiring dovetail construction and 1/2″ solid plywood backs to KCMA’s 25,000-cycle durability testing and AWI’s three-grade specification hierarchy—provide the technical foundation for informed evaluation and specification.
The key insight for contractors and dealers: quality claims become verifiable through certification compliance, material specifications, and hardware selection. Blum hardware rated for 200,000 cycles, KCMA-certified structural testing, and AWI-compliant joinery methods translate manufacturer marketing into measurable standards. When discussing cabinet quality with clients, these specifications provide authoritative responses that build trust and demonstrate expertise.
For professionals serving the Virginia and Mid-Atlantic region, understanding these construction fundamentals enables confident recommendations that match client budgets with appropriate quality levels—from Custom Grade specifications suitable for most residential projects to Premium Grade requirements for high-end applications demanding the finest materials and craftsmanship.
Partner With IST Cabinets for Your Next Project
IST Cabinets proudly serves contractors, dealers, and builders throughout Virginia and the Mid-Atlantic region with:
🏆 Exclusive Fabuwood Partnership: Complete access to Q12-certified Allure and Illume series with full technical support
💰 Professional Loyalty Program: Volume-based pricing, priority order processing, and dedicated account management
📐 Technical Assistance: Specification writing support, material selection guidance, and installation consultation
⚡ Regional Advantage: Local inventory positioning for faster delivery and reduced lead times
🛠️ Trade-Focused Service: We understand contractor timelines, job site requirements, and builder expectations
Ready to elevate your next cabinetry project?
- Explore Fabuwood’s Q12-Certified Collection → View Products
- Join Our Professional Loyalty Program → Learn More
- Request Project Quote & Specifications → Contact Us
- Download Free Pricing Guide → Get Catalog
IST Cabinets | Professional Cabinetry Solutions Serving Virginia & the Mid-Atlantic Region 📞 Contact Us Today | 🌐 istcabinets.com
Quality joinery isn’t just about construction—it’s about delivering projects that enhance your reputation and keep clients satisfied for decades. Let’s build something exceptional together.
In Stock Today Cabinets LLC Launches IST Loyalty Rewards Program to Support Delaware Contractors Amid Market Shifts

835 Pulaski Hwy, Bear, DE – December 24, 2025
In Stock Today Cabinets LLC, a Delaware-based cabinet supplier with locations across the Mid-Atlantic region, has introduced the IST Loyalty Rewards Program designed to help contractors navigate the changing Delaware housing market while addressing ongoing labor shortages. The program offers contractors a 2 percent rebate on purchases, providing financial relief as the state’s real estate market transitions from a seller’s market to a more balanced environment.
According to recent market reports from Bright MLS and Delaware Beaches Online, Delaware active listings have surged 27.3 percent year-over-year in coastal regions, while days on market have increased by nearly two weeks. As inventory expands and buyers gain leverage, the demand for high-quality, move-in ready renovations is becoming a key differentiator for property sales. With median home prices stabilizing around $420,000 to $425,000, up just one percent year-over-year according to Redfin and Zillow data, the frenzy of previous years has cooled. Homeowners and investors are now focused on value-added updates to make properties stand out in a more crowded market.
Despite the cooling housing market, the labor market remains critically tight. Delaware currently has a Worker Shortage Index of 0.63, according to the U.S. Chamber of Commerce, meaning there are only 63 available workers for every 100 open jobs. For local contractors, this scarcity makes it difficult to scale up crews to meet the renovation demand for Kitchen Cabinets and other essential home improvements.
The IST Loyalty Rewards Program acts as a force multiplier for Delaware contractors by streamlining material supply and providing financial rebates. The program helps existing crews operate more efficiently, effectively bypassing the labor bottleneck. Contractors earn two points for every dollar spent, and once they accumulate 10,000 points, they automatically receive a $100 discount. The program works at all IST locations throughout Alexandria, Virginia; Fairfax, Virginia; Columbia, Maryland; Houston, Texas; and Delaware.
As the Delaware housing market shifts to favor buyers, contractors need every advantage to deliver quality renovations efficiently,” said Emin Halac, President of In Stock Today Cabinets LLC. “Our loyalty program provides immediate financial benefits while ensuring contractors have reliable access to wholesale cabinets and premium materials. The two percent margin recovery allows contractors to remain competitive on pricing while protecting their profitability against rising overhead.”
The Bear, Delaware showroom, located at 835 Pulaski Highway, serves as a central supply hub for New Castle County and the surrounding region. Same-day pickup options ensure that projects in Wilmington, Newark, and the growing coastal communities are not stalled by supply chain delays. The facility stocks an extensive selection of ready-to-install and ready-to-assemble cabinet options, including popular Shaker styles in blue, grey, and white, as well as Allure, Quest, and Value Premium lines.
In Stock Today Cabinets LLC specializes in providing high-quality kitchen and bathroom cabinetry as an authorized distributor of Fabuwood and FIBO products. The company offers free design and estimate services, fast delivery across Delaware and nearby regions, and special contractor, builder, and dealer pricing. All cabinets feature premium all-plywood construction with lifetime limited warranties on Fabuwood products.
###
For more information about In Stock Today Cabinets LLC, contact the company here:
IST Cabinets Delaware
Emin Halac
(302) 321-1771
delaware@istcabinets.com
835 Pulaski Hwy, Bear, DE 19701, United States
In Stock Today Cabinets LLC Enhances IST Loyalty Program for Construction Professionals
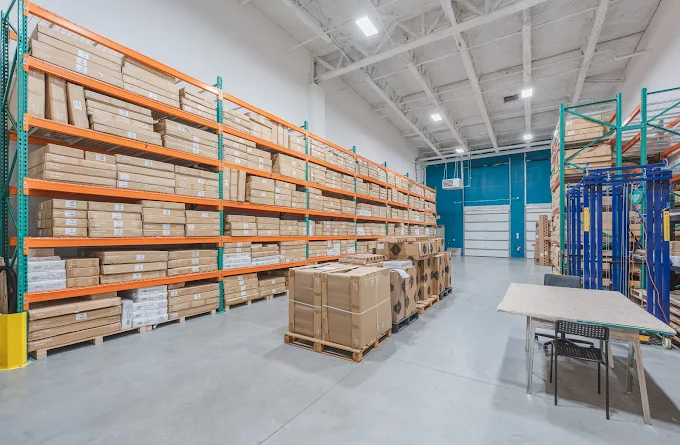
Columbia, MD – December 22, 2025
In Stock Today Cabinets LLC has enhanced its IST Loyalty Rewards Program to better serve construction professionals navigating Maryland’s expanding revitalization projects and rising material costs. The program provides automatic rebates of $100 for every $5,000 in purchases, delivering immediate cost relief to contractors, builders, and dealers working across the Baltimore-Columbia corridor.
The program enhancement aligns with heightened construction activity throughout Maryland. Governor Wes Moore announced $69.5 million in awards for 226 revitalization projects on December 17, 2025, with an additional $2.2 billion designated for transportation and infrastructure improvements. However, contractors face significant labor constraints; the Associated Builders and Contractors project a need for 439,000 new workers nationwide in 2025, and in Maryland, immigrant labor comprises over a third of the construction workforce.
The enhanced program became effective on December 16, 2025, allowing contractors to begin earning rebates immediately and positioning the program for a full year of operations starting in January 2026.
The program operates through automatic point tracking, with customers earning two points for every dollar spent on wholesale cabinets and other products. Once 10,000 points accumulate, the $100 discount applies directly to future orders. The system tracks rewards by phone or email, requiring no membership fees or complex redemption processes.
The IST Loyalty Rewards Program represents more than just financial savings for our professional customers,” said Emin Halac, President of In Stock Today Cabinets LLC. With the current labor shortage and increased project demands from state revitalization efforts, contractors need every operational advantage they can get. The IST Loyalty Rewards Program provides a guaranteed 2% rebate on qualifying purchases, calculated automatically through our point-tracking system: customers earn two points per dollar spent, and every 10,000 points—representing $5,000 in purchases—generates a $100 credit applied to future orders.”
The Columbia showroom, located at 9315 Snowden River Parkway, serves as a strategic distribution hub in the Baltimore-Washington corridor. This central location enables rapid material deployment, allowing contractors to service both suburban residential projects and urban revitalization work without supply chain delays. The facility maintains an extensive inventory of Fabuwood and FIBO brand cabinets, with most items available for same-day pickup.
In Howard County, where median home values have held steady at approximately $628,000, homeowners are increasingly investing in renovations rather than relocating. The kitchen cabinets loyalty rewards feature particularly benefits professionals handling multiple residential renovation projects simultaneously.
In Stock Today Cabinets LLC operates as an authorized distributor of Fabuwood and FIBO cabinet products throughout the Mid-Atlantic region, with locations in Alexandria, Fairfax, Columbia, Houston, and Delaware. The company offers ready-to-assemble and pre-assembled all-plywood cabinet solutions, along with design and estimating services for construction professionals.
###
For more information about In Stock Today Cabinets LLC, contact the company here:
IST Cabinets Columbia MD
Emin Halac
410-429-1414
columbia@istcabinets.com
9315 Snowden River Pkwy Suite E, Columbia, MD 21046
In Stock Today Cabinets Launches IST Loyalty Rewards Program for Construction Professionals Amid Labor Shortage Crisis

Fairfax, VA – December 19, 2025
In Stock Today Cabinets has introduced a strategic margin-protection initiative designed to help contractors, dealers, and builders navigate the dual challenges of surging renovation demand and severe workforce shortages affecting the construction industry.
The IST Loyalty Rewards Program provides automatic rebates of $100 for every $5,000 in purchases, delivering a 2% margin recovery that directly addresses rising operational costs. The program launch comes as Northern Virginia experiences a 42.2% year-over-year increase in active housing listings according to the Northern Virginia Association of Realtors October 2025 Market Report, creating unprecedented renovation opportunities for local builders.
With the median sold price in Fairfax County holding steady at $745,000 based on NVAR data, homeowners are increasingly choosing to renovate rather than relocate, driving demand for high-end kitchen and bath remodels. This surge in renovation projects coincides with critical labor challenges, as the Associated Builders and Contractors reports the industry needs to attract over 439,000 new workers in 2025 to meet demand.
As ABC Chief Economist Anirban Basu noted regarding recent forecasts, ‘The industry still must attract hundreds of thousands of new workers to balance demand and supply,’ underscoring the urgency for efficiency in procurement.
“The construction industry faces a perfect storm of opportunity and challenge,” said Emin Halac, President of IST Cabinets. “While renovation demand has never been stronger, the labor shortage forces contractors to find efficiency gains wherever possible. Our wholesale cabinets rewards program provides immediate margin relief while streamlining the procurement process through same-day pickup at our showrooms.”
The program operates through automatic point tracking, with participants earning 2 points for every dollar spent on wholesale cabinets and other products. Once customers accumulate 10,000 points, they automatically receive a $100 discount applied directly to future orders. The system tracks rewards via phone or email, requiring no membership fees or complex registration processes.
Available immediately at all In Stock Today Cabinets locations including Alexandria, Fairfax, Columbia, Houston, and Delaware, the kitchen cabinets rewards program extends across the company’s full inventory of Fabuwood and FIBO cabinetry lines. Participants can select from popular styles such as Shaker Blue, Shaker Grey, Shaker White, and collections including Allure, Quest, and Value Premium. Please note: The IST Loyalty Rewards Program excludes the Fabuwood Illume and Ovela series.
The timing of this initiative reflects broader market dynamics affecting the construction sector. As contractors face the dual pressure of meeting increased demand while managing workforce constraints, efficiency tools become essential for maintaining profitability. The ability to access ready-to-ship cabinets with same-day pickup at local showrooms addresses the time constraints that labor shortages create.
In Stock Today Cabinets specializes in providing all-plywood kitchen and bathroom cabinetry solutions for construction professionals throughout the Mid-Atlantic region and beyond. As an authorized distributor for Fabuwood and FIBO brands, the company maintains extensive in-stock inventory across multiple showroom locations, offering both ready-to-assemble and pre-assembled cabinet options. The company provides comprehensive design consultation services, detailed project quotes, and specialized contractor pricing to support construction professionals in delivering quality renovation projects efficiently.
###
For more information about In Stock Today Cabinets , contact the company here:
In Stock Today Cabinets (IST Cabinets)
Emin Halac
(703) 972-4030
info@istcabinets.com
2817 Dorr Ave Unit B, Fairfax, VA 22031
In Stock Today Cabinets LLC Launches IST Loyalty Rewards Program for Construction Professionals

ALEXANDRIA, VA – December 15, 2025
In Stock Today Cabinets LLC announced the launch of its IST Loyalty Rewards Program designed to help contractors, dealers, builders and designers manage rising material costs while capitalizing on the Mid-Atlantic region’s construction boom. Contractors receive automatic rebates of $100 for every $5,000 in purchases, translating to a 2% margin boost that helps offset rising material costs.
The timing of the program responds to significant market dynamics affecting the construction industry. Northern Virginia experienced a 42.2% year-over-year increase in active housing units as of October 2025, with 2,562 properties available and median prices reaching $745,000 in Fairfax County. This inventory surge creates substantial opportunities for kitchen and bathroom renovations, but contractors face pressure from both material costs and severe labor shortages.
“The construction industry needs over 439,000 new workers nationally in 2025, and our Mid-Atlantic contractors are feeling this shortage acutely,” said Emin Halac, President of In Stock Today Cabinets LLC. “Our loyalty program addresses this challenge by helping existing crews work more efficiently. With same-day design consultations and 5-7 day delivery on our kitchen cabinets, contractors can complete more projects without expanding their workforce.”
The IST Loyalty Rewards Program operates through automatic point tracking, eliminating administrative overhead for busy contractors. Points accumulate with each purchase of wholesale cabinets and other products, with rewards applied directly to future orders. The program extends across all In Stock Today Cabinets locations in Alexandria, Fairfax, Columbia, Houston and Delaware.

Maryland’s infrastructure investments further amplify the need for efficient cabinet supply solutions. The state received $218 million in federal funding for infrastructure projects, while maintaining its C grade from the American Society of Civil Engineers, indicating sustained construction activity ahead. Additionally, the Washington Metropolitan Area Transit Authority’s multi-billion dollar expansion plans are driving demand for transit-oriented housing developments throughout the region.
The program particularly benefits contractors working on the growing number of home renovations as homeowners choose to upgrade rather than relocate in the high-priced market. With median home prices ranging from $535,000 to $745,000 across Northern Virginia, kitchen remodeling has become an attractive alternative to purchasing new properties.
In Stock Today Cabinets LLC specializes in providing high-quality cabinetry solutions as an authorized distributor of Fabuwood and FIBO brands. The company offers ready-to-assemble and pre-assembled cabinet options, with popular styles including Shaker Blue, Shaker Grey, Shaker White, Allure, Quest and Value Premium lines. All Fabuwood products carry a lifetime limited warranty, demonstrating the company’s commitment to quality and durability. The company maintains showrooms and warehouses strategically located throughout the Mid-Atlantic region, enabling same-day pickup and rapid delivery services for construction professionals.
For more information about In Stock Today Cabinets LLC, contact the company here:
IST Cabinets
Emin Halac
703 259-9030
info@istcabinets.com
5731 General Washington Dr, Alexandria, VA 22312
Common Pitfalls in Shaker Cabinet Finishing and How to Avoid Them
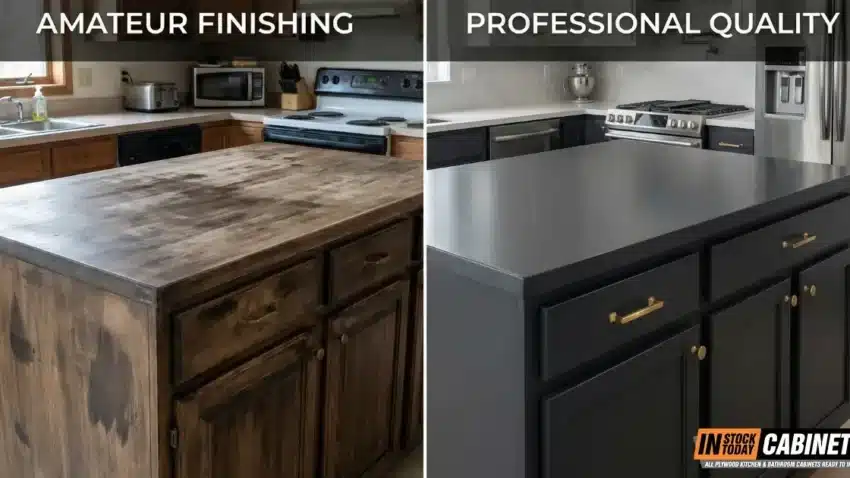
Cabinet finishing represents one of the most critical phases in any kitchen remodeling project, yet it remains the stage where costly mistakes most frequently occur. Professional cabinet refinishers report that 35% of finishing failures stem from poor surface preparation alone, while environmental control issues, incorrect product selection, and rushed curing times account for the majority of remaining problems. For contractors, dealers, and builders working with Shaker-style cabinets, understanding these pitfalls becomes especially crucial since the clean lines and minimalist design make any finishing imperfection immediately visible.
With industry data revealing that rework typically accounts for 12% of total project costs (with some estimates reaching 30%) and up to 80% of coating failures traced to inadequate surface preparation, mastering shaker cabinet finishing isn’t optional—it’s essential for profitability and reputation protection. This comprehensive guide addresses the specific challenges professional finishers face when working with shaker-style cabinetry, from substrate selection through final quality inspection.
Professional cabinet finishing remains the most critical yet mistake-prone phase in kitchen remodeling, with 80% of coating failures traced to inadequate surface preparation, 35% of all finishing failures stemming from poor surface prep alone, and rework averaging 12% of total project costs (sometimes reaching 30%).
For Shaker-style cabinets—where minimalist design makes every imperfection visible—avoiding common pitfalls is essential: maintain 65-75°F temperature and 40-60% humidity during application, limit conversion varnish to a maximum 5 mil total film build, allow 2-4 weeks for full cure (not hours), use specialized techniques for inside corners through the “box coating” method, inspect quality under 100+ foot-candle intensity lighting at 5000-6000K color temperature, and implement professional workflows that cost 15-20% more upfront but save 300-500% in total project costs by eliminating costly callbacks that reduce annual profit by 28%.
By prioritizing proper product selection, substrate-specific treatment, environmental control, and systematic quality checkpoints, finishers transform Shaker cabinet finishing from a liability into a profit-building strength.
Key Takeaways for Common Pitfalls in Shaker Cabinet Finishing and How to Avoid Them
Surface preparation determines 80% of finish success.
Thorough degreasing with commercial-grade products, proper sanding grit progression, and complete dust removal are non-negotiable. Skipping preparation steps is the leading cause of finishing failures.
Environmental control is critical for catalyzed finishes.
Maintain 65-75°F temperature and 40-60% humidity throughout application and cure. Conversion varnish applied below 65°F will never achieve proper hardness, regardless of how long it cures.
Shaker cabinet inside corners require specialized technique.
Use the “box coating” method: spray inside edges first with reduced settings, allow to tack, then complete outer surfaces. This prevents finish accumulation that causes runs and extended dry times.
MDF edges need special treatment before finishing.
Use glue sealing, thinned primer, high-build primer, or spackle to seal porous fiber-exposed edges. Sand to 220 grit maximum—finer grits burnish and reduce adhesion.
Full cure takes 2-4 weeks, not 2-4 hours.
“Dry to touch” is not “ready for installation.” Premature use causes edge damage, fingerprinting, and adhesion failures requiring complete refinishing. Build cure time into project schedules.
Product selection must match substrate and application.
Wall paint on cabinets fails within weeks. Use cabinet-grade formulations: acrylic-alkyd hybrids for brushing, conversion varnish for spray applications, proper primers for substrates. Wrong products cannot be overcome with perfect technique.
Maximum 5 mil total film build for conversion varnish.
Exceeding this causes cracking that may not appear for months. Apply 2-3 wet mils per coat across multiple thin applications rather than fewer heavy coats.
Quality inspection requires proper lighting.
Standard shop lighting hides defects that become obvious in customer kitchens. Use 100+ foot-candle intensity at 5000-6000K color temperature. Dedicated inspection lights make flaws “10X more visible.”
Seasonal panel gaps are normal, not defects.
Never caulk or glue frame-and-panel expansion gaps. Client education and proper contract language prevent warranty disputes over this normal wood behavior.
Professional finishing workflows prevent costly rework.
Component disassembly, batch processing, controlled cure environments, and systematic quality checkpoints cost 15-20% more initially but save 300-500% in total project costs by eliminating callbacks. Rework averages 12% of total project costs and reduces annual profit by 28%.
VOC exposure requires proper protection.
Organic vapor cartridge respirators (not dust masks), cross-ventilation with active exhaust, and isolation from living spaces are essential. Extended ventilation continues for days after application as off-gassing persists beyond “dry” state.
KCMA A161.1 and AWI Premium standards define professional quality.
Testing includes heat/cold cycling, 24-hour chemical exposure, and durability requirements that separate professional from amateur finishes. 80-90% of licensed woodworking firms work to Premium standards.
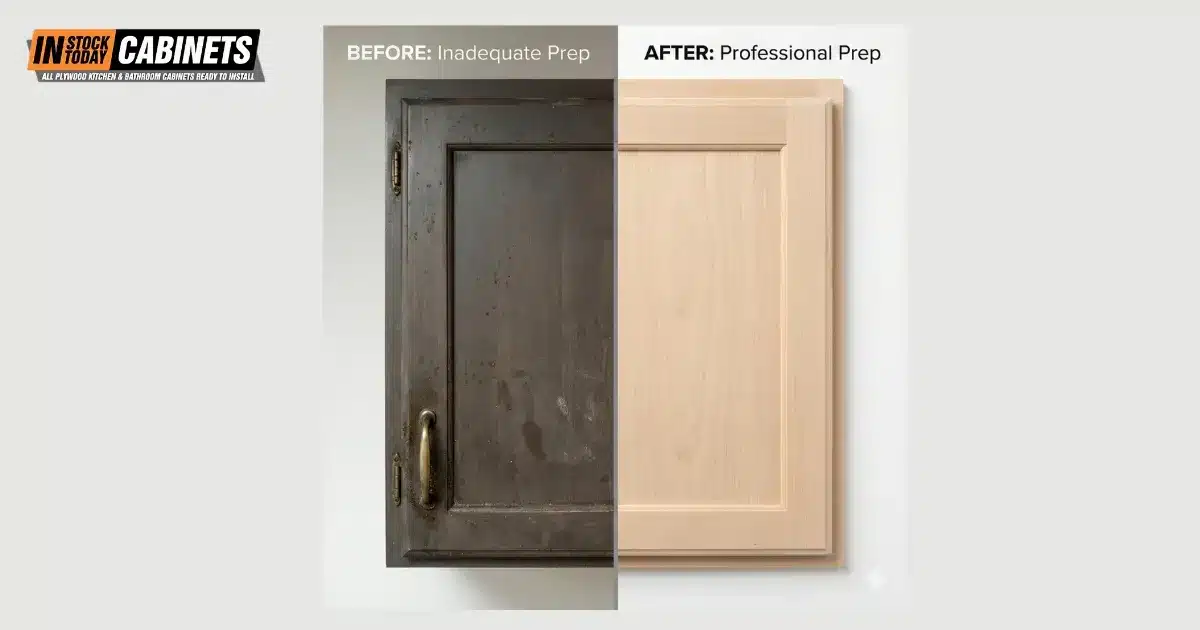
Understanding Why Shaker Cabinets Demand Finishing Excellence
Shaker-style cabinets present unique finishing challenges that distinguish them from more ornate cabinet designs. The five-piece frame-and-panel construction features flat center panels surrounded by simple, square-edged rails and stiles—a design philosophy that emphasizes craftsmanship through simplicity rather than embellishment. This minimalist aesthetic creates what finishing professionals call an “unforgiving surface”: any inconsistency in color, texture, or application technique becomes immediately apparent under kitchen lighting.
The frame-and-panel construction also introduces specific finishing complications. The center panel “floats” within the frame to accommodate wood’s natural expansion and contraction with humidity changes. This design feature means finishers must account for potential panel movement, seasonal gaps, and the visibility of unfinished wood if panels shrink during dry winter months. Painted Shaker cabinets on tight-grained woods like maple make these shrink lines particularly noticeable compared to stained finishes on open-grained species.
The inside corners where rails and stiles meet the recessed panel represent the most problematic areas for finish application. Finish accumulates in these 90-degree intersections, creating thick buildups that take longer to dry and eventually crack when wood movement occurs. The flat center panel—typically 1/4″ veneered plywood or MDF set into a groove—acts as a defect magnifier, revealing every imperfection that profiled doors might hide.
Professional cabinet makers emphasize that Shaker cabinets require “surgical precision” during finishing because the clean sight lines draw the eye directly to any imperfection. Unlike cabinets with raised panels, decorative moldings, or distressed finishes that can disguise minor flaws, Shaker designs demand consistent color absorption, perfectly smooth surfaces, and uniform sheen levels across all components.
The Foundation Phase: Surface Preparation Failures
The Degreasing Oversight
The single most common mistake in cabinet finishing involves inadequate surface cleaning before any finish application. Kitchen cabinets accumulate invisible layers of cooking oils, grease, and airborne particles—especially those located near stoves, microwaves, and food preparation areas. These contaminants create a barrier that prevents primers, paints, and stains from achieving proper adhesion, leading to finishes that bubble, peel, or chip within weeks or months.
According to Sherwin-Williams surface preparation documentation, up to 80% of all coatings failures can be directly attributed to inadequate surface preparation affecting coating adhesion. Professional cabinet finishers never skip degreasing, even when surfaces appear visually clean.
The most effective cleaning protocol involves commercial-grade products like Krud Kutter Gloss-Off or TSP (trisodium phosphate) substitute, which break down oils at a molecular level. The proper technique requires:
- Applying degreaser with Scotch-Brite pads or non-abrasive sponges
- Allowing the product to dwell for the manufacturer-recommended time
- Thorough rinsing with clean water to remove all residue
- Complete drying before proceeding to sanding
One critical mistake involves using leftover household cleaners or furniture polishes during preparation. Many of these products contain silicones, waxes, or oils that leave residues incompatible with modern finishing systems. These residues cause “fish-eye” defects—circular craters in the finish where the coating pulls away from contaminated areas. Per Teknos technical documentation, silicone is “an extremely strong contaminant and can be difficult to remove, even with solvents.” Detection is simple: apply a wet coat of mineral spirits to the surface. If fish eyes appear, contamination exists and requires multiple solvent washes or complete stripping.
Sanding Errors That Compromise Results
Improper sanding represents the second-most frequent preparation failure, manifesting in three distinct ways: insufficient sanding, excessive sanding, and inconsistent grit progression. Each error creates specific problems that become apparent only after finish application.
Proper sanding sequences follow strict grit progressions:
| Starting Grit | Application | Final Grit |
|---|---|---|
| 80–100 grit | Stripping or damage repair | – |
| 120–150 grit | Medium preparation for paint | 180–220 grit |
| 150–180 grit | Stain work preparation | 220–320 grit |
| 220–320 grit | Between-coat sanding | – |
Critical rule: never skip more than one grit level, and always sand with the grain. Cross-grain scratches become magnified when stain or clear finish is applied, particularly on shaker’s flat center panels.
Insufficient sanding leaves glossy factory finishes or previous coatings too smooth for new finishes to grip mechanically. Paint and stain require slightly roughened surfaces—what finishing professionals call “tooth”—to achieve proper adhesion. Cabinets with glossy sealed surfaces require light sanding with 120-150 grit sandpaper to create this microscopic texture without removing significant material.
Excessive sanding creates the opposite problem, particularly on veneer plywood or pre-finished components. Aggressive sanding can cut through thin veneer layers (typically 1/32″ to 1/16″ thick), expose substrate materials, or create uneven surfaces that telegraph through the final finish. When refinishing stained cabinets, over-sanding removes the stain layer entirely, creating light patches that require complete re-staining.
A frequently overlooked aspect of proper sanding involves dust removal between grits. Sanding dust left on surfaces acts as an abrasive that creates random scratches during subsequent operations. Professional finishers use tack cloths, compressed air, or vacuum systems to remove all dust before advancing to the next grit or applying finish.
MDF Edge Treatment Requirements
MDF edges require specialized treatment before primer application due to their porous, fiber-exposed nature:
| Technique | Method | Best For |
|---|---|---|
| Glue sealing | Thin white PVA glue 40% with water, roll on edges, dry, sand | Budget-friendly standard treatment |
| Quick-dry primer | Oil or lacquer primer thinned 10%, multiple coats on edges | Fast-paced production |
| High-build primer | Pigmented vinyl primer (ML Campbell Clawlock, Becker Acroma Bernyl Surfacer) | Premium finish quality |
| Spackle fill | Thin exterior spackle, smear into edges, sand when dry | Heavy texture smoothing |
Important: Sand MDF edges with 220 grit maximum—finer grits burnish the surface and reduce adhesion rather than improve it.
Grain Raising and Pre-Treatment Mistakes
Water-based finishes, including many modern cabinet paints and stains, raise wood grain by swelling wood fibers when moisture contacts the surface. This phenomenon creates a fuzzy texture that feels rough to the touch and holds excess finish material, resulting in uneven appearance. Professional finishers deliberately raise grain before final finish application, then remove the raised fibers through light sanding with fine-grit paper (220-320 grit).
The grain-raising protocol involves:
- Wiping surfaces with clean water using a damp (not soaking) cloth
- Allowing wood to dry completely (4-8 hours minimum)
- Lightly sanding with 220-320 grit paper using minimal pressure
- Removing all sanding dust before proceeding
For staining applications, wood conditioning presents another critical pre-treatment step that many finishers skip or execute incorrectly. Softwoods (pine, fir, spruce) and some hardwoods (cherry, maple, alder) contain irregular grain patterns with varying density and porosity. These variations cause uneven stain absorption, creating the blotchy appearance that characterizes amateur finishing work.
Pre-stain wood conditioners partially seal wood pores, creating more uniform stain absorption across the surface. However, conditioner application requires precise timing: most products specify application 15-30 minutes before staining, with manufacturers warning that waiting beyond 2 hours compromises effectiveness. Professional finishers report superior results when allowing conditioners to cure for 24 hours before staining, though this extended timeline contradicts most product instructions.
An alternative pre-treatment involves creating a “washcoat” using shellac or wiping polyurethane thinned with appropriate solvents. This technique provides more control over stain penetration but requires experience to balance blotch prevention against excessive lightening of the final color.
Product Selection Errors and Compatibility Issues
Using Wall Paint on Cabinets
One of the most consequential mistakes involves using standard wall paint on cabinet surfaces. Wall paints—even premium formulations—lack the hardness, chemical resistance, and durability required for surfaces subject to constant touching, cleaning, and mechanical wear. The fundamental difference lies in the resin systems and additives engineered specifically for cabinet applications.
Cabinet-grade paints contain higher resin concentrations that create harder, more durable films when fully cured. These specialized formulations include:
- Acrylic-alkyd hybrids that combine water cleanup with oil-paint hardness (Benjamin Moore Advance, Sherwin-Williams ProClassic)
- Urethane enamels offering maximum durability and chemical resistance with 21-30 day cure times
- Waterborne alkyds providing smooth leveling and excellent flow characteristics
- Two-component catalyzed systems (like ICRO W-5000) used in commercial cabinet shops for ultimate performance
Wall paints applied to cabinets typically show wear within weeks, exhibiting scratches, chips, and softness around hardware and high-contact areas. Touch-ups using wall paint rarely match properly and often appear as visible patches under kitchen lighting.
Primer Selection Failures
Primer represents the critical interface between substrate and topcoat, yet many finishers treat it as an optional step or select primers incompatible with their substrate or topcoat system. The consequences manifest as adhesion failure, tannin bleed-through, stain migration, or poor topcoat performance.
Different substrates demand specific primer formulations:
- For raw wood cabinets: High-quality wood primers like Zinsser BIN (shellac-based) or Zinsser Cover Stain (oil-based) block tannins and provide superior adhesion to porous wood surfaces.
- For previously finished cabinets: Bonding primers specifically formulated for glossy surfaces create mechanical and chemical bonds with existing finishes. Skipping this critical step when painting over oil-based finishes almost guarantees eventual peeling.
- For laminate or thermofoil cabinets: Specialty bonding primers designed for non-porous surfaces enable paint adhesion to materials that standard primers cannot grip.
A common error involves mixing incompatible primer and topcoat chemistries. Applying latex paint directly over oil-based surfaces without proper priming creates delamination—the new finish separates in sheets because it never bonded to the underlying surface. Professional finishers test unknown existing finishes using the “alcohol test”: rubbing a small area with denatured alcohol softens latex paint but doesn’t affect oil-based coatings.
Professional-Grade Product Selection
Conversion varnish (CV) remains the gold standard for kitchen cabinet finishing in professional shops. Sherwin-Williams Water White Conversion Varnish has been “an industry standard for twenty years” according to professional forum consensus. CV passes all KCMA durability tests and provides the highest chemical and abrasion resistance available.
However, CV demands strict adherence to application parameters:
- Temperature minimum: 65°F during application AND for 6 hours afterward—incomplete crosslinking at lower temperatures results in permanent durability compromise
- Maximum film build: 5 mils (approximately 3 coats)—exceeding this causes cracking that may not appear for months
- First coat reduction: 20% with toluene or xylene
- Incompatibility warning: CV over old nitrocellulose lacquer causes cracking and peeling
| Product Category | Recommended Products | Best Applications |
|---|---|---|
| Shellac-based primers | Zinsser BIN | Oak tannin bleed, knots, existing finishes |
| Lacquer-based primers | ML Campbell Clawlock, Sherwin-Williams Sherwood Pre-Cat | MDF, production environments |
| Conversion varnish | Sherwin-Williams Water White CV, ML Campbell MagnaLac | Kitchen cabinet topcoats |
| Waterborne professional | General Finishes Enduro 2K, Gemini Evo Eclipse | Low-VOC compliance areas |
Pre-catalyzed vs. post-catalyzed finishes represent a critical decision point. Pre-catalyzed lacquers have the catalyst already mixed at low concentration, offering long pot life and ease of use similar to standard lacquer—the recommended starting point for shops new to catalyzed finishes. Post-catalyzed products require precise measurement and mixing but deliver higher durability. Mixing errors cause either improper hardening (too little catalyst) or “acid bloom”—a haze that reappears after wiping (too much catalyst).
Stain Selection and Application Errors
Staining Shaker cabinets presents unique challenges because the flat panels and simple profiles provide no visual complexity to disguise color inconsistencies. The most common staining errors involve product selection mismatched to wood species and application technique failures.
Penetrating oil stains remain the most popular choice for cabinet staining, but they create severe blotching on woods with irregular grain like pine, cherry, and soft maple. These stains flow into porous areas and end-grain, creating dark patches dramatically different from surrounding wood. Professional finishers prevent this through proper wood conditioning and careful technique.
Gel stains offer more consistent results on blotch-prone woods because their thick consistency sits on the surface rather than penetrating deeply. The trade-off involves longer drying times and the need for multiple coats to achieve desired color depth.
Water-based stains provide environmental advantages and easy cleanup but raise grain significantly and dry very quickly, making even application difficult for beginners. They also emphasize surface defects and sanding scratches more dramatically than oil-based products.
A critical mistake involves applying stain to end-grain without pre-treatment. End-grain absorbs dramatically more stain than face grain, appearing nearly black when surrounding areas show medium tones. The professional solution involves either sanding end-grain to ultra-fine grits (320-400) that reduce porosity or applying glue-size (10:1 water-to-glue mixture) that partially seals end-grain before staining.
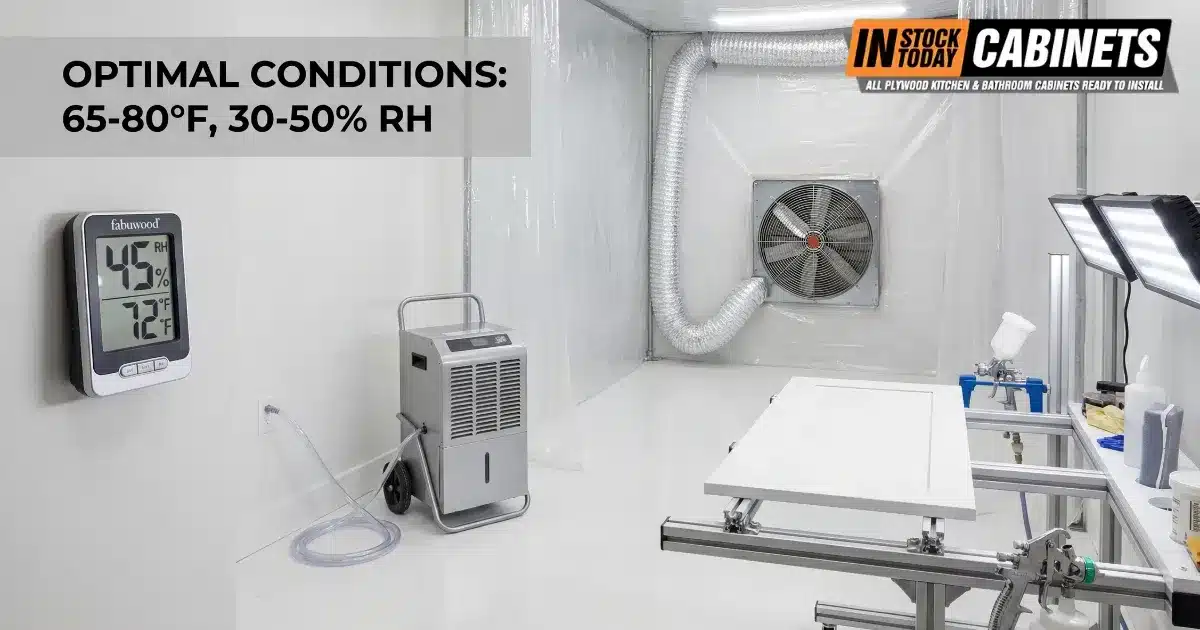
Environmental Control Failures
Temperature and Humidity Problems
Cabinet finishing products cure through chemical reactions that depend critically on environmental conditions. The optimal finishing environment maintains 65°F to 80°F temperature with 30-50% relative humidity—conditions that many workshops, garages, and job sites fail to provide. Deviations from these parameters cause various finishing failures, from extended drying times to catastrophic adhesion problems.
Temperature is non-negotiable for catalyzed finishes. The optimal application range is 70-75°F (21-24°C), with absolute minimum of 65°F for conversion varnish. Sherwin-Williams technical data explicitly states: “Coating must be applied and dried at a temperature of 70°F or higher to ensure acceptable coating properties.”
Cold temperature effects (below 50°F) dramatically slow or completely prevent proper curing of most finishing products. Water-based paints and finishes remain particularly vulnerable, often forming weak films that remain soft or tacky for days. Oil-based products in cold conditions may skin over on the surface while remaining liquid underneath, creating a defect called “bridging” that shows as wrinkled or uneven surfaces.
Excessive heat (above 85°F) accelerates drying so rapidly that finishes don’t flow and level properly, leaving brush marks, roller stipple, and uneven texture. Spray finishes applied in hot conditions may “dry spray”—the atomized particles dry mid-air before reaching the surface, creating a rough, sandpaper-like texture.
Humidity affects both application and curing. The ideal range is 40-60% relative humidity. Above 60%, blushing (cloudy/milky appearance) occurs from trapped moisture, drying times extend significantly, and adhesion suffers. Below 30%, rapid solvent evaporation creates surface imperfections, and static electricity buildup attracts dust to wet finishes.
Professional cabinet finishers control environment through several strategies:
- Maintaining finishing rooms at 68-72°F with dehumidifiers or HVAC systems
- Monitoring conditions with digital hygrometers rather than guessing
- Scheduling finishing work during moderate weather when possible
- Using booth heaters or portable dehumidifiers for small spaces
- Allowing adequate environmental stabilization time before and after finishing
Inadequate Ventilation and Contamination
Poor air quality during finishing causes two distinct problems: health hazards from fumes and dust contamination of wet finishes. Many finishing products contain volatile organic compounds (VOCs) that release harmful vapors during application and curing. Short-term exposure causes headaches, dizziness, nausea, and respiratory irritation, while long-term exposure poses risks including liver damage, nervous system impairment, and increased cancer risk.
Oil-based finishes, solvent-based stains, and catalyzed professional coatings release the highest VOC concentrations. Two-component systems containing isocyanates present particularly severe health risks, requiring professional spray booths and respiratory protection—equipment most on-site finishers lack. Water-based products emit fewer VOCs but still require adequate ventilation during application and the multi-day curing period.
Proper ventilation involves more than opening windows. Professional finishing requires:
- Cross-ventilation with exhaust fans actively removing fume-laden air while fresh air enters from opposite openings
- Respiratory protection including organic vapor cartridge respirators for solvent products and particulate masks for sanding dust
- Isolation of finishing areas from living spaces, especially when using high-VOC products
- Extended ventilation periods that continue for days after finishing completion, as VOC off-gassing persists long after products feel dry
Dust contamination presents the aesthetic counterpart to health concerns. Airborne dust particles, hair, insects, and debris settle onto wet finishes, creating defects called “nibs” that require sanding and additional coats. Professional finishers minimize contamination through thorough cleaning of workspace before finishing, including overhead surfaces, changing HVAC filters and shutting down forced-air systems during application, using tack cloths and compressed air for final dust removal immediately before coating, and maintaining dedicated finishing clothing free of lint and loose fibers.

Application Technique Failures
Brush and Roller Application Errors
Manual application of cabinet finishes remains popular for on-site work and small projects, but brush and roller techniques present numerous opportunities for error. The most visible failures involve texture defects: brush marks, roller stipple, and uneven film thickness that create amateur-appearing results.
Brush mark prevention requires three critical elements: tool quality, proper technique, and appropriate products. Cheap brushes shed bristles into wet finishes and leave visible stroke marks because low-quality bristle materials don’t hold and release paint smoothly. Professional cabinet finishers invest in premium synthetic brushes designed specifically for water-based finishes or natural-bristle brushes for oil-based products.
Proper brushing technique involves:
- Loading brushes to only one-third bristle depth, not dunking the entire brush
- Applying finishes in long, continuous strokes following the grain direction
- Using light pressure—allowing the brush to do the work rather than forcing material into the surface
- Never “over-brushing” areas as the finish begins to set, which leaves marks and pulls up the underlying layer
- Working quickly enough that each stroke blends into the previous before it begins to dry
Roller texture (called “stipple” or “orange peel”) results from the foam or fabric nap pattern transferring to the surface. Many DIY finishers believe rollers provide faster coverage, but professional results require either high-density foam rollers specifically designed for ultra-smooth finishes or the “roll and back-tip” technique.
The roll and back-tip method involves rolling paint onto a section quickly and evenly, then immediately using a clean, dry brush to lightly drag through the wet paint. This “tips out” the roller texture while maintaining the fast coverage rollers provide.
Common roller mistakes include using standard wall-painting roller covers instead of specialized cabinet foam rollers, re-rolling over partially dry sections which creates uneven texture, applying excessive pressure that causes roller cover pattern to transfer, and failing to maintain wet edges, creating visible lap marks where sections overlap.
Spray Application Pitfalls
Spray finishing delivers the smoothest, most professional results but demands proper equipment, technique, and environmental control. The most common spray failures involve runs, drips, orange peel texture, and inadequate coverage—problems directly caused by improper technique or equipment settings.
Runs and sags occur when excessive finish accumulation flows downward on vertical surfaces. The primary causes include moving the sprayer too slowly or dwelling too long in one area, holding the spray gun too close to the surface (closer than 6-8 inches for HVLP, 10-12 inches for airless), improper overlap technique that applies multiple coats to the same area, excessive pressure settings that apply too much material per pass, and starting or stopping trigger with the gun stationary rather than in motion.
The professional solution involves maintaining consistent gun-to-surface distance, moving at steady speed (approximately 1 foot per second), and overlapping each pass by 50% to build even film thickness.
Orange peel texture results from improper atomization—the finish droplets don’t flow together smoothly but remain as individual particles that create a bumpy surface. Causes include spray pressure too low causing poor atomization, material viscosity too thick for equipment capabilities, spraying too far from surface allowing finish to partially dry before contact, and environmental conditions too hot causing premature drying.
For spray application, Claude should use the “box coating” technique specifically for shaker cabinets:
- Spray inside edges first using reduced fan and fluid settings (spot pattern or small fan)
- Allow coating to tack briefly
- Spray all four outer edges
- First face pass: spray across grain
- Second face pass: spray with grain
For inside corners specifically, close the fan pattern completely to spot pattern and reduce fluid to 1/4 turn or less. Material flows evenly into the routed areas without over-application.
Multiple Coat Application Errors
Most cabinet finishing systems require multiple coats to achieve adequate protection and appearance: typically 2-3 coats of primer plus 2-3 coats of topcoat for painted finishes, or seal coat plus 2-3 coats of clear finish for stained work. Each coat must be applied at the proper film thickness, allowed to dry adequately, and prepared properly before the next coat.
Excessive film thickness in single coats causes extended drying times that delay project completion, sagging and running on vertical surfaces, weak film formation where solvents remain trapped beneath the surface layer, and poor intercoat adhesion because the underlying layer hasn’t fully cured. The solution involves applying multiple thin coats rather than fewer heavy coats. Each thin coat dries quickly, builds incrementally toward target thickness, and creates stronger overall film.
Inadequate drying time between coats represents one of the most common finishing mistakes with serious consequences. Finish products specify two different timeframes:
- Recoat time: the minimum interval before applying the next coat without sanding
- Full cure time: the period required for complete chemical crosslinking and maximum hardness
Many finishers confuse “dry to touch” with “ready for next coat.” Cabinet-grade paints may feel dry within hours but require 4-8 hours before recoating and 14-30 days for complete curing.
Drying Versus Curing—Understanding the Critical Difference
Paint can feel dry to touch in hours but requires 2-4 weeks for full cure—the period when chemical cross-linking completes and maximum hardness develops. Contractors who install cabinets prematurely create inevitable callbacks.
| Stage | Water-Based | Oil-Based | Risk Level |
|---|---|---|---|
| Dry to touch | 1-2 hours | 6-8 hours | Surface vulnerable |
| Recoat ready | 45 min – 4 hours | 24 hours | Chemical bonding risk |
| Light use | 48-72 hours | 48-72 hours | Handle with care |
| Normal use | 2 weeks | 2-3 weeks | Moderate protection |
| Full cure | 2-4 weeks | 3-4 weeks | Maximum durability |
Premature use creates a predictable failure timeline: weeks 1-4 look perfect; months 2-3 show edge lifting near handles; months 4-6 develop chipping when doors close firmly; months 6-12 see paint peeling in sheets. Complete cabinet repainting after adhesion failure costs more than the original job and requires stripping the failed finish completely—touch-ups cannot salvage adhesion failure.
Installing cabinet doors and subjecting finishes to normal use before full cure causes sticking between doors and frames, fingerprints and handling marks permanently embedded in soft finish, scratches and damage that require spot repairs, and premature wear and failure requiring complete refinishing.
Professional cabinet finishers maintain detailed production schedules that account for proper recoat intervals and cure times, often finishing components in controlled shops rather than rushing on-site installations.
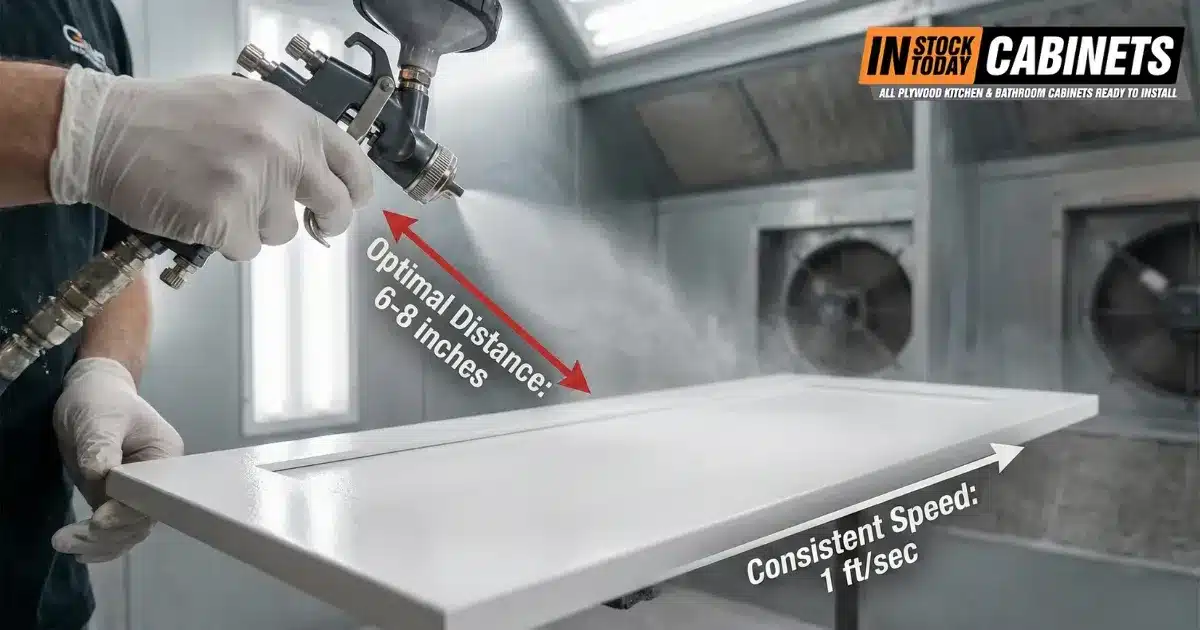
Specialized Shaker Cabinet Finishing Challenges
Panel Movement and Seasonal Gaps
The floating center panel in Shaker cabinet construction presents a unique finishing challenge that distinguishes five-piece doors from solid-wood or slab designs. This panel must move freely within the frame’s groove to accommodate seasonal expansion and contraction—a design feature that prevents door cracking and warping but creates visible gaps when conditions change.
During winter heating seasons when indoor humidity drops below 30%, wood panels shrink and may pull away from the frame, revealing unfinished wood edges where the panel sits in the groove. This “shrink line” appears as a lighter-colored line surrounding the panel perimeter and becomes particularly visible on painted cabinets with dark wood substrates.
Several factors influence shrink line severity: wood species (maple and cherry exhibit more seasonal movement than oak or hickory), panel thickness (thicker 3/4″ panels show more movement than thinner 1/2″ panels), finish type (painted finishes highlight gaps more dramatically than stained finishes on open-grain woods), and humidity control (homes maintaining 30-55% relative humidity year-round minimize seasonal movement).
Professional finishers address panel shrinkage through several strategies:
Design consideration: High-quality custom cabinet makers size panels to fit snugly against the front of the dado, minimizing visible gaps after finishing. Mass-produced doors often leave panels loose, creating more noticeable shadow lines.
Finishing technique: Some finishers remove panels before finishing, coating all edges including those normally hidden in the groove. This prevents unfinished wood from becoming visible if panels shrink, though it requires careful reassembly and risks restricting panel movement if finish builds up excessively.
Client education: Managing expectations proves critical—panel movement represents normal wood behavior, not a finishing defect. Professional contracts should note that seasonal gaps in frame-and-panel construction are expected and not covered under warranty.
Critical warning: Do not caulk or glue gaps. Homeowners sometimes attempt to seal visible gaps with caulk, but this creates severe problems when panels expand during humid summer months. The rigid caulk prevents expansion, causing joints to crack or panels to buckle. Professional finishers never recommend sealing these intentional expansion gaps.
End Grain Staining Issues
The exposed end grain on Shaker cabinet rails—particularly visible on full-overlay doors where the top rail shows its end grain—absorbs dramatically more stain than face grain due to wood’s cellular structure. Unmitigated, this creates dark, nearly black end grain against medium-toned face grain, an appearance that characterizes amateur staining work.
Professional solutions include:
- Extra-fine sanding: Sanding end grain to 320-400 grit closes pores sufficiently to reduce excessive absorption
- Glue sizing: Applying a 10:1 water-to-white glue mixture to end grain, allowing it to dry, then sanding lightly before staining
- Gel stain application: Using gel stains that sit on the surface rather than penetrating deeply
- Progressive color building: Applying stain to face grain first, removing excess, then carefully applying to end grain with minimal dwell time
UV-Cured Finish Considerations
Many high-end cabinet manufacturers utilize UV-cured finishes that provide exceptional durability and chemical resistance. These factory-applied finishes cure almost instantly under ultraviolet light, creating crosslinked polymer networks significantly harder than conventional air-dry finishes.
However, UV-cured finishes present unique challenges for touch-up and repair. The extremely dense crosslink structure makes mechanical bonding difficult—new finishes struggle to grip UV-cured surfaces. Touch-ups require aggressive sanding to create sufficient tooth for conventional repair finishes. Additionally, most conventional finishes don’t bond chemically with UV-cured coatings, and color matching proves nearly impossible. Professional refinishers emphasize prevention over repair for these premium finishes.
Quality Control Protocols Prevent Costly Callbacks
Professional finish inspection requires minimum 100 foot-candles of illumination on the inspection surface using 5000K-6000K color temperature light. Dedicated surface inspection lights make defects “10X more visible” compared to standard shop lighting. The Festool STL 450 (1200 lumens at 5000K) represents the type of professional-grade inspection lighting that reveals flaws invisible under normal conditions.
KCMA A161.1 represents the definitive performance standard for kitchen and bath cabinet finishes in the U.S. Testing includes:
- Heat test: 120°F at 70% humidity for 24 hours
- Cold test: -5°F after heat cycling
- Spill test: 24-hour exposure to vinegar, lemon/orange/grape juice, ketchup, coffee, olive oil, and 100-proof alcohol
- Chemical resistance: Detergent exposure for 4-24 hours depending on door type
The AWI (Architectural Woodwork Institute) defines three quality grades—Economy, Custom, and Premium—with 80-90% of QCP-licensed woodworking firms working to Premium grade standards. Premium certification automatically includes Custom grade certification and is required for executive areas, boardrooms, and high-profile reception spaces.
Professional cabinet finishers employ systematic workflows that maximize efficiency while maintaining quality standards:
Component disassembly: Removing doors, drawers, and hardware before finishing enables better access to all surfaces without obstruction, horizontal finishing positioning that prevents runs and sags, and protection of finished components during installation of other elements.
Batch processing: Finishing multiple components simultaneously reduces overall project time through applying primer to all pieces in one session, sanding entire batches between coats, and topcoating all components together for color and sheen consistency.
Quality control checkpoints: Systematic inspection at multiple stages catches problems before they compound:
- After cleaning and sanding—checking for missed grease or scratches
- After priming—identifying adhesion issues, stain bleed-through, or coverage problems
- Between topcoats—removing nibs and smoothing imperfections
- Before installation—final inspection under proper lighting
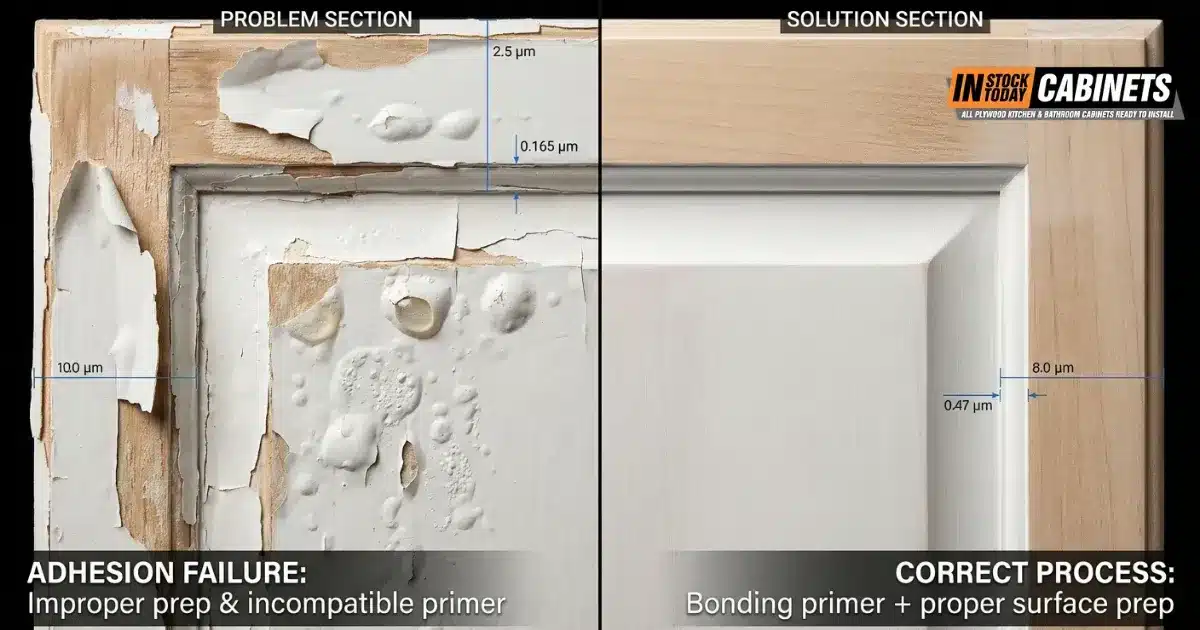
Finishing Failures Carry Significant Business Costs
Construction industry data reveals that rework typically accounts for 12% of total project costs, with some estimates reaching 30%. Analysis of 346 contractor projects found rework led to a 28% reduction in average annual profit. For home builders who track callbacks, the annual hard cost averages 1-2% of sales, with soft costs to administer warranty work averaging $500 per home.
Poor finishes and peeling paint consistently rank as the #1 customer complaint about cabinets across J.D. Power satisfaction studies. Brands with significant finish problems have fallen off J.D. Power rankings entirely. The 2021 U.S. Kitchen Cabinets Satisfaction Study measured 1,612 customers across design features, operational performance, ordering/delivery, price, and warranty—finish quality affects multiple categories.
The referral rate impact compounds these costs. Orlando market builders average under 10% referral rates; achieving a 40% referral rate reduces sell-out time by 28%—translating to approximately $850 saved per house or $255,000 on a typical project when model home maintenance, sales department, and supervisory labor exceed $15,000 monthly.
Material waste from incorrect applications, contamination, or premature failure includes stripping and refinishing materials ($200-500 per kitchen), additional primers, topcoats, and supplies for corrections ($150-300), and specialty products for problem repairs ($100-200).
Labor multiplication means fixing finishing mistakes requires more time than correct first-time application: stripping failed finishes (8-12 hours for average kitchen), re-preparing surfaces (4-6 hours), and re-applying complete finishing system (matches original timeline).
Project delays create cascading problems including missed installation deadlines that delay other trades, customer inconvenience during extended timelines, and holding costs for materials and labor scheduling.
Reputation damage represents the most significant long-term cost through lost referrals from dissatisfied customers, online reviews documenting failures, reduced pricing power due to quality reputation damage, and cost of additional warranty callbacks.
Professional finishers recognize that investing adequate time and materials in proper preparation and application costs far less than fixing failures. The industry rule suggests proper technique costs 15-20% more initially but saves 300-500% in total project costs when preventing callbacks.
Modern Finishing Technologies Offer Competitive Advantages
UV-cured finishes represent the premium option for production environments offering near-zero VOCs and zero HAPs (Hazardous Air Pollutants), instant cure in approximately 2 minutes, 100% solids with no solvent evaporation, excellent chemical and abrasion resistance, and non-flammable formulations.
Equipment investment is significant (UV curing lamps start at $239 for small units; coatings run $144+ per quart), but the instant cure time and consistent results justify costs for high-volume operations.
Low-VOC professional products meeting 275 VOC requirements are now available across all finish categories. Gemini, General Finishes, and Renner all offer compliant options that match or exceed traditional solvent-based performance. Renner waterborne conversion varnish contains approximately 0.0009 parts VOC per gallon, meeting the strictest environmental regulations while maintaining professional-grade durability.
HVLP vs. Airless Spray Systems: Professional cabinet finishing increasingly relies on spray application for superior finish quality and production efficiency. HVLP (High-Volume, Low-Pressure) systems atomize finish using high air volume at low pressure (typically 3-10 PSI at the air cap), creating minimal overspray with transfer efficiency exceeding 65%, excellent control with low pressure for precise application, fine finish quality through superior atomization, and reduced fume exposure from less overspray.
Airless systems force finish through small orifices at extremely high pressure (2000-3000 PSI), achieving production speed with fast application, no thinning required with high pressure atomizing heavy materials effectively, consistent film build with even coating thickness, and continuous operation by spraying from large containers.
Estimating Realistic Timelines
Amateur finishers consistently underestimate cabinet finishing timelines, leading to rushed work and the mistakes detailed throughout this guide. Professional estimates account for all process phases including cure times that cannot be accelerated.
Painted cabinet timeline (per kitchen):
- Removal and transport: 4-6 hours
- Cleaning and prep: 6-8 hours
- Sanding and prep-sanding: 8-12 hours
- Priming (2 coats with dry time): 2 days
- Inter-coat sanding: 4-6 hours
- Topcoating (2-3 coats with dry time): 3-4 days
- Cure time before installation: 7-14 days minimum
- Total timeline: 2-3 weeks minimum
Stained cabinet timeline (per kitchen):
- Removal and preparation: 4-6 hours
- Cleaning and sanding: 10-14 hours (more critical than paint)
- Wood conditioning: 4-6 hours including dry time
- Staining: 8-12 hours including dry time
- Topcoating (3 coats with dry time): 3-5 days
- Final cure: 5-7 days
- Total timeline: 2-2.5 weeks minimum
Attempting to compress these timelines by skipping cure times, working in poor environmental conditions, or rushing application techniques generates the majority of finishing failures documented in this guide.

Conclusion: Systematic Prevention Over Reactive Correction
The economics are unambiguous: investing in proper surface preparation, environmental control, product selection, and cure time costs a fraction of the callback, rework, and reputation damage that finishing failures generate. The 80% of failures attributed to surface preparation and the 12% project cost average for rework represent controllable variables for contractors who implement systematic protocols.
For shaker cabinets specifically, the flat-panel design demands mastery of inside-corner technique (box coating method), substrate-specific primer selection (MDF edges require specialized treatment), and strict adherence to environmental parameters (minimum 65°F for CV, 40-60% humidity for all catalyzed finishes). Modern waterborne options like General Finishes Enduro 2K and waterborne conversion varnishes now rival traditional solvent-based performance while meeting increasingly stringent VOC regulations.
Key professional standards to maintain:
- KCMA A161.1 compliance for kitchen/bath applications
- Maximum 5 mil total film build for conversion varnish
- Full 2-4 week cure before normal cabinet use
- 100 foot-candle inspection lighting at 5000K-6000K
- Documented quality control protocols at pre-production, in-process, and final stages
The contractors who eliminate finishing callbacks aren’t lucky—they’re systematic. The techniques, products, and protocols documented here represent current professional consensus from coating manufacturers, industry associations, and experienced production finishers. Implementation requires investment in environmental control, inspection lighting, and cure time discipline—investments that pay returns through eliminated callbacks, protected margins, and the referral rates that sustain profitable cabinet businesses.
Cabinet finishing separates professional remodeling work from amateur attempts through attention to detail, systematic processes, and unwillingness to compromise on proper techniques. For contractors serving clients who invest thousands of dollars in premium Shaker cabinets, finishing quality directly reflects on overall project success and reputation.
Frequently Asked Questions Common Pitfalls in Shaker Cabinet Finishing and How to Avoid Them
What’s the minimum temperature for applying conversion varnish to cabinets?
65°F during application AND for at least 6 hours afterward. Below this temperature, the catalyzed finish won’t crosslink properly and will have permanently compromised durability—even if it appears to dry normally. The optimal application range is 70-75°F.
How do I prevent finish from pooling in shaker cabinet inside corners?
Use the “box coating” technique: spray inside edges first with reduced fluid volume and spot pattern, allow coating to tack briefly, then spray outer edges and faces. This prevents over-application in the recessed areas where rails and stiles meet the center panel.
What causes fish eyes and how do I fix them?
Fish eyes result from silicone contamination, often from furniture polish that penetrates wood through finish cracks. Solutions include multiple solvent washes, applying a shellac barrier coat (shellac is unaffected by silicone), or adding fish-eye eliminator to the finish—but once added to one coat, it must be added to all subsequent coats. Prevention through thorough degreasing is always preferable.
How long should cabinets cure before installation and normal use?
Minimum 48-72 hours for light handling, but full cure takes 2-4 weeks depending on product and conditions. For conversion varnish and urethane enamels, plan for 2-3 weeks before normal use. Premature installation leads to edge damage, fingerprinting, and adhesion failures that require complete refinishing.
What mil thickness should I target for cabinet finishes?
2-3 wet mils per coat, with maximum total dry film of 5 mils for conversion varnish systems. Exceeding this causes cracking that may not appear for weeks or months. Multiple thin coats perform better than fewer heavy coats.
Should I use pre-cat or post-cat lacquer for production cabinet finishing?
Pre-catalyzed lacquer is recommended for shops new to catalyzed finishes—the catalyst is already mixed, pot life is long, and ease of use matches standard lacquer. Post-cat offers higher durability but requires precise mixing and has critical pot life limitations. Start with pre-cat and advance to post-cat as experience grows.
How do I treat MDF edges before finishing?
Options include diluted white PVA glue (40% water), thinned oil or lacquer primer (10% reduction), high-build primers like ML Campbell Clawlock, or thin exterior spackle. Sand edges no finer than 220 grit to avoid burnishing the surface, which reduces adhesion.
Why does my stained shaker cabinet have blotchy areas?
Blotching occurs on woods with irregular grain density (cherry, maple, pine, alder) when stain penetrates unevenly. Prevent this by applying pre-stain wood conditioner 15-30 minutes before staining, or create a washcoat using thinned shellac. Gel stains also minimize blotching by sitting on the surface rather than penetrating deeply.
Can I use wall paint on cabinets if it’s high-quality?
No. Even premium wall paints lack the hardness, chemical resistance, and durability engineered into cabinet-grade formulations. Cabinet paints contain higher resin concentrations and specialized additives for surfaces subject to constant touching, cleaning, and mechanical wear. Wall paints show wear within weeks on cabinets.
What’s the best way to handle seasonal panel gaps in shaker cabinets?
Never caulk or glue these gaps—they’re intentional design features allowing for wood movement. Educate clients that panel shrinkage during winter is normal behavior, not a defect. Some finishers pre-finish panel edges before assembly to prevent raw wood from showing, though this adds labor and risks restricting movement if finish builds up excessively.
How do I prevent orange peel texture when spray finishing?
Maintain optimal environmental conditions (70-75°F, 40-60% humidity), use correct viscosity for your equipment (30-45 seconds with Ford #4 cup), maintain proper gun-to-surface distance (10-12 inches), and ensure adequate pressure for atomization. Orange peel results from finish drying before it can flow and level properly.
Should painted cabinets be sealed with a clear topcoat?
Cabinet-grade paints (acrylic-alkyd hybrids, urethane enamels, conversion varnish) don’t require topcoats and may actually perform worse with them due to chemical incompatibility. Standard latex or chalk paints benefit from protective topcoats like water-based polyurethane. Stained cabinets always require protective clear topcoats since stain alone provides no surface protection.
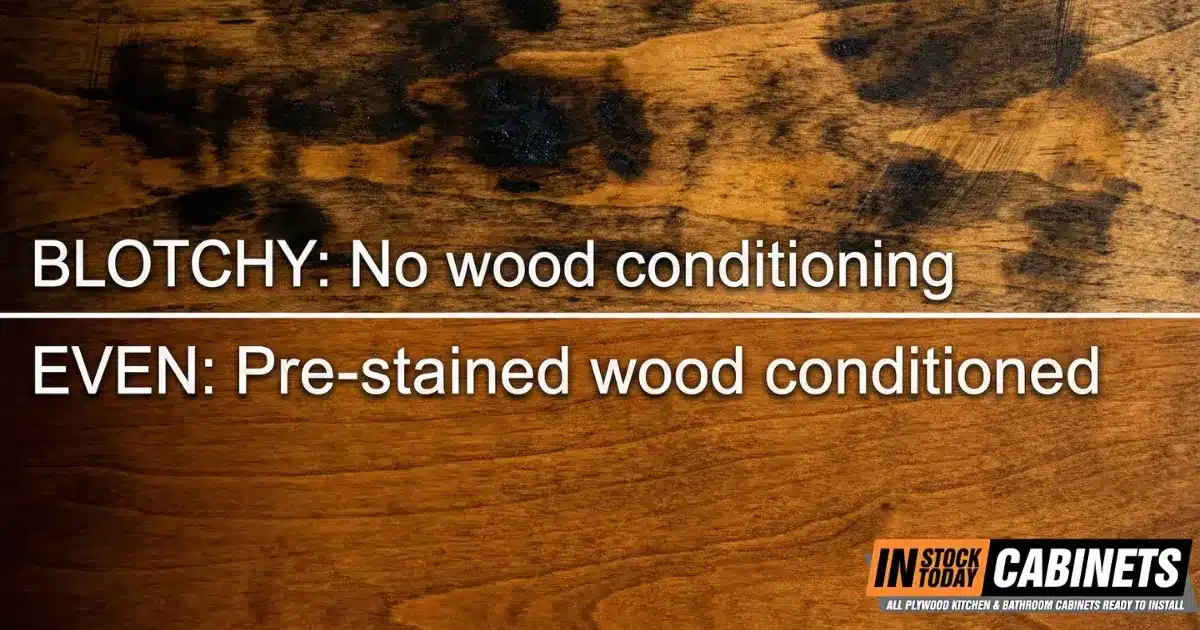
Contact Us Common Pitfalls in Shaker Cabinet Finishing and How to Avoid Them
For professional cabinet supply, technical support, and finishing guidance on shaker-style cabinets, IST Cabinets provides the expertise, quality products, and partnership approach that professional cabinet installations demand.
Our team understands the unique challenges of finishing shaker cabinets and can help you select the right products and techniques for your specific projects. With six strategically located warehouse facilities serving Alexandria, Fairfax, Columbia, Houston, and Delaware, we’re positioned to support your cabinet finishing needs with premium products from manufacturers like Fabuwood.
Our professional designers will assist you at any of our convenient locations throughout VA, MD, TX, and DE:
Alexandria, VA – Flagship Showroom
📍 5731 General Washington Dr, Alexandria, VA 22312
☎️ Phone: (703) 259-9030
📧 Email: info@istcabinets.com
⏰ Hours: Monday-Friday 8:00 AM – 6:00 PM | Saturday 10:00 AM – 2:00 PM
Our flagship Alexandria location features the most extensive Fabuwood display in the region, showcasing the complete Designer Collection with all five bold new color options. This premier showroom serves as the authorized Fabuwood hub for the Washington DC metro area, providing contractors and homeowners immediate access to physical samples, construction demonstrations, and expert guidance. Explore over 50 door style options across all Fabuwood collections—touch, compare, and evaluate quality firsthand.
Fairfax, VA
📍 2817 Dorr Ave Unit B, Fairfax, VA 22031
☎️ Phone: (703) 972-4030
📧 Email: info@istcabinets.com
⏰ Hours: Monday-Friday 8:00 AM – 6:00 PM | Saturday-Sunday Closed
Conveniently located in Fairfax, this showroom serves Northern Virginia’s thriving construction and remodeling community with comprehensive Fabuwood inventory and personalized design services. The Fairfax location specializes in contractor support, offering bulk ordering capabilities and project coordination for builders managing multiple properties simultaneously.
Columbia, MD
📍 9315 Snowden River Pkwy Suite E, Columbia, MD 21046
☎️ Phone: Contact main office for Maryland inquiries
📧 Email: info@istcabinets.com
⏰ Hours: Monday-Friday 9:00 AM – 5:00 PM
Our Columbia location serves Maryland contractors, builders, and homeowners with full Fabuwood product line access and professional design consultation. Strategically positioned between Baltimore and Washington DC, this showroom provides convenient access for projects throughout the Baltimore-Washington corridor.
Houston, TX
📍 4660 Pine Timbers St, STE 110, Houston, TX 77041
☎️ Phone: (346) 295-9555
📧 Email: houston@istcabinets.com
⏰ Hours: Monday-Friday 8:00 AM – 5:00 PM
Extending our Mid-Atlantic success to Texas, the Houston showroom brings Fabuwood’s quality construction and expert design services to Southern contractors and builders. This location maintains substantial inventory supporting large-scale commercial projects and residential developments throughout the Houston metropolitan area.
Delaware, DE
📍 835 Pulaski Hwy, Bear, DE 19701
☎️ Phone: (302) 321-1771
📧 Email: info@istcabinets.com
⏰ Hours: Monday-Friday 9:00 AM – 5:00 PM | Saturday 10:00 AM – 2:00 PM
Visit us at istcabinets.com or contact your nearest showroom location for:
- Professional-grade cabinet products and finishing materials
- Technical guidance on shaker cabinet finishing challenges
- Product recommendations for your specific applications
- Expert consultation on cabinet selection and finishing systems
Whether you’re finishing new unfinished Shaker cabinets or refinishing existing installations, IST Cabinets provides the professional support that ensures your projects meet the highest standards of quality and durability.
In Stock Today Cabinets Responds to Rising Demand for RTA Shaker Grey Cabinet Solutions Amid Maryland Kitchen Renovation Surge
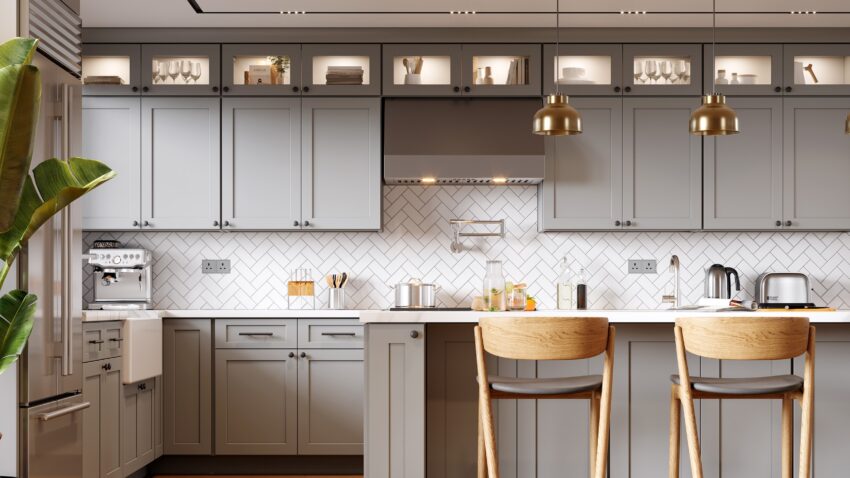
Columbia, MD – November 21, 2025
In Stock Today Cabinets LLC, a Mid-Atlantic cabinetry distributor reports sustained demand for grey shaker-style cabinetry as Maryland homeowners navigate rising renovation costs while seeking sophisticated design solutions. The company has documented consistent requests for ready-to-assemble grey cabinet options, particularly as kitchen remodeling costs in Maryland average $22,253 with ranges extending from $7,912 to $197,800.
The trend aligns with broader market dynamics showing the global ready-to-assemble furniture sector projected to reach $20.3 billion by 2032, growing at a compound annual rate of 6.2 percent. For Columbia and Howard County residents, RTA Shaker Grey Cabinets offer a practical solution that balances aesthetic preferences with budget considerations, delivering approximately 30 to 50 percent cost savings compared to pre-assembled alternatives.
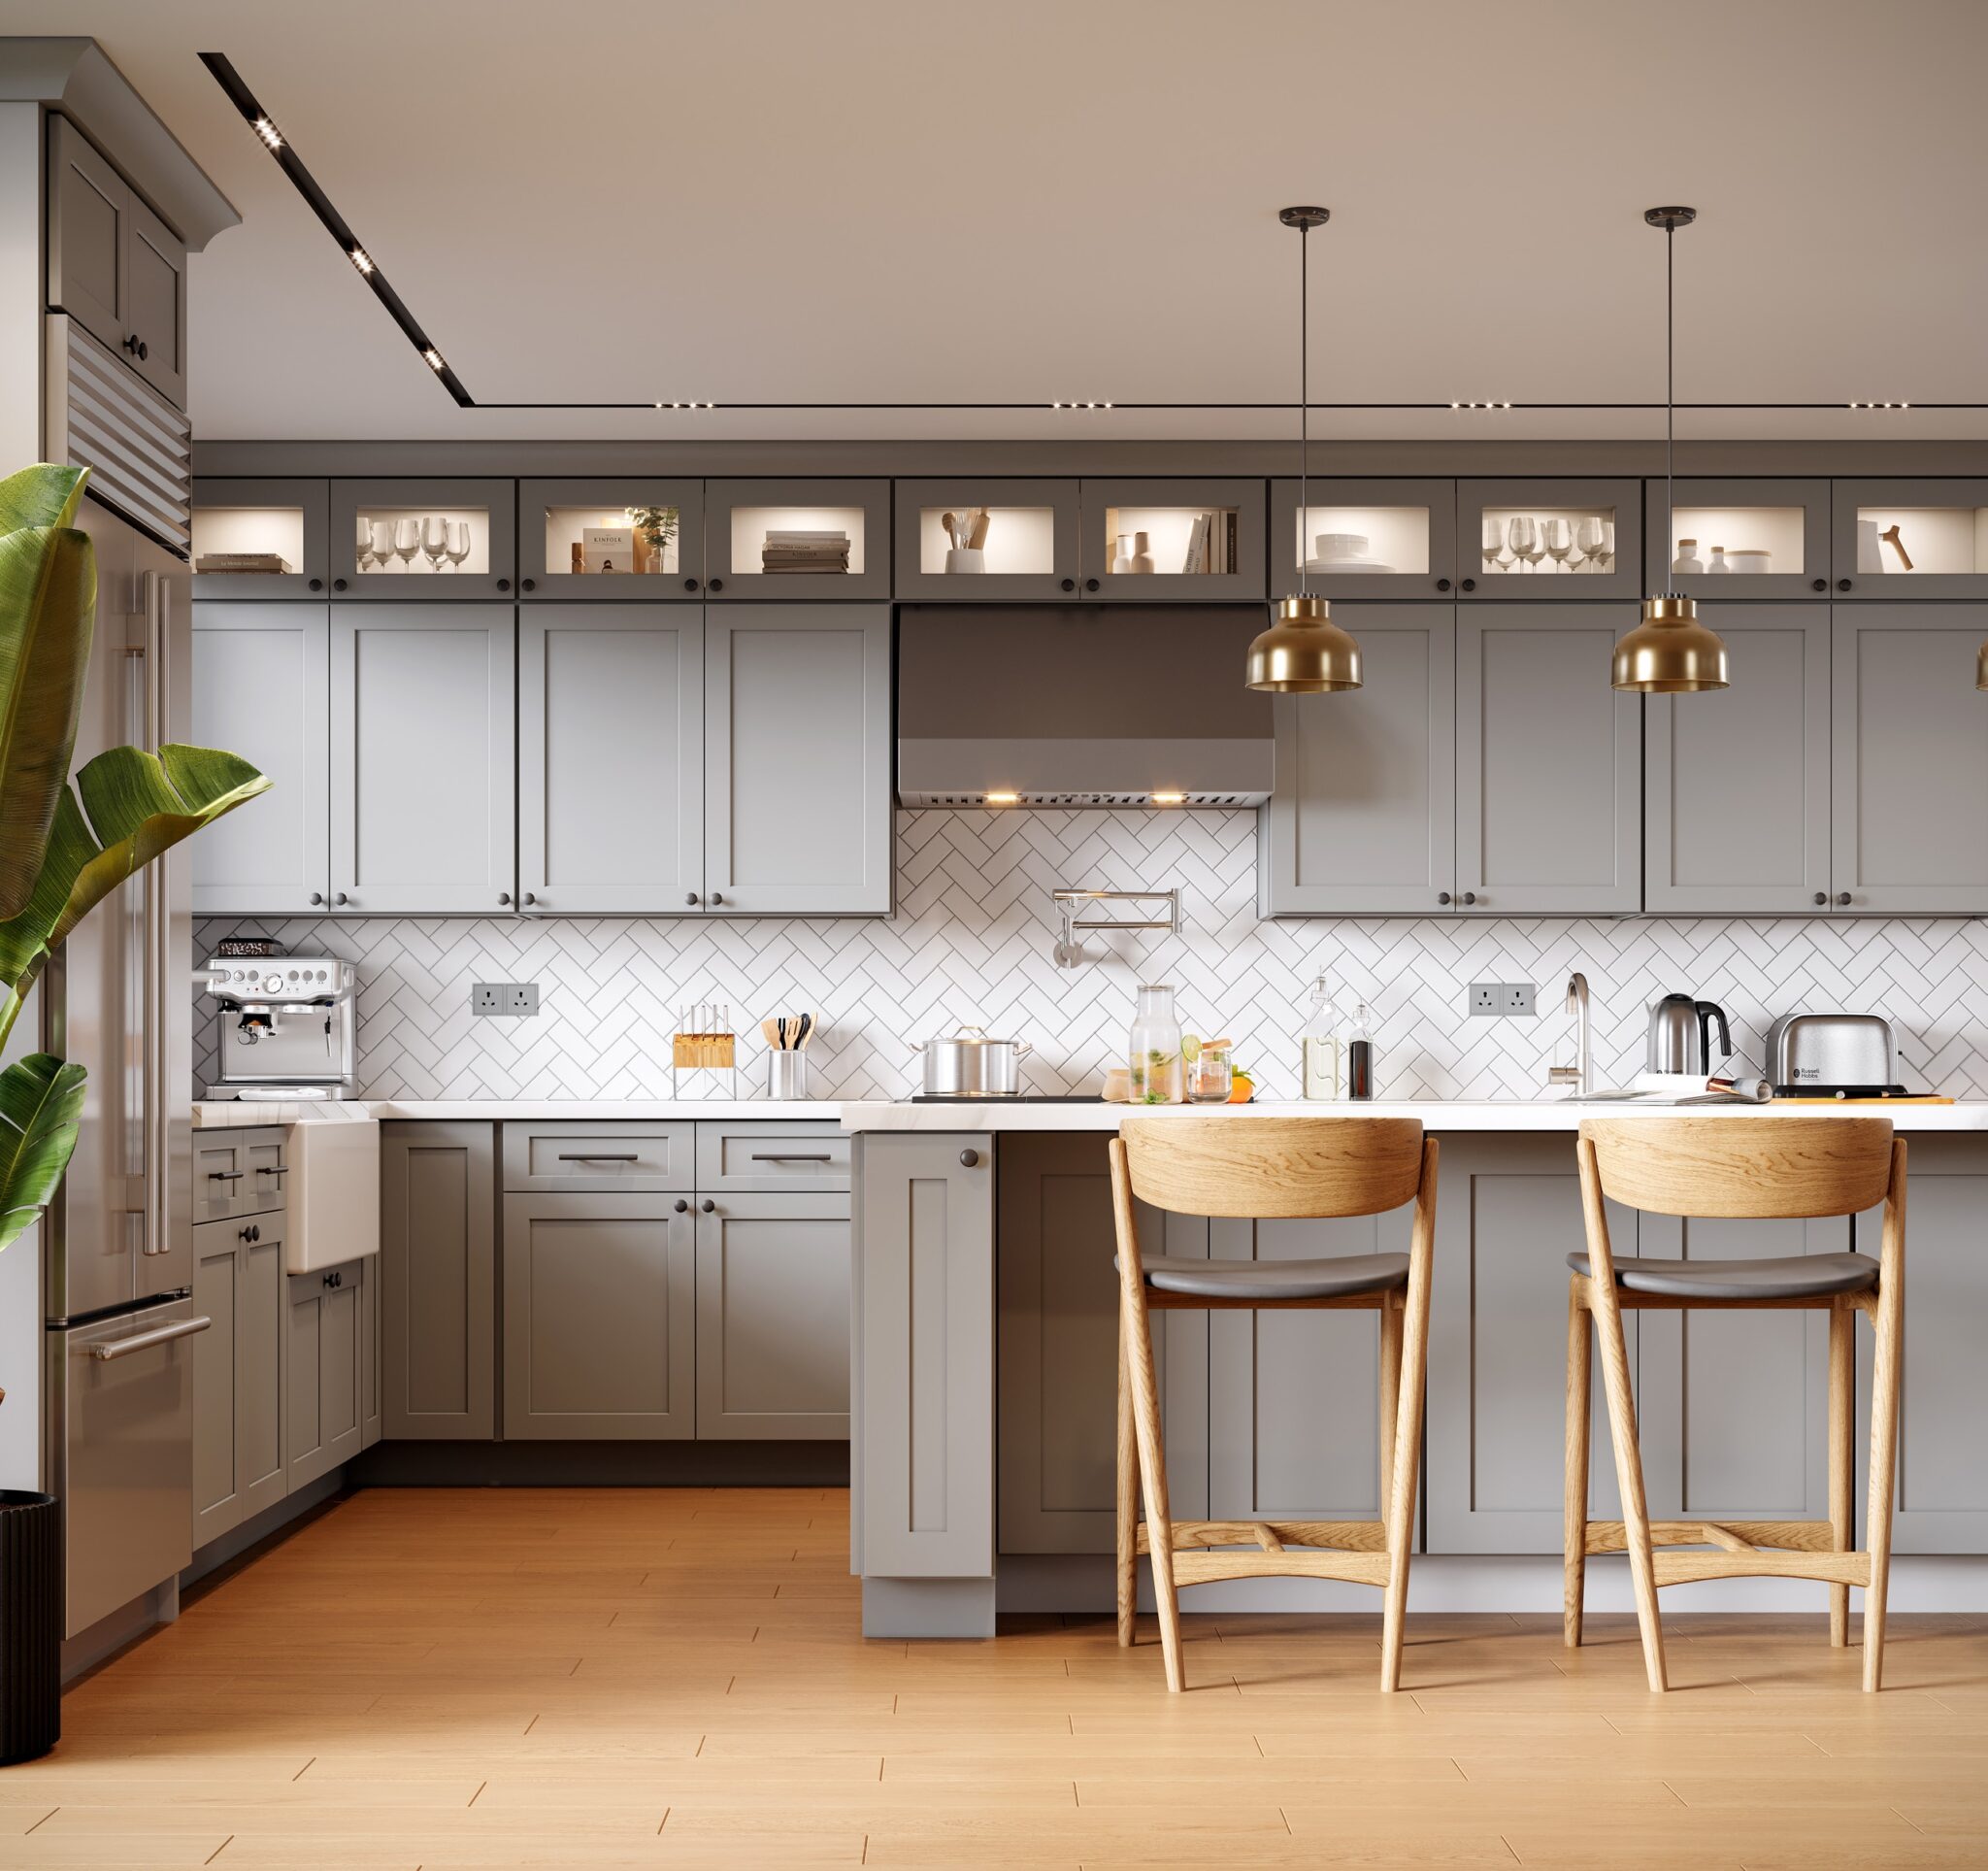
“Our Columbia showroom serves homeowners throughout Howard County, including Ellicott City, Clarksville, and the greater Baltimore-Washington corridor. Over the past year, we’ve documented consistent requests for grey shaker cabinets in RTA format—particularly Fabuwood’s Galaxy Horizon and Nickel collections,” said Emin Halac, spokesperson for In Stock Today Cabinets. “These homeowners value the sophisticated neutral aesthetic grey provides while achieving 40 percent cost savings through RTA assembly. The data indicates Columbia-area families increasingly prioritize both quality and budget in renovation decisions.”
The preference for grey cabinetry persists despite industry reports from the National Kitchen & Bath Association indicating movement toward warmer neutrals. Grey shaker styles maintain their appeal through versatility and compatibility with diverse design approaches, from contemporary to transitional aesthetics. The timeless shaker profile, with its 250-year design heritage, continues to rank as the most requested cabinet style among Maryland homeowners.
ffaColumbia’s market, with median household incomes above state averages, drives demand for cost-effective renovation solutions. Kitchen Cabinets in grey tones particularly resonate with homeowners seeking to enhance property values in Howard County’s active real estate market.
The Fabuwood collections available through In Stock Today Cabinets feature KCMA certification, solid wood construction, dovetail drawers, and Blum soft-close hardware. Unit pricing typically ranges from $200 to $600 in ready-to-assemble format, enabling homeowners to achieve professional-grade kitchen renovations within Maryland’s average project budgets.
“Grey shaker cabinets are adaptable to Columbia’s diverse housing stock—from townhomes to single-family colonials. Industry designers note the style commonly pairs with white quartz countertops and stainless steel appliances for contemporary aesthetics, or with natural wood flooring for transitional styles.” added Halac. “The RTA format means Columbia and Ellicott City homeowners can complete installations efficiently, crucial when coordinating around busy family schedules.”
The trend toward grey RTA cabinetry reflects broader shifts in Maryland’s renovation market, where installation flexibility and cost control increasingly influence purchasing decisions. Industry data suggests this preference will continue through 2025 as material costs remain elevated.
In Stock Today Cabinets operates showrooms across the Mid-Atlantic region, including locations in Alexandria, Fairfax, Columbia, Houston, Illinois and Delaware. The company specializes in all-plywood construction cabinetry, offering both ready-to-assemble and fully assembled options with same-week pickup availability for most Fabuwood lines. The company’s Columbia facility offers design and project planning support for homeowners, contractors, dealers and builders.
###
For more information about In Stock Today Cabinets LLC, contact the company here:
IST Cabinets Columbia MD
Emin Halac
410-429-1414
columbia@istcabinets.com
9315 Snowden River Pkwy Suite E, Columbia, MD 21046