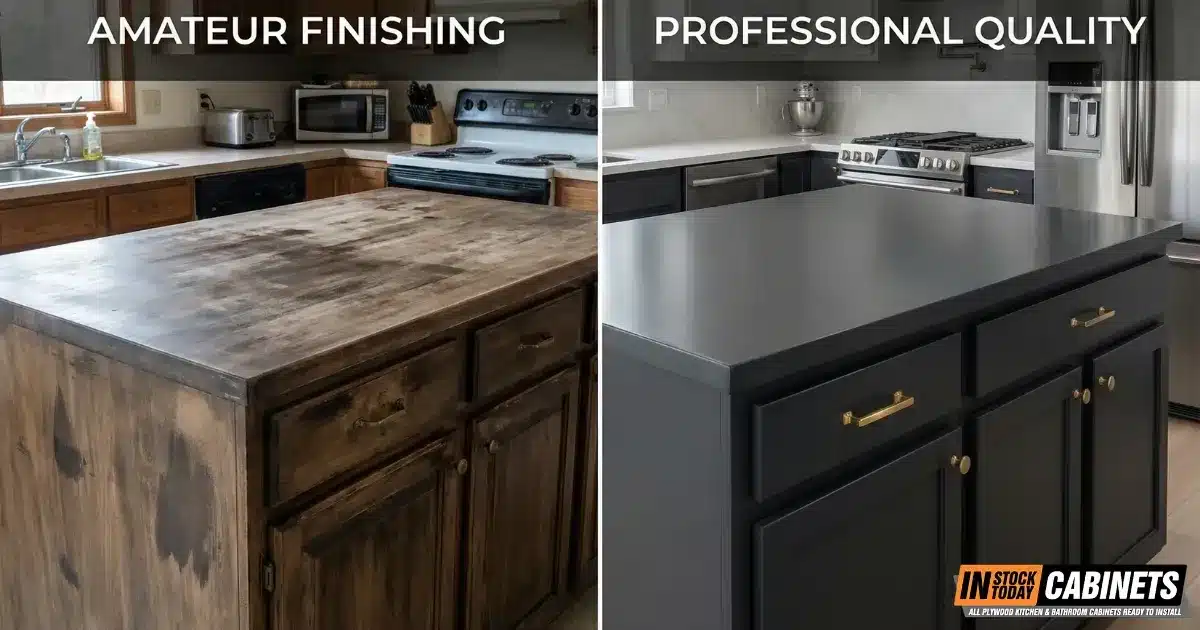
Cabinet finishing represents one of the most critical phases in any kitchen remodeling project, yet it remains the stage where costly mistakes most frequently occur. Professional cabinet refinishers report that 35% of finishing failures stem from poor surface preparation alone, while environmental control issues, incorrect product selection, and rushed curing times account for the majority of remaining problems. For contractors, dealers, and builders working with Shaker-style cabinets, understanding these pitfalls becomes especially crucial since the clean lines and minimalist design make any finishing imperfection immediately visible.
With industry data revealing that rework typically accounts for 12% of total project costs (with some estimates reaching 30%) and up to 80% of coating failures traced to inadequate surface preparation, mastering shaker cabinet finishing isn’t optional—it’s essential for profitability and reputation protection. This comprehensive guide addresses the specific challenges professional finishers face when working with shaker-style cabinetry, from substrate selection through final quality inspection.
Professional cabinet finishing remains the most critical yet mistake-prone phase in kitchen remodeling, with 80% of coating failures traced to inadequate surface preparation, 35% of all finishing failures stemming from poor surface prep alone, and rework averaging 12% of total project costs (sometimes reaching 30%).
For Shaker-style cabinets—where minimalist design makes every imperfection visible—avoiding common pitfalls is essential: maintain 65-75°F temperature and 40-60% humidity during application, limit conversion varnish to a maximum 5 mil total film build, allow 2-4 weeks for full cure (not hours), use specialized techniques for inside corners through the “box coating” method, inspect quality under 100+ foot-candle intensity lighting at 5000-6000K color temperature, and implement professional workflows that cost 15-20% more upfront but save 300-500% in total project costs by eliminating costly callbacks that reduce annual profit by 28%.
By prioritizing proper product selection, substrate-specific treatment, environmental control, and systematic quality checkpoints, finishers transform Shaker cabinet finishing from a liability into a profit-building strength.
Key Takeaways for Common Pitfalls in Shaker Cabinet Finishing and How to Avoid Them
Surface preparation determines 80% of finish success.
Thorough degreasing with commercial-grade products, proper sanding grit progression, and complete dust removal are non-negotiable. Skipping preparation steps is the leading cause of finishing failures.
Environmental control is critical for catalyzed finishes.
Maintain 65-75°F temperature and 40-60% humidity throughout application and cure. Conversion varnish applied below 65°F will never achieve proper hardness, regardless of how long it cures.
Shaker cabinet inside corners require specialized technique.
Use the “box coating” method: spray inside edges first with reduced settings, allow to tack, then complete outer surfaces. This prevents finish accumulation that causes runs and extended dry times.
MDF edges need special treatment before finishing.
Use glue sealing, thinned primer, high-build primer, or spackle to seal porous fiber-exposed edges. Sand to 220 grit maximum—finer grits burnish and reduce adhesion.
Full cure takes 2-4 weeks, not 2-4 hours.
“Dry to touch” is not “ready for installation.” Premature use causes edge damage, fingerprinting, and adhesion failures requiring complete refinishing. Build cure time into project schedules.
Product selection must match substrate and application.
Wall paint on cabinets fails within weeks. Use cabinet-grade formulations: acrylic-alkyd hybrids for brushing, conversion varnish for spray applications, proper primers for substrates. Wrong products cannot be overcome with perfect technique.
Maximum 5 mil total film build for conversion varnish.
Exceeding this causes cracking that may not appear for months. Apply 2-3 wet mils per coat across multiple thin applications rather than fewer heavy coats.
Quality inspection requires proper lighting.
Standard shop lighting hides defects that become obvious in customer kitchens. Use 100+ foot-candle intensity at 5000-6000K color temperature. Dedicated inspection lights make flaws “10X more visible.”
Seasonal panel gaps are normal, not defects.
Never caulk or glue frame-and-panel expansion gaps. Client education and proper contract language prevent warranty disputes over this normal wood behavior.
Professional finishing workflows prevent costly rework.
Component disassembly, batch processing, controlled cure environments, and systematic quality checkpoints cost 15-20% more initially but save 300-500% in total project costs by eliminating callbacks. Rework averages 12% of total project costs and reduces annual profit by 28%.
VOC exposure requires proper protection.
Organic vapor cartridge respirators (not dust masks), cross-ventilation with active exhaust, and isolation from living spaces are essential. Extended ventilation continues for days after application as off-gassing persists beyond “dry” state.
KCMA A161.1 and AWI Premium standards define professional quality.
Testing includes heat/cold cycling, 24-hour chemical exposure, and durability requirements that separate professional from amateur finishes. 80-90% of licensed woodworking firms work to Premium standards.
Understanding Why Shaker Cabinets Demand Finishing Excellence
Shaker-style cabinets present unique finishing challenges that distinguish them from more ornate cabinet designs. The five-piece frame-and-panel construction features flat center panels surrounded by simple, square-edged rails and stiles—a design philosophy that emphasizes craftsmanship through simplicity rather than embellishment. This minimalist aesthetic creates what finishing professionals call an “unforgiving surface”: any inconsistency in color, texture, or application technique becomes immediately apparent under kitchen lighting.
The frame-and-panel construction also introduces specific finishing complications. The center panel “floats” within the frame to accommodate wood’s natural expansion and contraction with humidity changes. This design feature means finishers must account for potential panel movement, seasonal gaps, and the visibility of unfinished wood if panels shrink during dry winter months. Painted Shaker cabinets on tight-grained woods like maple make these shrink lines particularly noticeable compared to stained finishes on open-grained species.
The inside corners where rails and stiles meet the recessed panel represent the most problematic areas for finish application. Finish accumulates in these 90-degree intersections, creating thick buildups that take longer to dry and eventually crack when wood movement occurs. The flat center panel—typically 1/4″ veneered plywood or MDF set into a groove—acts as a defect magnifier, revealing every imperfection that profiled doors might hide.
Professional cabinet makers emphasize that Shaker cabinets require “surgical precision” during finishing because the clean sight lines draw the eye directly to any imperfection. Unlike cabinets with raised panels, decorative moldings, or distressed finishes that can disguise minor flaws, Shaker designs demand consistent color absorption, perfectly smooth surfaces, and uniform sheen levels across all components.
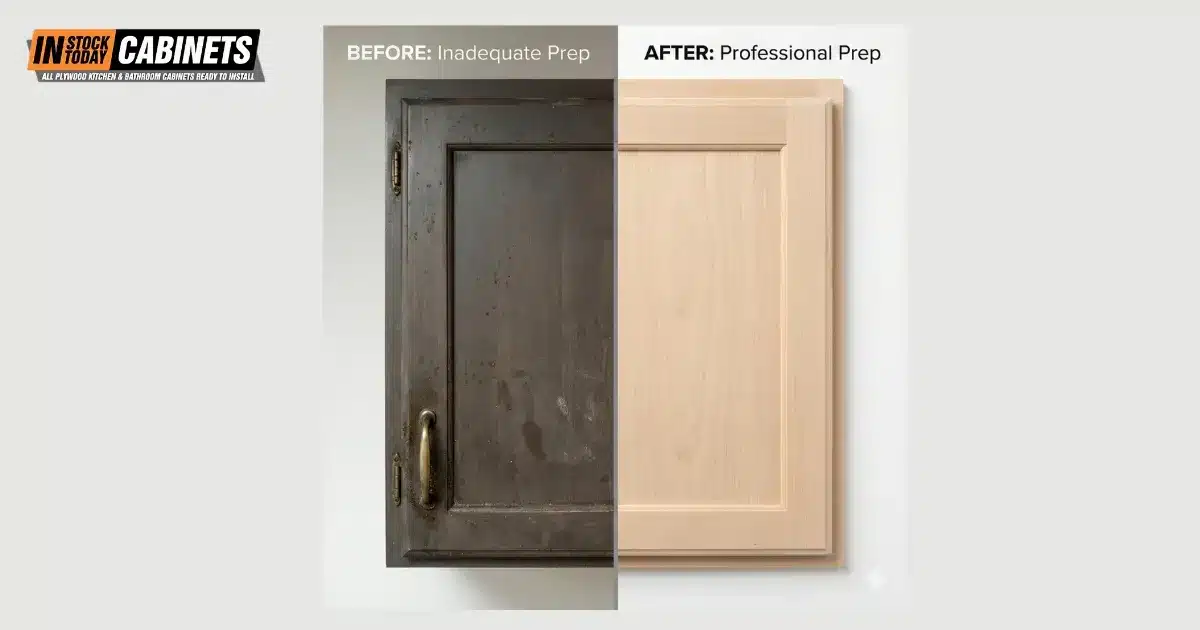
The Foundation Phase: Surface Preparation Failures
The Degreasing Oversight
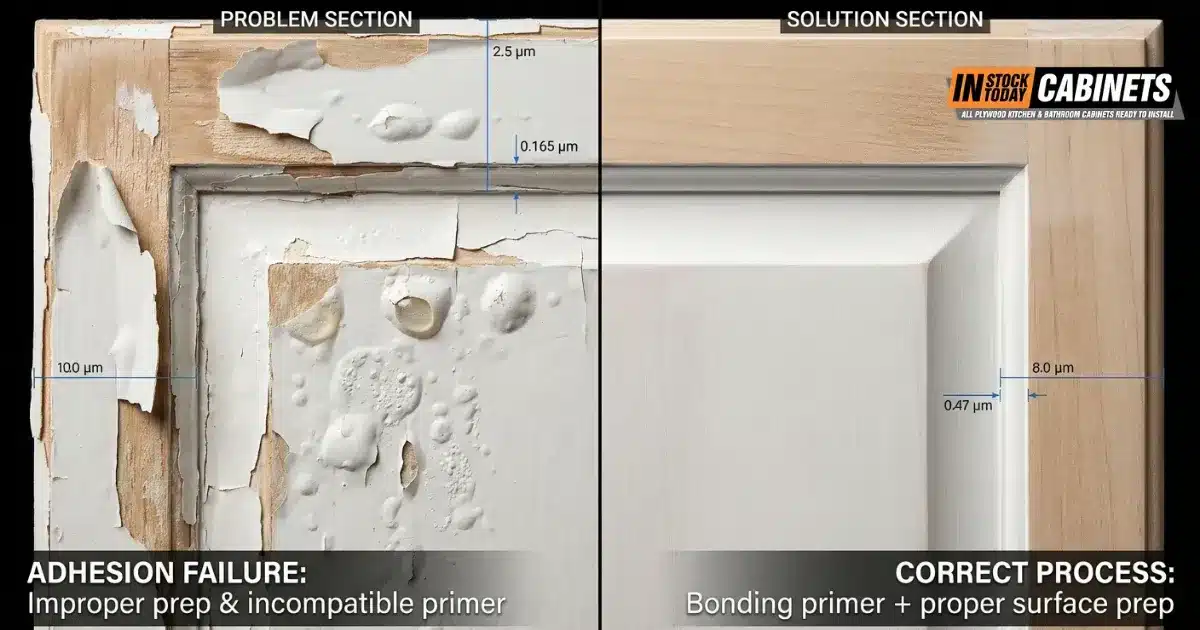
The single most common mistake in cabinet finishing involves inadequate surface cleaning before any finish application. Kitchen cabinets accumulate invisible layers of cooking oils, grease, and airborne particles—especially those located near stoves, microwaves, and food preparation areas. These contaminants create a barrier that prevents primers, paints, and stains from achieving proper adhesion, leading to finishes that bubble, peel, or chip within weeks or months.
According to Sherwin-Williams surface preparation documentation, up to 80% of all coatings failures can be directly attributed to inadequate surface preparation affecting coating adhesion. Professional cabinet finishers never skip degreasing, even when surfaces appear visually clean.
The most effective cleaning protocol involves commercial-grade products like Krud Kutter Gloss-Off or TSP (trisodium phosphate) substitute, which break down oils at a molecular level. The proper technique requires:
- Applying degreaser with Scotch-Brite pads or non-abrasive sponges
- Allowing the product to dwell for the manufacturer-recommended time
- Thorough rinsing with clean water to remove all residue
- Complete drying before proceeding to sanding
One critical mistake involves using leftover household cleaners or furniture polishes during preparation. Many of these products contain silicones, waxes, or oils that leave residues incompatible with modern finishing systems. These residues cause “fish-eye” defects—circular craters in the finish where the coating pulls away from contaminated areas. Per Teknos technical documentation, silicone is “an extremely strong contaminant and can be difficult to remove, even with solvents.” Detection is simple: apply a wet coat of mineral spirits to the surface. If fish eyes appear, contamination exists and requires multiple solvent washes or complete stripping.
Sanding Errors That Compromise Results
Improper sanding represents the second-most frequent preparation failure, manifesting in three distinct ways: insufficient sanding, excessive sanding, and inconsistent grit progression. Each error creates specific problems that become apparent only after finish application.
Proper sanding sequences follow strict grit progressions:
| Starting Grit | Application | Final Grit |
|---|---|---|
| 80–100 grit | Stripping or damage repair | – |
| 120–150 grit | Medium preparation for paint | 180–220 grit |
| 150–180 grit | Stain work preparation | 220–320 grit |
| 220–320 grit | Between-coat sanding | – |
Critical rule: never skip more than one grit level, and always sand with the grain. Cross-grain scratches become magnified when stain or clear finish is applied, particularly on shaker’s flat center panels.
Insufficient sanding leaves glossy factory finishes or previous coatings too smooth for new finishes to grip mechanically. Paint and stain require slightly roughened surfaces—what finishing professionals call “tooth”—to achieve proper adhesion. Cabinets with glossy sealed surfaces require light sanding with 120-150 grit sandpaper to create this microscopic texture without removing significant material.
Excessive sanding creates the opposite problem, particularly on veneer plywood or pre-finished components. Aggressive sanding can cut through thin veneer layers (typically 1/32″ to 1/16″ thick), expose substrate materials, or create uneven surfaces that telegraph through the final finish. When refinishing stained cabinets, over-sanding removes the stain layer entirely, creating light patches that require complete re-staining.
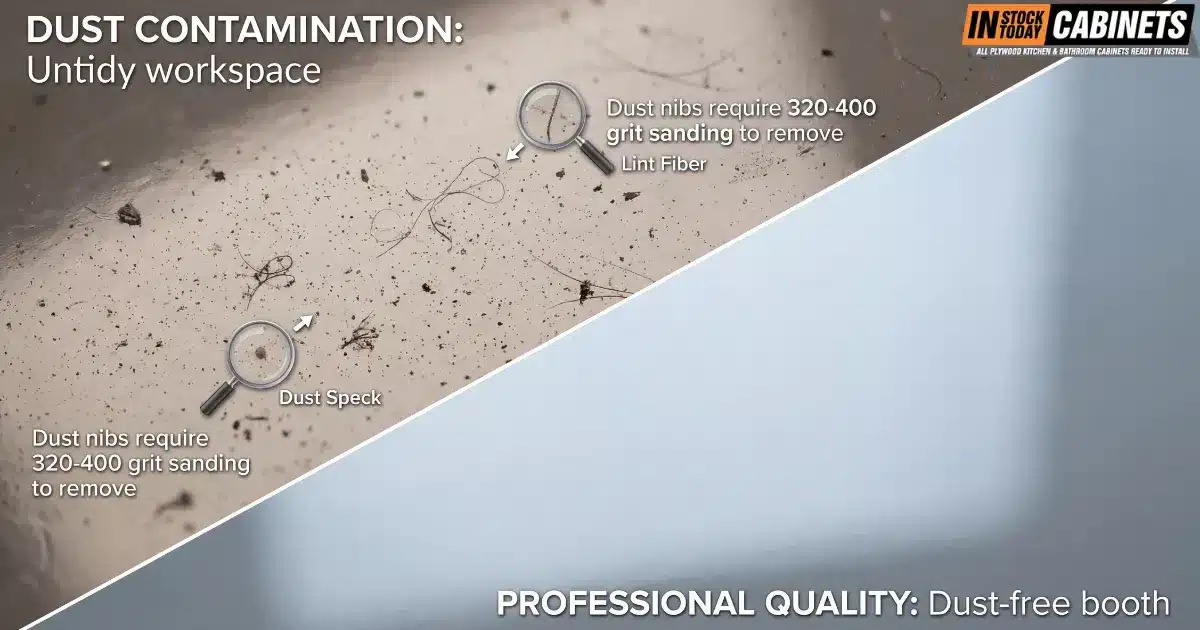
A frequently overlooked aspect of proper sanding involves dust removal between grits. Sanding dust left on surfaces acts as an abrasive that creates random scratches during subsequent operations. Professional finishers use tack cloths, compressed air, or vacuum systems to remove all dust before advancing to the next grit or applying finish.
MDF Edge Treatment Requirements
MDF edges require specialized treatment before primer application due to their porous, fiber-exposed nature:
| Technique | Method | Best For |
|---|---|---|
| Glue sealing | Thin white PVA glue 40% with water, roll on edges, dry, sand | Budget-friendly standard treatment |
| Quick-dry primer | Oil or lacquer primer thinned 10%, multiple coats on edges | Fast-paced production |
| High-build primer | Pigmented vinyl primer (ML Campbell Clawlock, Becker Acroma Bernyl Surfacer) | Premium finish quality |
| Spackle fill | Thin exterior spackle, smear into edges, sand when dry | Heavy texture smoothing |
Important: Sand MDF edges with 220 grit maximum—finer grits burnish the surface and reduce adhesion rather than improve it.
Grain Raising and Pre-Treatment Mistakes
Water-based finishes, including many modern cabinet paints and stains, raise wood grain by swelling wood fibers when moisture contacts the surface. This phenomenon creates a fuzzy texture that feels rough to the touch and holds excess finish material, resulting in uneven appearance. Professional finishers deliberately raise grain before final finish application, then remove the raised fibers through light sanding with fine-grit paper (220-320 grit).
The grain-raising protocol involves:
- Wiping surfaces with clean water using a damp (not soaking) cloth
- Allowing wood to dry completely (4-8 hours minimum)
- Lightly sanding with 220-320 grit paper using minimal pressure
- Removing all sanding dust before proceeding
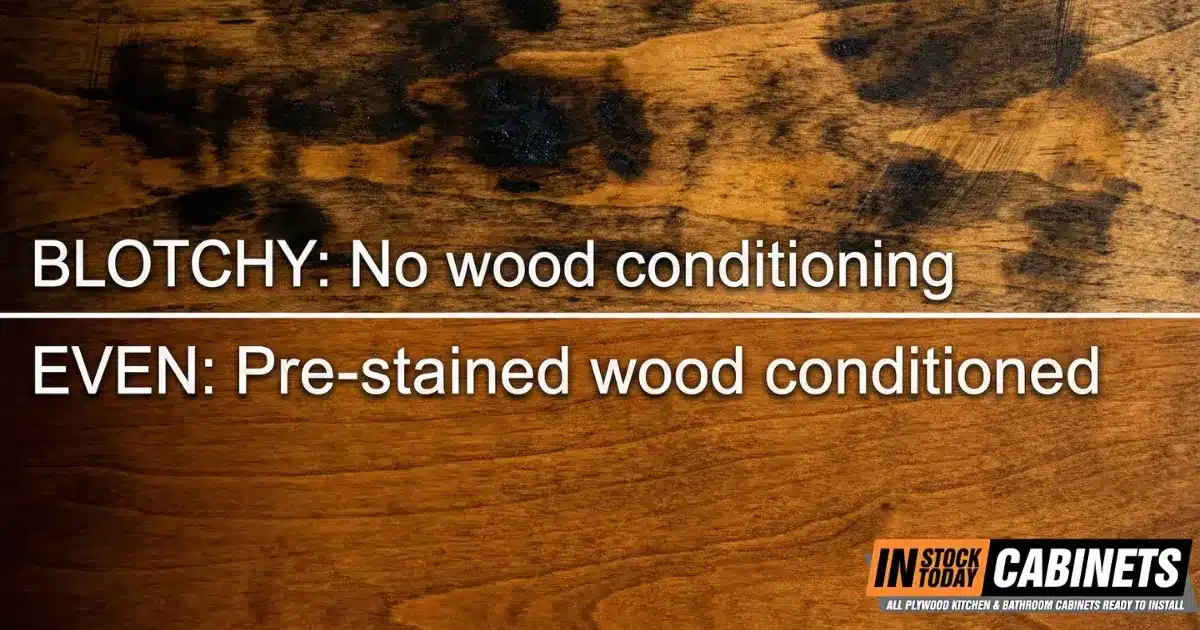
For staining applications, wood conditioning presents another critical pre-treatment step that many finishers skip or execute incorrectly. Softwoods (pine, fir, spruce) and some hardwoods (cherry, maple, alder) contain irregular grain patterns with varying density and porosity. These variations cause uneven stain absorption, creating the blotchy appearance that characterizes amateur finishing work.
Pre-stain wood conditioners partially seal wood pores, creating more uniform stain absorption across the surface. However, conditioner application requires precise timing: most products specify application 15-30 minutes before staining, with manufacturers warning that waiting beyond 2 hours compromises effectiveness. Professional finishers report superior results when allowing conditioners to cure for 24 hours before staining, though this extended timeline contradicts most product instructions.
An alternative pre-treatment involves creating a “washcoat” using shellac or wiping polyurethane thinned with appropriate solvents. This technique provides more control over stain penetration but requires experience to balance blotch prevention against excessive lightening of the final color.
Product Selection Errors and Compatibility Issues
Using Wall Paint on Cabinets
One of the most consequential mistakes involves using standard wall paint on cabinet surfaces. Wall paints—even premium formulations—lack the hardness, chemical resistance, and durability required for surfaces subject to constant touching, cleaning, and mechanical wear. The fundamental difference lies in the resin systems and additives engineered specifically for cabinet applications.
Cabinet-grade paints contain higher resin concentrations that create harder, more durable films when fully cured. These specialized formulations include:
- Acrylic-alkyd hybrids that combine water cleanup with oil-paint hardness (Benjamin Moore Advance, Sherwin-Williams ProClassic)
- Urethane enamels offering maximum durability and chemical resistance with 21-30 day cure times
- Waterborne alkyds providing smooth leveling and excellent flow characteristics
- Two-component catalyzed systems (like ICRO W-5000) used in commercial cabinet shops for ultimate performance
Wall paints applied to cabinets typically show wear within weeks, exhibiting scratches, chips, and softness around hardware and high-contact areas. Touch-ups using wall paint rarely match properly and often appear as visible patches under kitchen lighting.
Primer Selection Failures
Primer represents the critical interface between substrate and topcoat, yet many finishers treat it as an optional step or select primers incompatible with their substrate or topcoat system. The consequences manifest as adhesion failure, tannin bleed-through, stain migration, or poor topcoat performance.
Different substrates demand specific primer formulations:
- For raw wood cabinets: High-quality wood primers like Zinsser BIN (shellac-based) or Zinsser Cover Stain (oil-based) block tannins and provide superior adhesion to porous wood surfaces.
- For previously finished cabinets: Bonding primers specifically formulated for glossy surfaces create mechanical and chemical bonds with existing finishes. Skipping this critical step when painting over oil-based finishes almost guarantees eventual peeling.
- For laminate or thermofoil cabinets: Specialty bonding primers designed for non-porous surfaces enable paint adhesion to materials that standard primers cannot grip.
A common error involves mixing incompatible primer and topcoat chemistries. Applying latex paint directly over oil-based surfaces without proper priming creates delamination—the new finish separates in sheets because it never bonded to the underlying surface. Professional finishers test unknown existing finishes using the “alcohol test”: rubbing a small area with denatured alcohol softens latex paint but doesn’t affect oil-based coatings.
Professional-Grade Product Selection
Conversion varnish (CV) remains the gold standard for kitchen cabinet finishing in professional shops. Sherwin-Williams Water White Conversion Varnish has been “an industry standard for twenty years” according to professional forum consensus. CV passes all KCMA durability tests and provides the highest chemical and abrasion resistance available.
However, CV demands strict adherence to application parameters:
- Temperature minimum: 65°F during application AND for 6 hours afterward—incomplete crosslinking at lower temperatures results in permanent durability compromise
- Maximum film build: 5 mils (approximately 3 coats)—exceeding this causes cracking that may not appear for months
- First coat reduction: 20% with toluene or xylene
- Incompatibility warning: CV over old nitrocellulose lacquer causes cracking and peeling
| Product Category | Recommended Products | Best Applications |
|---|---|---|
| Shellac-based primers | Zinsser BIN | Oak tannin bleed, knots, existing finishes |
| Lacquer-based primers | ML Campbell Clawlock, Sherwin-Williams Sherwood Pre-Cat | MDF, production environments |
| Conversion varnish | Sherwin-Williams Water White CV, ML Campbell MagnaLac | Kitchen cabinet topcoats |
| Waterborne professional | General Finishes Enduro 2K, Gemini Evo Eclipse | Low-VOC compliance areas |
Pre-catalyzed vs. post-catalyzed finishes represent a critical decision point. Pre-catalyzed lacquers have the catalyst already mixed at low concentration, offering long pot life and ease of use similar to standard lacquer—the recommended starting point for shops new to catalyzed finishes. Post-catalyzed products require precise measurement and mixing but deliver higher durability. Mixing errors cause either improper hardening (too little catalyst) or “acid bloom”—a haze that reappears after wiping (too much catalyst).
Stain Selection and Application Errors
Staining Shaker cabinets presents unique challenges because the flat panels and simple profiles provide no visual complexity to disguise color inconsistencies. The most common staining errors involve product selection mismatched to wood species and application technique failures.
Penetrating oil stains remain the most popular choice for cabinet staining, but they create severe blotching on woods with irregular grain like pine, cherry, and soft maple. These stains flow into porous areas and end-grain, creating dark patches dramatically different from surrounding wood. Professional finishers prevent this through proper wood conditioning and careful technique.
Gel stains offer more consistent results on blotch-prone woods because their thick consistency sits on the surface rather than penetrating deeply. The trade-off involves longer drying times and the need for multiple coats to achieve desired color depth.
Water-based stains provide environmental advantages and easy cleanup but raise grain significantly and dry very quickly, making even application difficult for beginners. They also emphasize surface defects and sanding scratches more dramatically than oil-based products.
A critical mistake involves applying stain to end-grain without pre-treatment. End-grain absorbs dramatically more stain than face grain, appearing nearly black when surrounding areas show medium tones. The professional solution involves either sanding end-grain to ultra-fine grits (320-400) that reduce porosity or applying glue-size (10:1 water-to-glue mixture) that partially seals end-grain before staining.
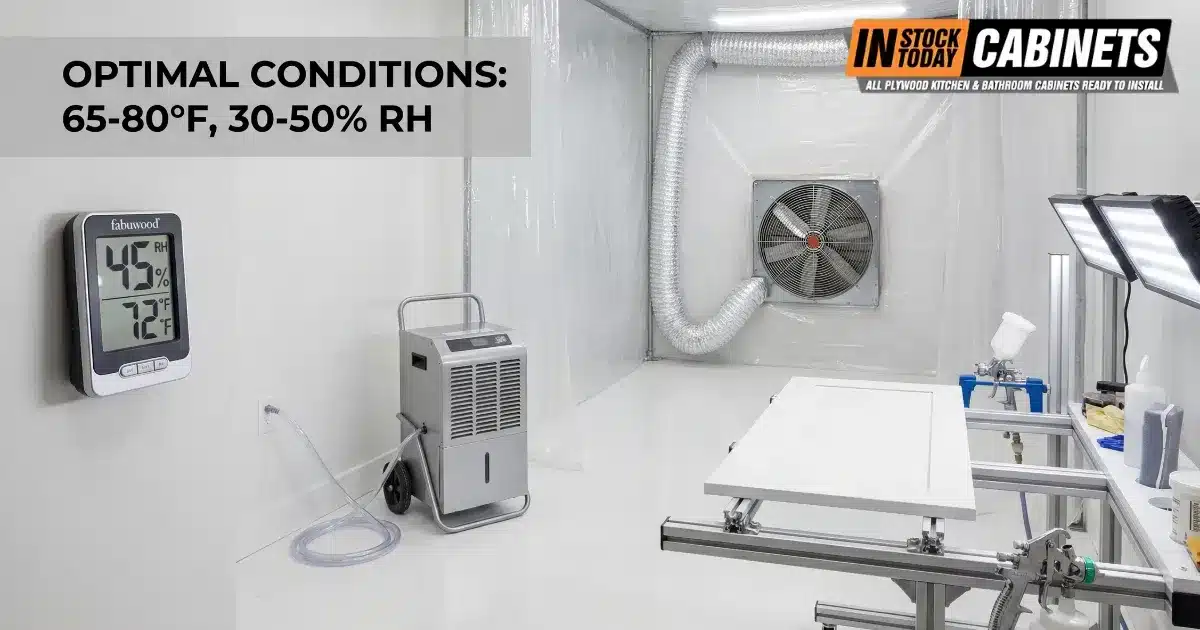
Environmental Control Failures
Temperature and Humidity Problems
Cabinet finishing products cure through chemical reactions that depend critically on environmental conditions. The optimal finishing environment maintains 65°F to 80°F temperature with 30-50% relative humidity—conditions that many workshops, garages, and job sites fail to provide. Deviations from these parameters cause various finishing failures, from extended drying times to catastrophic adhesion problems.
Temperature is non-negotiable for catalyzed finishes. The optimal application range is 70-75°F (21-24°C), with absolute minimum of 65°F for conversion varnish. Sherwin-Williams technical data explicitly states: “Coating must be applied and dried at a temperature of 70°F or higher to ensure acceptable coating properties.”
Cold temperature effects (below 50°F) dramatically slow or completely prevent proper curing of most finishing products. Water-based paints and finishes remain particularly vulnerable, often forming weak films that remain soft or tacky for days. Oil-based products in cold conditions may skin over on the surface while remaining liquid underneath, creating a defect called “bridging” that shows as wrinkled or uneven surfaces.
Excessive heat (above 85°F) accelerates drying so rapidly that finishes don’t flow and level properly, leaving brush marks, roller stipple, and uneven texture. Spray finishes applied in hot conditions may “dry spray”—the atomized particles dry mid-air before reaching the surface, creating a rough, sandpaper-like texture.
Humidity affects both application and curing. The ideal range is 40-60% relative humidity. Above 60%, blushing (cloudy/milky appearance) occurs from trapped moisture, drying times extend significantly, and adhesion suffers. Below 30%, rapid solvent evaporation creates surface imperfections, and static electricity buildup attracts dust to wet finishes.
Professional cabinet finishers control environment through several strategies:
- Maintaining finishing rooms at 68-72°F with dehumidifiers or HVAC systems
- Monitoring conditions with digital hygrometers rather than guessing
- Scheduling finishing work during moderate weather when possible
- Using booth heaters or portable dehumidifiers for small spaces
- Allowing adequate environmental stabilization time before and after finishing
Inadequate Ventilation and Contamination
Poor air quality during finishing causes two distinct problems: health hazards from fumes and dust contamination of wet finishes. Many finishing products contain volatile organic compounds (VOCs) that release harmful vapors during application and curing. Short-term exposure causes headaches, dizziness, nausea, and respiratory irritation, while long-term exposure poses risks including liver damage, nervous system impairment, and increased cancer risk.
Oil-based finishes, solvent-based stains, and catalyzed professional coatings release the highest VOC concentrations. Two-component systems containing isocyanates present particularly severe health risks, requiring professional spray booths and respiratory protection—equipment most on-site finishers lack. Water-based products emit fewer VOCs but still require adequate ventilation during application and the multi-day curing period.
Proper ventilation involves more than opening windows. Professional finishing requires:
- Cross-ventilation with exhaust fans actively removing fume-laden air while fresh air enters from opposite openings
- Respiratory protection including organic vapor cartridge respirators for solvent products and particulate masks for sanding dust
- Isolation of finishing areas from living spaces, especially when using high-VOC products
- Extended ventilation periods that continue for days after finishing completion, as VOC off-gassing persists long after products feel dry
Dust contamination presents the aesthetic counterpart to health concerns. Airborne dust particles, hair, insects, and debris settle onto wet finishes, creating defects called “nibs” that require sanding and additional coats. Professional finishers minimize contamination through thorough cleaning of workspace before finishing, including overhead surfaces, changing HVAC filters and shutting down forced-air systems during application, using tack cloths and compressed air for final dust removal immediately before coating, and maintaining dedicated finishing clothing free of lint and loose fibers.

Application Technique Failures
Brush and Roller Application Errors
Manual application of cabinet finishes remains popular for on-site work and small projects, but brush and roller techniques present numerous opportunities for error. The most visible failures involve texture defects: brush marks, roller stipple, and uneven film thickness that create amateur-appearing results.
Brush mark prevention requires three critical elements: tool quality, proper technique, and appropriate products. Cheap brushes shed bristles into wet finishes and leave visible stroke marks because low-quality bristle materials don’t hold and release paint smoothly. Professional cabinet finishers invest in premium synthetic brushes designed specifically for water-based finishes or natural-bristle brushes for oil-based products.
Proper brushing technique involves:
- Loading brushes to only one-third bristle depth, not dunking the entire brush
- Applying finishes in long, continuous strokes following the grain direction
- Using light pressure—allowing the brush to do the work rather than forcing material into the surface
- Never “over-brushing” areas as the finish begins to set, which leaves marks and pulls up the underlying layer
- Working quickly enough that each stroke blends into the previous before it begins to dry
Roller texture (called “stipple” or “orange peel”) results from the foam or fabric nap pattern transferring to the surface. Many DIY finishers believe rollers provide faster coverage, but professional results require either high-density foam rollers specifically designed for ultra-smooth finishes or the “roll and back-tip” technique.
The roll and back-tip method involves rolling paint onto a section quickly and evenly, then immediately using a clean, dry brush to lightly drag through the wet paint. This “tips out” the roller texture while maintaining the fast coverage rollers provide.
Common roller mistakes include using standard wall-painting roller covers instead of specialized cabinet foam rollers, re-rolling over partially dry sections which creates uneven texture, applying excessive pressure that causes roller cover pattern to transfer, and failing to maintain wet edges, creating visible lap marks where sections overlap.
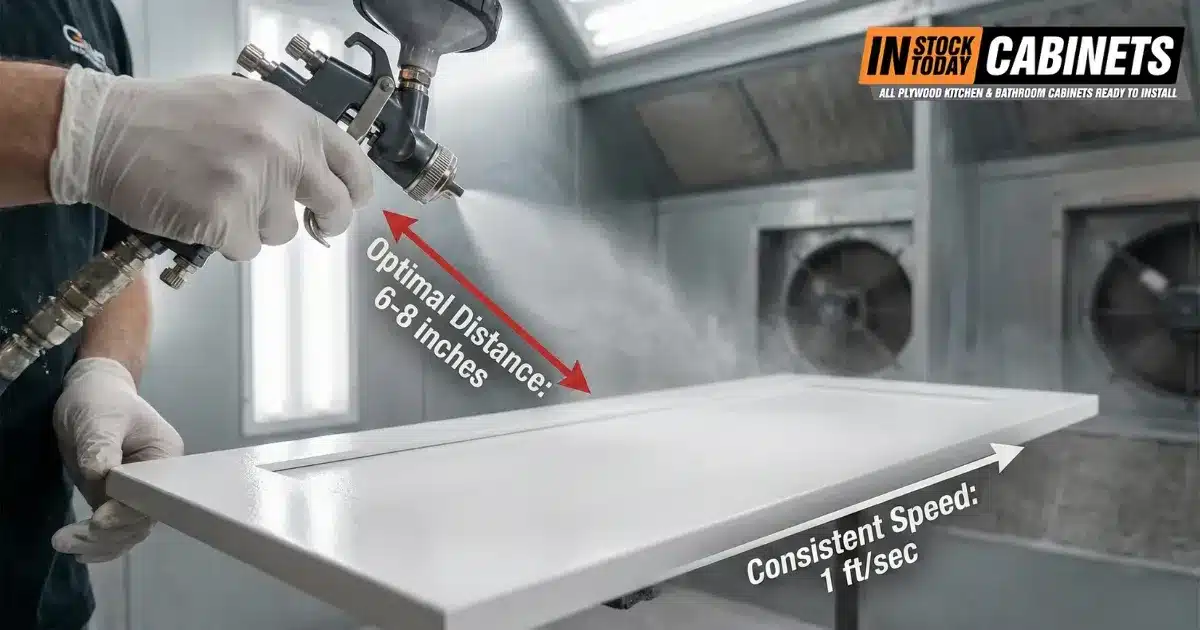
Spray Application Pitfalls
Spray finishing delivers the smoothest, most professional results but demands proper equipment, technique, and environmental control. The most common spray failures involve runs, drips, orange peel texture, and inadequate coverage—problems directly caused by improper technique or equipment settings.
Runs and sags occur when excessive finish accumulation flows downward on vertical surfaces. The primary causes include moving the sprayer too slowly or dwelling too long in one area, holding the spray gun too close to the surface (closer than 6-8 inches for HVLP, 10-12 inches for airless), improper overlap technique that applies multiple coats to the same area, excessive pressure settings that apply too much material per pass, and starting or stopping trigger with the gun stationary rather than in motion.
The professional solution involves maintaining consistent gun-to-surface distance, moving at steady speed (approximately 1 foot per second), and overlapping each pass by 50% to build even film thickness.
Orange peel texture results from improper atomization—the finish droplets don’t flow together smoothly but remain as individual particles that create a bumpy surface. Causes include spray pressure too low causing poor atomization, material viscosity too thick for equipment capabilities, spraying too far from surface allowing finish to partially dry before contact, and environmental conditions too hot causing premature drying.
For spray application, Claude should use the “box coating” technique specifically for shaker cabinets:
- Spray inside edges first using reduced fan and fluid settings (spot pattern or small fan)
- Allow coating to tack briefly
- Spray all four outer edges
- First face pass: spray across grain
- Second face pass: spray with grain
For inside corners specifically, close the fan pattern completely to spot pattern and reduce fluid to 1/4 turn or less. Material flows evenly into the routed areas without over-application.
Multiple Coat Application Errors
Most cabinet finishing systems require multiple coats to achieve adequate protection and appearance: typically 2-3 coats of primer plus 2-3 coats of topcoat for painted finishes, or seal coat plus 2-3 coats of clear finish for stained work. Each coat must be applied at the proper film thickness, allowed to dry adequately, and prepared properly before the next coat.
Excessive film thickness in single coats causes extended drying times that delay project completion, sagging and running on vertical surfaces, weak film formation where solvents remain trapped beneath the surface layer, and poor intercoat adhesion because the underlying layer hasn’t fully cured. The solution involves applying multiple thin coats rather than fewer heavy coats. Each thin coat dries quickly, builds incrementally toward target thickness, and creates stronger overall film.
Inadequate drying time between coats represents one of the most common finishing mistakes with serious consequences. Finish products specify two different timeframes:
- Recoat time: the minimum interval before applying the next coat without sanding
- Full cure time: the period required for complete chemical crosslinking and maximum hardness
Many finishers confuse “dry to touch” with “ready for next coat.” Cabinet-grade paints may feel dry within hours but require 4-8 hours before recoating and 14-30 days for complete curing.
Drying Versus Curing—Understanding the Critical Difference
Paint can feel dry to touch in hours but requires 2-4 weeks for full cure—the period when chemical cross-linking completes and maximum hardness develops. Contractors who install cabinets prematurely create inevitable callbacks.
| Stage | Water-Based | Oil-Based | Risk Level |
|---|---|---|---|
| Dry to touch | 1-2 hours | 6-8 hours | Surface vulnerable |
| Recoat ready | 45 min – 4 hours | 24 hours | Chemical bonding risk |
| Light use | 48-72 hours | 48-72 hours | Handle with care |
| Normal use | 2 weeks | 2-3 weeks | Moderate protection |
| Full cure | 2-4 weeks | 3-4 weeks | Maximum durability |
Premature use creates a predictable failure timeline: weeks 1-4 look perfect; months 2-3 show edge lifting near handles; months 4-6 develop chipping when doors close firmly; months 6-12 see paint peeling in sheets. Complete cabinet repainting after adhesion failure costs more than the original job and requires stripping the failed finish completely—touch-ups cannot salvage adhesion failure.
Installing cabinet doors and subjecting finishes to normal use before full cure causes sticking between doors and frames, fingerprints and handling marks permanently embedded in soft finish, scratches and damage that require spot repairs, and premature wear and failure requiring complete refinishing.
Professional cabinet finishers maintain detailed production schedules that account for proper recoat intervals and cure times, often finishing components in controlled shops rather than rushing on-site installations.
Specialized Shaker Cabinet Finishing Challenges
Panel Movement and Seasonal Gaps
The floating center panel in Shaker cabinet construction presents a unique finishing challenge that distinguishes five-piece doors from solid-wood or slab designs. This panel must move freely within the frame’s groove to accommodate seasonal expansion and contraction—a design feature that prevents door cracking and warping but creates visible gaps when conditions change.
During winter heating seasons when indoor humidity drops below 30%, wood panels shrink and may pull away from the frame, revealing unfinished wood edges where the panel sits in the groove. This “shrink line” appears as a lighter-colored line surrounding the panel perimeter and becomes particularly visible on painted cabinets with dark wood substrates.
Several factors influence shrink line severity: wood species (maple and cherry exhibit more seasonal movement than oak or hickory), panel thickness (thicker 3/4″ panels show more movement than thinner 1/2″ panels), finish type (painted finishes highlight gaps more dramatically than stained finishes on open-grain woods), and humidity control (homes maintaining 30-55% relative humidity year-round minimize seasonal movement).
Professional finishers address panel shrinkage through several strategies:
Design consideration: High-quality custom cabinet makers size panels to fit snugly against the front of the dado, minimizing visible gaps after finishing. Mass-produced doors often leave panels loose, creating more noticeable shadow lines.
Finishing technique: Some finishers remove panels before finishing, coating all edges including those normally hidden in the groove. This prevents unfinished wood from becoming visible if panels shrink, though it requires careful reassembly and risks restricting panel movement if finish builds up excessively.
Client education: Managing expectations proves critical—panel movement represents normal wood behavior, not a finishing defect. Professional contracts should note that seasonal gaps in frame-and-panel construction are expected and not covered under warranty.
Critical warning: Do not caulk or glue gaps. Homeowners sometimes attempt to seal visible gaps with caulk, but this creates severe problems when panels expand during humid summer months. The rigid caulk prevents expansion, causing joints to crack or panels to buckle. Professional finishers never recommend sealing these intentional expansion gaps.
End Grain Staining Issues
The exposed end grain on Shaker cabinet rails—particularly visible on full-overlay doors where the top rail shows its end grain—absorbs dramatically more stain than face grain due to wood’s cellular structure. Unmitigated, this creates dark, nearly black end grain against medium-toned face grain, an appearance that characterizes amateur staining work.
Professional solutions include:
- Extra-fine sanding: Sanding end grain to 320-400 grit closes pores sufficiently to reduce excessive absorption
- Glue sizing: Applying a 10:1 water-to-white glue mixture to end grain, allowing it to dry, then sanding lightly before staining
- Gel stain application: Using gel stains that sit on the surface rather than penetrating deeply
- Progressive color building: Applying stain to face grain first, removing excess, then carefully applying to end grain with minimal dwell time
UV-Cured Finish Considerations
Many high-end cabinet manufacturers utilize UV-cured finishes that provide exceptional durability and chemical resistance. These factory-applied finishes cure almost instantly under ultraviolet light, creating crosslinked polymer networks significantly harder than conventional air-dry finishes.
However, UV-cured finishes present unique challenges for touch-up and repair. The extremely dense crosslink structure makes mechanical bonding difficult—new finishes struggle to grip UV-cured surfaces. Touch-ups require aggressive sanding to create sufficient tooth for conventional repair finishes. Additionally, most conventional finishes don’t bond chemically with UV-cured coatings, and color matching proves nearly impossible. Professional refinishers emphasize prevention over repair for these premium finishes.
Quality Control Protocols Prevent Costly Callbacks
Professional finish inspection requires minimum 100 foot-candles of illumination on the inspection surface using 5000K-6000K color temperature light. Dedicated surface inspection lights make defects “10X more visible” compared to standard shop lighting. The Festool STL 450 (1200 lumens at 5000K) represents the type of professional-grade inspection lighting that reveals flaws invisible under normal conditions.
KCMA A161.1 represents the definitive performance standard for kitchen and bath cabinet finishes in the U.S. Testing includes:
- Heat test: 120°F at 70% humidity for 24 hours
- Cold test: -5°F after heat cycling
- Spill test: 24-hour exposure to vinegar, lemon/orange/grape juice, ketchup, coffee, olive oil, and 100-proof alcohol
- Chemical resistance: Detergent exposure for 4-24 hours depending on door type
The AWI (Architectural Woodwork Institute) defines three quality grades—Economy, Custom, and Premium—with 80-90% of QCP-licensed woodworking firms working to Premium grade standards. Premium certification automatically includes Custom grade certification and is required for executive areas, boardrooms, and high-profile reception spaces.
Professional cabinet finishers employ systematic workflows that maximize efficiency while maintaining quality standards:
Component disassembly: Removing doors, drawers, and hardware before finishing enables better access to all surfaces without obstruction, horizontal finishing positioning that prevents runs and sags, and protection of finished components during installation of other elements.
Batch processing: Finishing multiple components simultaneously reduces overall project time through applying primer to all pieces in one session, sanding entire batches between coats, and topcoating all components together for color and sheen consistency.
Quality control checkpoints: Systematic inspection at multiple stages catches problems before they compound:
- After cleaning and sanding—checking for missed grease or scratches
- After priming—identifying adhesion issues, stain bleed-through, or coverage problems
- Between topcoats—removing nibs and smoothing imperfections
- Before installation—final inspection under proper lighting
Finishing Failures Carry Significant Business Costs
Construction industry data reveals that rework typically accounts for 12% of total project costs, with some estimates reaching 30%. Analysis of 346 contractor projects found rework led to a 28% reduction in average annual profit. For home builders who track callbacks, the annual hard cost averages 1-2% of sales, with soft costs to administer warranty work averaging $500 per home.
Poor finishes and peeling paint consistently rank as the #1 customer complaint about cabinets across J.D. Power satisfaction studies. Brands with significant finish problems have fallen off J.D. Power rankings entirely. The 2021 U.S. Kitchen Cabinets Satisfaction Study measured 1,612 customers across design features, operational performance, ordering/delivery, price, and warranty—finish quality affects multiple categories.
The referral rate impact compounds these costs. Orlando market builders average under 10% referral rates; achieving a 40% referral rate reduces sell-out time by 28%—translating to approximately $850 saved per house or $255,000 on a typical project when model home maintenance, sales department, and supervisory labor exceed $15,000 monthly.
Material waste from incorrect applications, contamination, or premature failure includes stripping and refinishing materials ($200-500 per kitchen), additional primers, topcoats, and supplies for corrections ($150-300), and specialty products for problem repairs ($100-200).
Labor multiplication means fixing finishing mistakes requires more time than correct first-time application: stripping failed finishes (8-12 hours for average kitchen), re-preparing surfaces (4-6 hours), and re-applying complete finishing system (matches original timeline).
Project delays create cascading problems including missed installation deadlines that delay other trades, customer inconvenience during extended timelines, and holding costs for materials and labor scheduling.
Reputation damage represents the most significant long-term cost through lost referrals from dissatisfied customers, online reviews documenting failures, reduced pricing power due to quality reputation damage, and cost of additional warranty callbacks.
Professional finishers recognize that investing adequate time and materials in proper preparation and application costs far less than fixing failures. The industry rule suggests proper technique costs 15-20% more initially but saves 300-500% in total project costs when preventing callbacks.
Modern Finishing Technologies Offer Competitive Advantages
UV-cured finishes represent the premium option for production environments offering near-zero VOCs and zero HAPs (Hazardous Air Pollutants), instant cure in approximately 2 minutes, 100% solids with no solvent evaporation, excellent chemical and abrasion resistance, and non-flammable formulations.
Equipment investment is significant (UV curing lamps start at $239 for small units; coatings run $144+ per quart), but the instant cure time and consistent results justify costs for high-volume operations.
Low-VOC professional products meeting 275 VOC requirements are now available across all finish categories. Gemini, General Finishes, and Renner all offer compliant options that match or exceed traditional solvent-based performance. Renner waterborne conversion varnish contains approximately 0.0009 parts VOC per gallon, meeting the strictest environmental regulations while maintaining professional-grade durability.
HVLP vs. Airless Spray Systems: Professional cabinet finishing increasingly relies on spray application for superior finish quality and production efficiency. HVLP (High-Volume, Low-Pressure) systems atomize finish using high air volume at low pressure (typically 3-10 PSI at the air cap), creating minimal overspray with transfer efficiency exceeding 65%, excellent control with low pressure for precise application, fine finish quality through superior atomization, and reduced fume exposure from less overspray.
Airless systems force finish through small orifices at extremely high pressure (2000-3000 PSI), achieving production speed with fast application, no thinning required with high pressure atomizing heavy materials effectively, consistent film build with even coating thickness, and continuous operation by spraying from large containers.
Estimating Realistic Timelines
Amateur finishers consistently underestimate cabinet finishing timelines, leading to rushed work and the mistakes detailed throughout this guide. Professional estimates account for all process phases including cure times that cannot be accelerated.
Painted cabinet timeline (per kitchen):
- Removal and transport: 4-6 hours
- Cleaning and prep: 6-8 hours
- Sanding and prep-sanding: 8-12 hours
- Priming (2 coats with dry time): 2 days
- Inter-coat sanding: 4-6 hours
- Topcoating (2-3 coats with dry time): 3-4 days
- Cure time before installation: 7-14 days minimum
- Total timeline: 2-3 weeks minimum
Stained cabinet timeline (per kitchen):
- Removal and preparation: 4-6 hours
- Cleaning and sanding: 10-14 hours (more critical than paint)
- Wood conditioning: 4-6 hours including dry time
- Staining: 8-12 hours including dry time
- Topcoating (3 coats with dry time): 3-5 days
- Final cure: 5-7 days
- Total timeline: 2-2.5 weeks minimum
Attempting to compress these timelines by skipping cure times, working in poor environmental conditions, or rushing application techniques generates the majority of finishing failures documented in this guide.
Conclusion: Systematic Prevention Over Reactive Correction
The economics are unambiguous: investing in proper surface preparation, environmental control, product selection, and cure time costs a fraction of the callback, rework, and reputation damage that finishing failures generate. The 80% of failures attributed to surface preparation and the 12% project cost average for rework represent controllable variables for contractors who implement systematic protocols.
For shaker cabinets specifically, the flat-panel design demands mastery of inside-corner technique (box coating method), substrate-specific primer selection (MDF edges require specialized treatment), and strict adherence to environmental parameters (minimum 65°F for CV, 40-60% humidity for all catalyzed finishes). Modern waterborne options like General Finishes Enduro 2K and waterborne conversion varnishes now rival traditional solvent-based performance while meeting increasingly stringent VOC regulations.
Key professional standards to maintain:
- KCMA A161.1 compliance for kitchen/bath applications
- Maximum 5 mil total film build for conversion varnish
- Full 2-4 week cure before normal cabinet use
- 100 foot-candle inspection lighting at 5000K-6000K
- Documented quality control protocols at pre-production, in-process, and final stages
The contractors who eliminate finishing callbacks aren’t lucky—they’re systematic. The techniques, products, and protocols documented here represent current professional consensus from coating manufacturers, industry associations, and experienced production finishers. Implementation requires investment in environmental control, inspection lighting, and cure time discipline—investments that pay returns through eliminated callbacks, protected margins, and the referral rates that sustain profitable cabinet businesses.
Cabinet finishing separates professional remodeling work from amateur attempts through attention to detail, systematic processes, and unwillingness to compromise on proper techniques. For contractors serving clients who invest thousands of dollars in premium Shaker cabinets, finishing quality directly reflects on overall project success and reputation.
Frequently Asked Questions Common Pitfalls in Shaker Cabinet Finishing and How to Avoid Them
What’s the minimum temperature for applying conversion varnish to cabinets?
65°F during application AND for at least 6 hours afterward. Below this temperature, the catalyzed finish won’t crosslink properly and will have permanently compromised durability—even if it appears to dry normally. The optimal application range is 70-75°F.
How do I prevent finish from pooling in shaker cabinet inside corners?
Use the “box coating” technique: spray inside edges first with reduced fluid volume and spot pattern, allow coating to tack briefly, then spray outer edges and faces. This prevents over-application in the recessed areas where rails and stiles meet the center panel.
What causes fish eyes and how do I fix them?
Fish eyes result from silicone contamination, often from furniture polish that penetrates wood through finish cracks. Solutions include multiple solvent washes, applying a shellac barrier coat (shellac is unaffected by silicone), or adding fish-eye eliminator to the finish—but once added to one coat, it must be added to all subsequent coats. Prevention through thorough degreasing is always preferable.
How long should cabinets cure before installation and normal use?
Minimum 48-72 hours for light handling, but full cure takes 2-4 weeks depending on product and conditions. For conversion varnish and urethane enamels, plan for 2-3 weeks before normal use. Premature installation leads to edge damage, fingerprinting, and adhesion failures that require complete refinishing.
What mil thickness should I target for cabinet finishes?
2-3 wet mils per coat, with maximum total dry film of 5 mils for conversion varnish systems. Exceeding this causes cracking that may not appear for weeks or months. Multiple thin coats perform better than fewer heavy coats.
Should I use pre-cat or post-cat lacquer for production cabinet finishing?
Pre-catalyzed lacquer is recommended for shops new to catalyzed finishes—the catalyst is already mixed, pot life is long, and ease of use matches standard lacquer. Post-cat offers higher durability but requires precise mixing and has critical pot life limitations. Start with pre-cat and advance to post-cat as experience grows.
How do I treat MDF edges before finishing?
Options include diluted white PVA glue (40% water), thinned oil or lacquer primer (10% reduction), high-build primers like ML Campbell Clawlock, or thin exterior spackle. Sand edges no finer than 220 grit to avoid burnishing the surface, which reduces adhesion.
Why does my stained shaker cabinet have blotchy areas?
Blotching occurs on woods with irregular grain density (cherry, maple, pine, alder) when stain penetrates unevenly. Prevent this by applying pre-stain wood conditioner 15-30 minutes before staining, or create a washcoat using thinned shellac. Gel stains also minimize blotching by sitting on the surface rather than penetrating deeply.
Can I use wall paint on cabinets if it’s high-quality?
No. Even premium wall paints lack the hardness, chemical resistance, and durability engineered into cabinet-grade formulations. Cabinet paints contain higher resin concentrations and specialized additives for surfaces subject to constant touching, cleaning, and mechanical wear. Wall paints show wear within weeks on cabinets.
What’s the best way to handle seasonal panel gaps in shaker cabinets?
Never caulk or glue these gaps—they’re intentional design features allowing for wood movement. Educate clients that panel shrinkage during winter is normal behavior, not a defect. Some finishers pre-finish panel edges before assembly to prevent raw wood from showing, though this adds labor and risks restricting movement if finish builds up excessively.
How do I prevent orange peel texture when spray finishing?
Maintain optimal environmental conditions (70-75°F, 40-60% humidity), use correct viscosity for your equipment (30-45 seconds with Ford #4 cup), maintain proper gun-to-surface distance (10-12 inches), and ensure adequate pressure for atomization. Orange peel results from finish drying before it can flow and level properly.
Should painted cabinets be sealed with a clear topcoat?
Cabinet-grade paints (acrylic-alkyd hybrids, urethane enamels, conversion varnish) don’t require topcoats and may actually perform worse with them due to chemical incompatibility. Standard latex or chalk paints benefit from protective topcoats like water-based polyurethane. Stained cabinets always require protective clear topcoats since stain alone provides no surface protection.
Contact Us Common Pitfalls in Shaker Cabinet Finishing and How to Avoid Them
For professional cabinet supply, technical support, and finishing guidance on shaker-style cabinets, IST Cabinets provides the expertise, quality products, and partnership approach that professional cabinet installations demand.
Our team understands the unique challenges of finishing shaker cabinets and can help you select the right products and techniques for your specific projects. With six strategically located warehouse facilities serving Alexandria, Fairfax, Columbia, Houston, and Delaware, we’re positioned to support your cabinet finishing needs with premium products from manufacturers like Fabuwood.
Our professional designers will assist you at any of our convenient locations throughout VA, MD, TX, and DE:
Alexandria, VA – Flagship Showroom
📍 5731 General Washington Dr, Alexandria, VA 22312
☎️ Phone: (703) 259-9030
📧 Email: info@istcabinets.com
⏰ Hours: Monday-Friday 8:00 AM – 6:00 PM | Saturday 10:00 AM – 2:00 PM
Our flagship Alexandria location features the most extensive Fabuwood display in the region, showcasing the complete Designer Collection with all five bold new color options. This premier showroom serves as the authorized Fabuwood hub for the Washington DC metro area, providing contractors and homeowners immediate access to physical samples, construction demonstrations, and expert guidance. Explore over 50 door style options across all Fabuwood collections—touch, compare, and evaluate quality firsthand.
Fairfax, VA
📍 2817 Dorr Ave Unit B, Fairfax, VA 22031
☎️ Phone: (703) 972-4030
📧 Email: info@istcabinets.com
⏰ Hours: Monday-Friday 8:00 AM – 6:00 PM | Saturday-Sunday Closed
Conveniently located in Fairfax, this showroom serves Northern Virginia’s thriving construction and remodeling community with comprehensive Fabuwood inventory and personalized design services. The Fairfax location specializes in contractor support, offering bulk ordering capabilities and project coordination for builders managing multiple properties simultaneously.
Columbia, MD
📍 9315 Snowden River Pkwy Suite E, Columbia, MD 21046
☎️ Phone: Contact main office for Maryland inquiries
📧 Email: info@istcabinets.com
⏰ Hours: Monday-Friday 9:00 AM – 5:00 PM
Our Columbia location serves Maryland contractors, builders, and homeowners with full Fabuwood product line access and professional design consultation. Strategically positioned between Baltimore and Washington DC, this showroom provides convenient access for projects throughout the Baltimore-Washington corridor.
Houston, TX
📍 4660 Pine Timbers St, STE 110, Houston, TX 77041
☎️ Phone: (346) 295-9555
📧 Email: houston@istcabinets.com
⏰ Hours: Monday-Friday 8:00 AM – 5:00 PM
Extending our Mid-Atlantic success to Texas, the Houston showroom brings Fabuwood’s quality construction and expert design services to Southern contractors and builders. This location maintains substantial inventory supporting large-scale commercial projects and residential developments throughout the Houston metropolitan area.
Delaware, DE
📍 835 Pulaski Hwy, Bear, DE 19701
☎️ Phone: (302) 321-1771
📧 Email: info@istcabinets.com
⏰ Hours: Monday-Friday 9:00 AM – 5:00 PM | Saturday 10:00 AM – 2:00 PM
Visit us at istcabinets.com or contact your nearest showroom location for:
- Professional-grade cabinet products and finishing materials
- Technical guidance on shaker cabinet finishing challenges
- Product recommendations for your specific applications
- Expert consultation on cabinet selection and finishing systems
Whether you’re finishing new unfinished Shaker cabinets or refinishing existing installations, IST Cabinets provides the professional support that ensures your projects meet the highest standards of quality and durability.