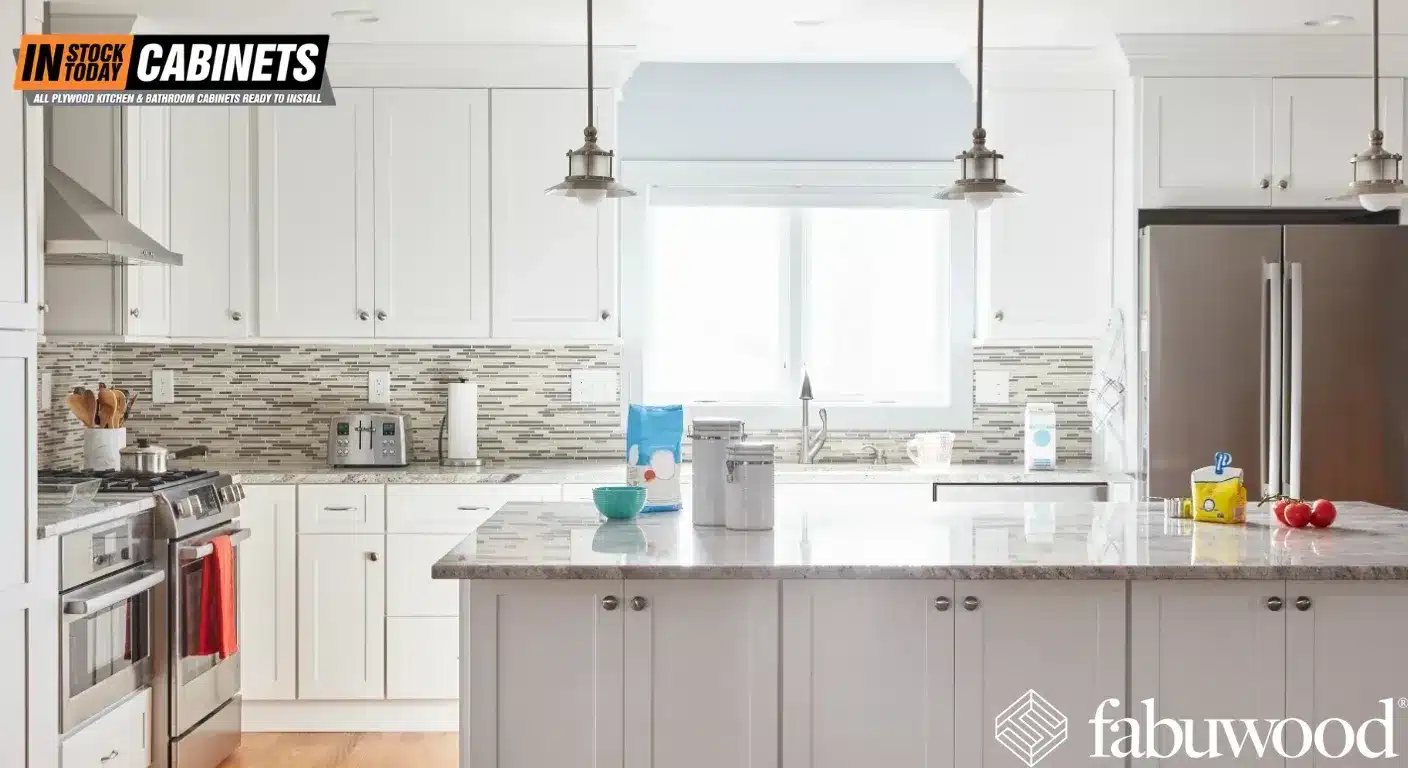
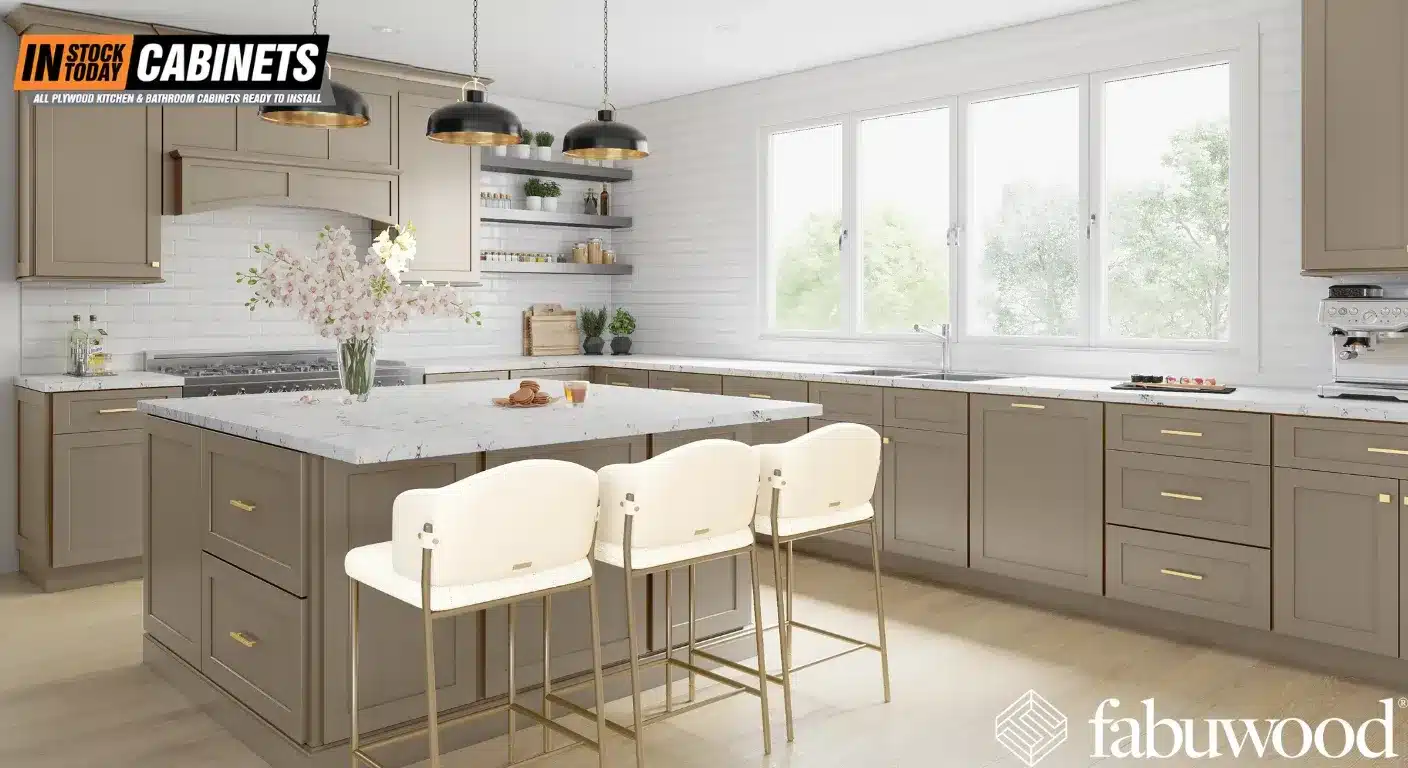
After speccing knobs, pulls, and handles across hundreds of Fabuwood kitchen installations in our Virginia, Maryland, Delaware, Texas, and Illinois showrooms, we’ve learned one thing the hard way — on a Shaker door, the fittings aren’t a finishing touch. They’re the defining detail.
Shaker cabinets earn their reputation on restraint. Flat panels, square edges, five-piece construction. Nothing decorative for decoration’s sake. That simplicity puts every pull, knob, and finish choice under a spotlight. Pick the wrong scale or a clashing tone, and it quietly undermines the entire kitchen. Get it right, and the space just feels intentional.
Hand-forged specialists often call cabinet fittings “the jewelry of the kitchen.” On Shaker cabinets, that analogy lands harder than on any other door style. Choosing the right shaker cabinet hardware requires more than picking what looks good on a screen — it means matching proportions, finishes, and placement to the specific geometry of the Shaker frame.
This checklist covers every decision point, from understanding Shaker construction to choosing brands, sizing pulls, matching finishes, nailing placement, and handling maintenance after installation. Bookmark it. Print it. Tape it to your project binder.
The Complete Checklist for Shaker Cabinets with the Right Hardware
Check each item before placing an order.
Design Decisions
Sizing & Proportion
Placement & Installation
Technical Details
Need help choosing? We offer free design consultations.
istcabinets.com
4 Categories
Understanding the Shaker Design DNA
Before opening a catalog, understand what makes Shaker doors structurally different from everything else. A Shaker-style door features five-piece construction — two vertical stiles, two horizontal rails, and a flat recessed center panel. Those elements create the clean geometric frame that is the style’s signature.
The design traces its roots to Shaker furniture, developed by the United Society of Believers in Christ’s Second Appearing (the Shakers). Their philosophy prioritized function over ornament — a principle that still defines the cabinet style today. Every knob and pull you choose either honors or contradicts that founding idea.
Frame width sets the style direction. Narrower stiles (3/4″ to 1-1/2″ on slim Shaker profiles) read modern. Wider stiles (2″ to 2-1/4″ on traditional Shaker) read classic or transitional. Your fittings should reinforce whichever direction the frame width establishes — sleeker pulls for narrow frames, more substantial silhouettes for wider ones.
One structural rule is non-negotiable. The center panel in a Shaker door is designed to float within the stile and rail grooves, allowing for seasonal wood expansion. As covered in our detailed guide on integration mistakes, drilling through or into the center panel pins that floating mechanism. The result is finish cracks, witness lines, or warping — damage that’s usually irreversible on painted surfaces. Knobs and pulls must mount exclusively on the solid wood stiles and rails.
Inset vs. Overlay — Why It Changes Your Plan
Shaker cabinets come in two setups, and the difference affects almost every fitting decision.
Overlay doors sit on top of the face frame. They’re the most common and use concealed European hinges. Pulls and knobs are optional from a functional standpoint — you can grip the door edge — but most homeowners add them for ergonomics and aesthetics.
Inset doors sit flush within the face frame. They require pulls or knobs because there’s no edge to grip. Inset hinges (either concealed or decorative exposed) change the visual rhythm of the cabinet. Exposed hinges pair naturally with traditional or farmhouse styles. Concealed inset hinges keep things clean for modern or transitional directions.
Inset construction also tightens alignment tolerances. The gaps between inset doors are visible from across the room, so placement must be precise to the millimeter. A jig isn’t optional here. It’s mandatory.
Step 1: Define Your Style Direction
Shaker cabinets are a blank canvas. That versatility is their greatest asset, but it means your fittings carry the burden of declaring where the kitchen goes. Three directions work.
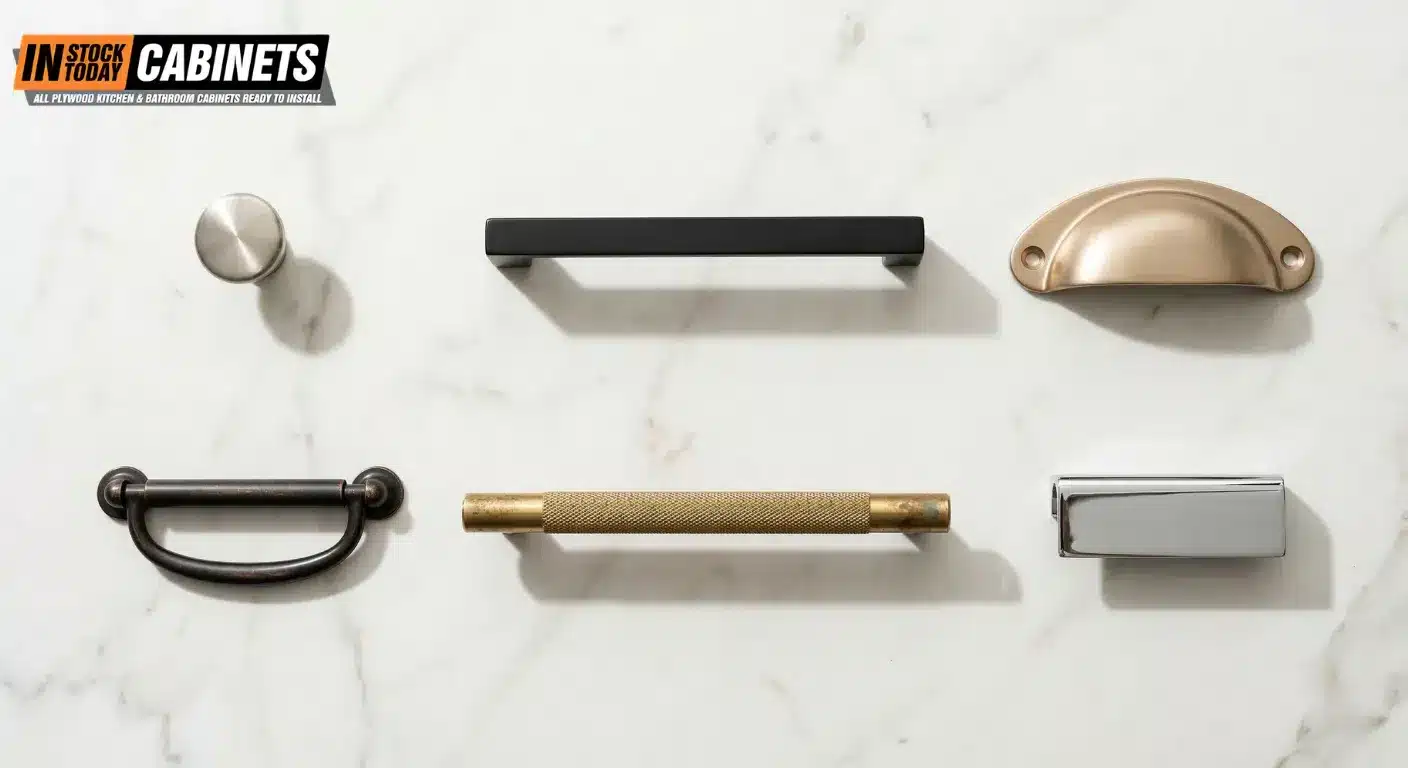
Traditional Shaker
Cup pulls (bin pulls) on drawers paired with simple round knobs on doors. Oil-rubbed bronze, antique brass, and unlacquered brass are the anchoring tones. Shapes are heritage-inspired but minimal — no filigree, no scrollwork. For taller pantry doors, cabinet latches add verticality and architectural charm that feels collected rather than coordinated.
Transitional Shaker
The largest market segment and the most forgiving. Arced bar pulls, tubular barrel pulls, D-pulls, and mixed knob-and-pull combinations all belong. Champagne bronze, satin brass, and satin nickel bridge classic Shaker joinery and cleaner contemporary spaces. 2026 trend reports point toward aged brass and bronze as standout metals in this category — valued for the warmth and character they develop over time.
Modern Shaker
Flat bar pulls, edge pulls, and integrated finger pulls define this direction. Flat bars mirror the door frame’s linear geometry. Edge pulls keep the cabinet face completely uninterrupted. Matte black, brushed nickel, and stainless steel dominate. Longer pulls (12–18″) on wide drawers emphasize horizontal lines. Flush-mount and finger pulls are trending in 2026 for their minimal profile.
Handleless / Push-to-Open
A fourth option gaining ground in 2026 — push-to-open and touch-activated systems eliminate visible fittings entirely. Mechanical springs or magnetic latches open the door with a gentle push. The result is an ultra-clean facade with zero touch wear on the cabinet surface. This works well in high-traffic zones near the stove or sink, where greasy or wet hands would otherwise degrade metal coatings over time.
Step 2: Choose Knobs, Pulls, or Both
This is one of the first practical decisions. It shapes both aesthetics and daily usability.
| Feature | Knobs | Pulls |
| Best for | Lighter doors, upper cabinets, small drawers | Heavier drawers, base cabinets, larger doors |
| Grip | Single-finger pinch grip | Full-hand grip with better pulling force |
| Install | One screw, simpler alignment | Two screws, requires precise C-C measurement |
| Cost | $2–15/piece typical | $4–50/piece typical |
| Accessibility | Can be difficult for arthritis or limited dexterity | Preferred for universal design — operable with one hand, no tight grasping |
The most popular combination among designers — knobs on upper cabinet doors, pulls on lower drawers and base cabinets. Upper doors are lighter and swing easily with a knob. Lower drawers and heavy base cabinets benefit from the grip and pulling power a pull provides. Pulls also pair particularly well with Shaker-style cabinets and are easier on older hands.
Mixing knobs and pulls is absolutely fine — most high-end kitchens do it. The rule is to keep a common design thread across both types, whether that’s a shared coating, a consistent shape family, or a matching alignment height. Knobs on all doors, pulls on all drawers. One metal tone throughout. That formula reads intentional rather than indecisive.
For universal design and ADA compliance, pulls are the safer default. Accessibility guidance specifies fittings operable with one hand, without tight grasping or pinching, and with no more than 5 lbf of force. D-shaped and bar pulls meet all three criteria. NKBA planning guidelines reference ICC/ANSI A117.1 accessibility standards as a basis for residential kitchen design, and those standards consistently favor pull-type handles over small round knobs.
Step 3: Match the Metal Tone to Your Cabinet Color
The metal coating sets the kitchen’s temperature — warm or cool, bold or quiet, modern or classic. A well-chosen champagne bronze pull elevates the same white cabinet that a generic polished chrome knob makes forgettable.
White Shaker Cabinets
Brushed nickel and chrome feel timeless in contemporary or minimalist spaces. Matte black creates crisp contrast that makes white cabinets read sharper. Brass and gold add warmth and a custom-quality appearance. White is the most forgiving canvas — almost any metal works if the undertones align.
Gray Shaker Cabinets
Gray splits into two camps. Light grays pair with silver, nickel, chrome, and stainless steel for a sleek result. Polished brass or copper can create striking contrast. Darker grays take matte or glossy black fittings beautifully. Gold on near-black grays feels unexpectedly elegant.
Navy and Deep-Toned Shaker Cabinets
Polished nickel is the classic pairing for navy — it gives a nautical-luxe feel. Aged brass as a secondary accent adds depth. For forest green or deep emerald, antique brass reads organic and earthy. Rocky Mountain’s color-pairing guide maps 18 kitchen colors to specific metal recommendations.
Wood-Tone and Stained Shaker Cabinets
Warm metals — brass, bronze, copper — complement natural wood tones. Bronze is being called the standout metal for 2026 because it carries warmth and bridges classic Shaker joinery with contemporary cabinetry. Oil-rubbed bronze remains the reliable traditional choice.
Pairing Quick Reference
| Cabinet Color | Primary Metal | Secondary Accent | Direction |
| White (Frost) | Matte Black | Satin Brass | Modern, high-contrast |
| Navy / Inky Blue | Polished Nickel | Aged Brass | Classic, nautical-luxe |
| Forest / Deep Green | Antique Brass | Matte Black | Organic, earthy |
| Natural / Stained Wood | Oil-Rubbed Bronze | Brushed Nickel | Warm, heritage |
| Greige / Warm Gray | Champagne Bronze | Pewter | Contemporary-softened |
The 70/30 Rule for Mixing Metals
One tone throughout is the safest path. But if you’re mixing, the 70/30 rule keeps it cohesive. One dominant metal (70%) covers most cabinet pulls, knobs, and the faucet. A secondary metal (30%) appears as an accent on the island, lighting, or pantry doors. This adds depth without visual chaos.
Coordinate beyond cabinets. Match your dominant metal to the faucet and sink fixtures. Let the secondary tone echo in pendant lights or the range hood. Designers call this the “top/middle/bottom” metals framework — lighting up top, cabinet fittings in the middle, plumbing at the bottom, all pulling from the same two-metal palette.
Step 4: Get the Size and Proportion Right
Incorrect sizing is one of the most visible mistakes on Shaker cabinets. The geometric grid of the stile-and-rail frame amplifies any proportional misstep. A pull that’s too small for a wide drawer looks timid. An oversized knob on a narrow door overwhelms the frame.
Pull Sizing and the Rule of Thirds
The rule of thirds is the industry standard. A pull’s length should equal roughly one-third of the drawer width or the door height. A standard 18″ drawer gets a 6″ pull. A 30″ drawer calls for a 10″ pull. The same principle applies vertically — a 36″-tall pantry door works well with a 12″ pull.
One distinction worth noting — overall length vs. center-to-center (C-C) measurement. Overall length is the full pull end-to-end. C-C is the distance between the two screw holes. When shopping, C-C is the spec that determines whether a pull fits your existing holes or a standard jig template. The Hardware Resources selection guide breaks down this distinction clearly.
| Drawer Width | Ideal Pull Length | Pull C-C | Count |
| 12″ or less | 4″–5″ | 3″ | 1 knob or 1 small pull |
| 12″–18″ | 4″–6″ | 3″–5″ | 1 pull |
| 18″–24″ | 6″–9″ | 5″–8″ | 1 pull |
| 24″–30″ | 9″–11″ | 8″–10″ | 1 large pull or 2 knobs |
| 30″–36″ | 11″–14″ | 10″–12″ | 1 oversized pull |
| 36″+ | 14″+ | Appliance / oversized | 1 pull (structural preference) |
Knob Sizing
Standard knobs range between 1–2″ in diameter and work on cabinet doors of any size. For drawers under 16″, one centered knob is enough. Wider drawers benefit from two knobs placed in the center of each outer third.
Wide Drawers — Why a Single Centered Pull Usually Wins
There’s a structural reason to prefer one centered pull on wide drawers (24″+) over two smaller ones. Users frequently pull from only one side when opening with one hand. This creates asymmetric torque — called drawer racking — which wears out undermount soft-close slides early and eventually misaligns the drawer box. One centered pull distributes force evenly.
If two pulls are needed for aesthetic reasons, use the “Divide by Six” rule. Divide the drawer width by six, and center each pull at that distance from the left and right edges.
Standard Hole Spacing
Common center-to-center measurements for standard pulls are 3″ (small drawers), 5″ (the most popular mid-size), and 128mm / 5-1/16″ (the European standard found in many product lines). Choosing standard sizes protects you when swapping handles later — new pulls reuse existing screw holes.
Step 5: Nail the Placement
Shaker cabinets are unforgiving about placement errors. The geometric grid makes even a 1/8″ misalignment visible across an entire wall of cabinetry. Olive & Barr’s full placement guide has good visual references, but here are the fundamentals.
The Non-Negotiable Rule
Handles and knobs must mount on stiles or rails — never on the recessed center panel. The stile-and-rail frame is the structural and visual anchor of Shaker design. Mounting on the center panel, as detailed in IST Cabinets’ installation guide, pins the floating panel and leads to cracking as the wood expands against the fixed screw.
Door Placement
- Wall cabinets — Position the fitting on the stile 5–3″ from the bottom edge of the door, on the side opposite the hinges. Accessible for multiple heights.
- Base cabinets — Same 2.5–3″ offset but measured from the top edge. Reduces bending and back strain.
- Tall pantry doors — Vertical mid-stile placement, aligned with user elbow height (roughly 40–42″ from the finished floor). This creates the most natural, effortless opening motion.
Drawer Placement
Center the pull or knob horizontally on the drawer front. For recessed-panel Shaker drawers, center it on the recessed panel — this is the most common and visually balanced position. Always measure and mark exact positions using a cabinet jig before drilling. Tape fittings in place first and step back to visually confirm alignment.
Specialty Cabinet Considerations
- Corner cabinets — Place the handle on the door that opens first (the one that clears the adjacent door). This prevents the daily frustration of grabbing the wrong one.
- Glass-front uppers — Choose smaller, more discreet fittings. The glass panel is the visual focus. Oversized pulls compete with the display inside.
- Appliance panels — Use appliance pulls (thicker diameter, deeper projection) that provide the grip strength needed to pull open a heavy refrigerator or dishwasher panel.
- Lazy Susan corners — A single pull centered on the door is enough. Two pulls create the racking problem described above.
Slim Shaker Profiles — A Special Case
Slim Shaker stiles can be as narrow as 3/4″ to 1-1/2″. On these profiles, standard bases often overhang the bevel — the angled transition from the flat stile to the recessed panel. The overhang creates a wobbly, unstable handle that grinds the coating every time the door opens. For slim profiles, specify fittings with small footprints (micro-knobs or edge pulls) and drill holes exactly 1″ from the inside frame edge.
Step 6: Pick the Right Shaker Cabinet Hardware Brand for Your Budget
Pricing varies wildly — from $2/piece to over $200/piece. For a typical kitchen with 30–40 handles and knobs, that’s anywhere from $80 to $6,000+. Here’s where the major brands land.
| Tier | Brand | Price/Piece | Known For | Shaker Sweet Spot |
| Budget | Liberty | $2–$8 | Value range, big-box availability (Home Depot, Lowe’s) | Basic bar pulls and knobs for rental or flip kitchens |
| Budget | Franklin Brass | $2–$6 | Bulk packs, Amazon and Wayfair | Simple round knobs and slim pulls |
| Mid-Range | Amerock | $5–$20 | 10+ coatings, 100-year heritage, KCMA-adjacent quality tier | Transitional bar pulls, cup pulls in champagne bronze |
| Mid-Range | Hickory | $8–$18 | Cup pulls, dual-drilling options | Farmhouse and traditional Shaker pairings |
| Premium | Top Knobs | $10–$35 | Designer favorite, 30+ collections, clean lines | Edge Pull Collection for slim Shaker; Aspen line for transitional |
| Premium | Emtek (Fortune Brands) | $15–$50 | 20+ coatings, modern/transitional strength | Urban Modern geometric knobs; Select line bar pulls |
| Luxury | Rejuvenation | $20–$80 | Portland-made, Williams-Sonoma brand, unlacquered brass specialty | Ideal for the unlacquered brass / living patina direction |
| Luxury | Armac Martin | $100–$300+ | British-made, solid brass, bespoke surface options | High-end traditional and transitional Shaker |
Our guidance from the showroom — spend the most on fittings you touch the most. Allocate premium budget to the primary work zone (sink area, range drawers, fridge adjacent), where you open and close doors 20–40 times a day. Budget options are perfectly fine for upper cabinets that open once or twice daily.
Step 7: Solid Brass vs. Zinc Alloy vs. Stainless Steel
The material inside the fitting matters as much as the coating on the outside. This is the most important quality differentiator — and the one most homeowners overlook.
Solid brass is the gold standard. It resists corrosion, holds its shape under years of daily use, and feels substantial in the hand. Unlacquered brass develops a living patina over time. Lacquered brass maintains its original sheen. Solid brass typically starts at $15–$20/piece and can exceed $100+ for artisan or bespoke options.
Zinc alloy (Zamak) is the industry’s workhorse material. The vast majority of pulls and knobs in the $5–$25 range are die-cast zinc with electroplated or PVD (Physical Vapor Deposition) coatings. Quality varies enormously. Look for brands that specify ANSI/BHMA certification — this means the product has been tested for pull resistance, surface durability, and cycle life.
Stainless steel resists fingerprints and corrosion, making it excellent near sinks and dishwashers. The weight and feel are solid. Stainless is most common in bar pull and edge pull formats.
Quick test at the store — pick up the piece. If it feels hollow, light, or tinny, it’s low-quality die-cast that will wobble within months. If it has weight and density, you’re in the right territory.
Step 8: Handle the Technical Installation Details
Screw Length and Pilot Holes
Most pulls and knobs ship with standard 1″, 8-32 machine screws designed for a 3/4″ door. These don’t account for varied Shaker construction. Always verify screw length against your actual door thickness. Drill pilot holes 1/64″ larger than the screw shank to prevent splitting the stile or rail. A 3/16″ drill bit works for most fittings. Use 1/4″ for pulls with stud-type mounts.
Overtightening is a silent killer. On five-piece drawer fronts, a microscopic air gap between the decorative frame and the drawer box means overtightening flexes the thin panel and cracks the factory surface. Tighten firmly. Stop before the coating protests.
Post-Installation Hinge Recalibration
Adding fittings changes the mass distribution and swing behavior of the door. Modern concealed hinges — like the Blum CLIP top BLUMOTION used in Fabuwood Shaker lines through IST Cabinets — offer six-way post-installation adjustment. Vertical adjustment corrects sag. Lateral adjustment maintains consistent reveals between adjacent doors. Depth adjustment ensures the door sits flush for proper soft-close dampening.
Step 9: Plan for Maintenance by Metal Type
Different coatings age differently. Choosing one without understanding its care requirements leads to buyer’s regret within a year.
- Brushed nickel and satin nickel — The lowest-maintenance option. Hides fingerprints, wipes clean with a damp cloth, resists water spots. Best choice for families with young children.
- Matte black — Shows fingerprints and minor scratches more than you’d expect. Wipe with a soft cloth and mild soap. Avoid abrasive cleaners that strip the coating. PVD-coated matte black holds up much better than powder-coated versions.
- Polished chrome — Shows every water spot and fingerprint. Requires frequent wiping near sinks. The upside: scratches can often be buffed out.
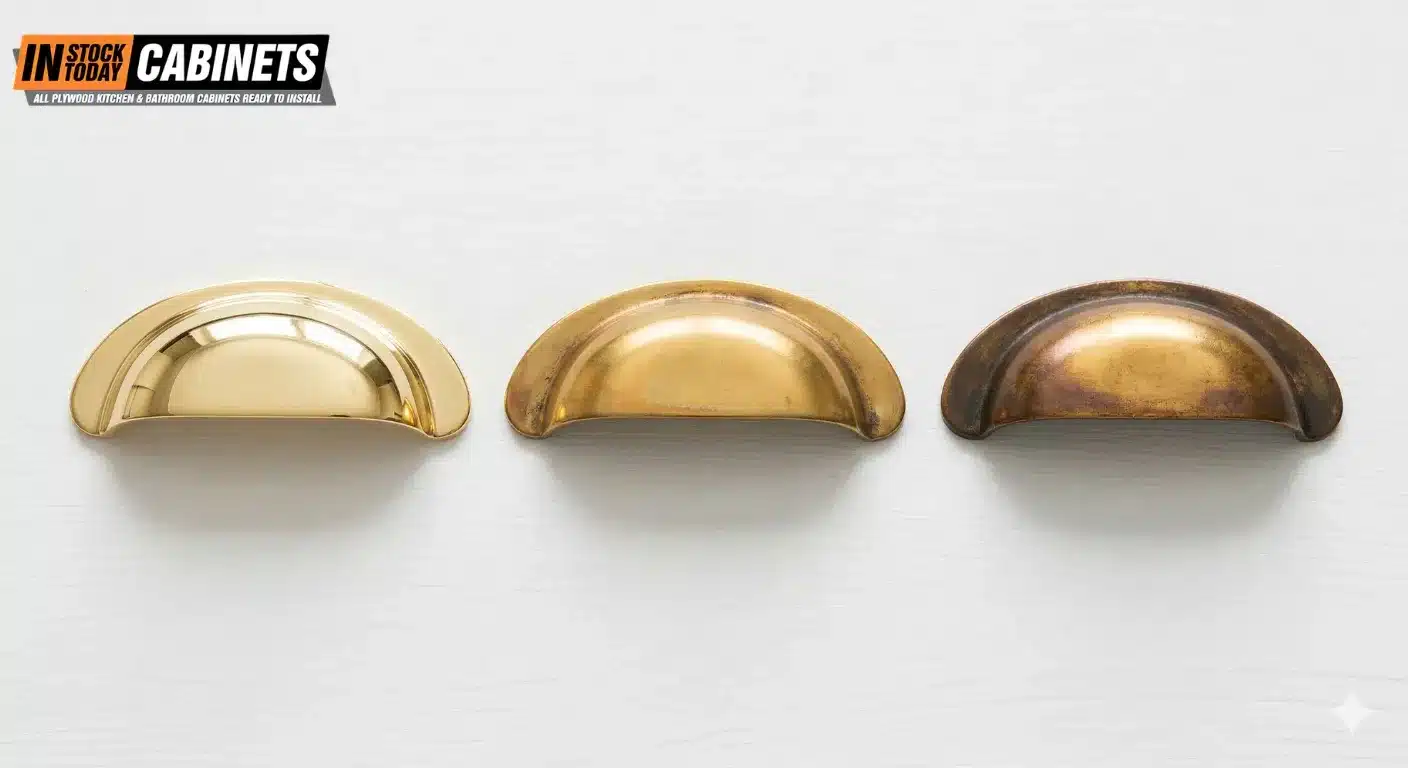
- Unlacquered brass (living patina) — The prestige choice — and the highest-maintenance one. It develops a natural patina that many homeowners love. To slow the patina, apply a thin coat of Carnauba wax every 6–12 months. To restore the original shine, a brass-specific polish and soft cloth bring it back. Not ideal for households that want zero upkeep.
- Oil-rubbed bronze — Moderate maintenance. The dark surface hides daily wear well. Clean with a damp cloth. Avoid vinegar-based or acidic cleaners that strip the oil layer.
- Champagne bronze — Most versions are PVD-coated, which means strong scratch resistance and minimal maintenance. Wipe with a soft cloth. One of the best balances of warmth, durability, and low effort.
The magnet test reveals whether a fitting is real brass or plated over steel. A magnet sticks to steel-core plated pieces but won’t stick to solid brass or zinc alloy. Useful for verifying quality at the store.
Shaker Cabinet Hardware Trends for 2026
The 2026 design cycle is shifting away from the manicured “show home” look. Plank’s trend report describes the movement as curated collections that feel assembled over time rather than ordered from one catalog. Several specific shifts stand out.
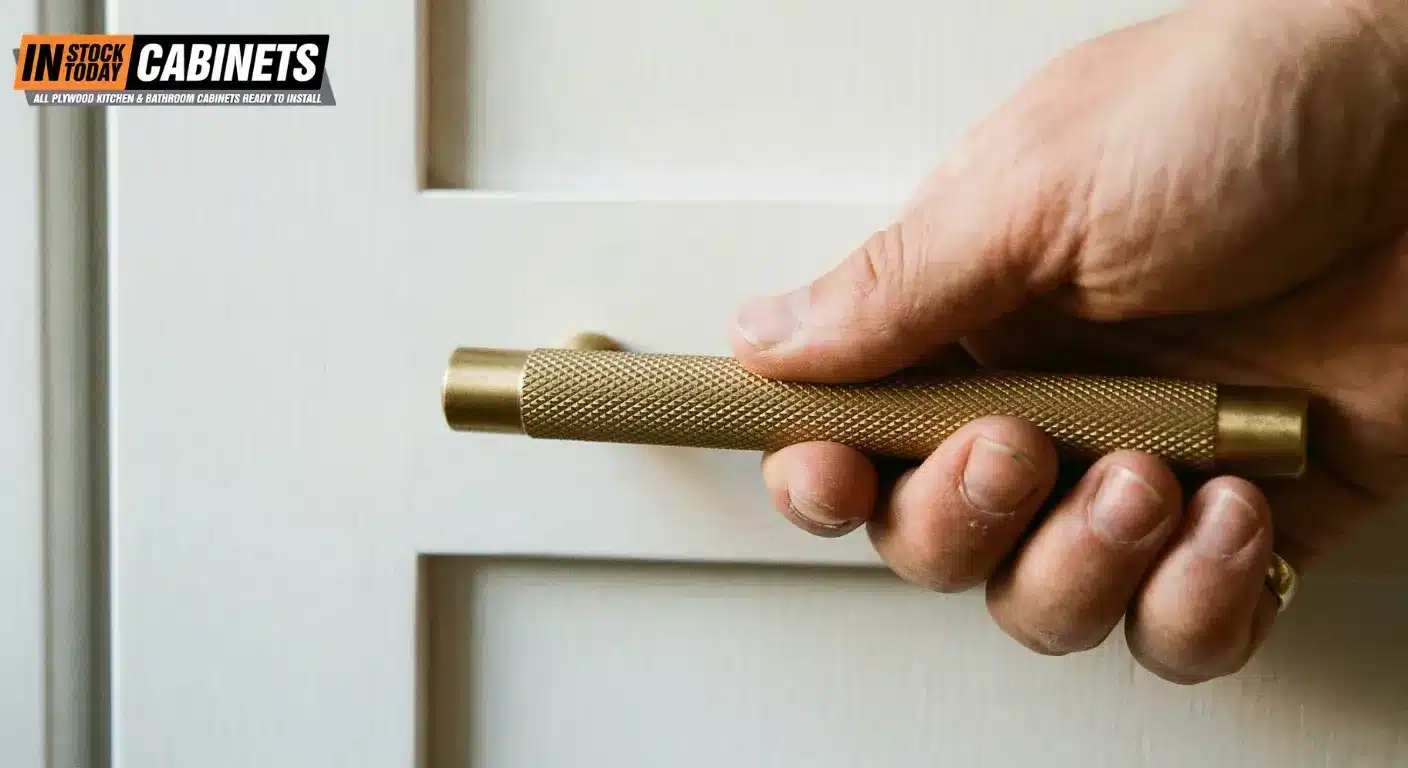
- Unlacquered brass and living patinas remain the most sought-after direction. The patina tells a story of use that aligns with the original Shaker philosophy of longevity.
- Knurled and textured surfaces add a tactile, haptic dimension. The cross-hatched knurled texture provides a secure grip while contrasting against flat Shaker panels.
- Sculptural, oversized pulls are moving from niche to mainstream. Handles are becoming functional art — soft curves, etched details, silhouettes that invite touch.
- Sustainable and artisan materials reflect a consumer shift toward ethical, small-batch production. Hand-forged pulls, leather wraps, and reclaimed metal add warmth that factory-produced options can’t.
- Backplates are returning as both protective and decorative elements. They shield the cabinet surface from ring wear at touch points and cover old holes when swapping sizes.
- Colored accents in muted tones — deep green, clay red, or soft charcoal ceramic knobs — are emerging as unexpected personality touches. Small doses only.
How to Make Shaker Cabinets Look High End
Upgrading your fittings is the single fastest path. But it’s not the only one. If you’re chasing a custom-kitchen look from stock or semi-custom Fabuwood Shaker cabinets, stack these five moves.
- Swap to premium pulls and knobs. Replace builder-grade knobs with solid brass pulls in a tone that coordinates with your fixtures. This alone transforms perceived quality.
- Add crown molding. Crown molding along the top of wall cabinets closes the gap between cabinets and ceiling. One of the most cost-effective upgrades for visual impact.
- Install under-cabinet lighting. LED strip lighting below wall cabinets illuminates the countertop, adds depth, and highlights the shadow line of Shaker door profiles.
- Add glass inserts to select upper doors. Two or four glass-front doors in a kitchen — flanking a range hood or framing a window — break up visual monotony and signal a custom build.
- Choose inset construction. If budget allows, inset Shaker cabinets with face-frame reveals look higher-end than standard overlay. The precision required signals craftsmanship.
The fitting swap is the fastest because it requires no cabinet replacement, no new doors, and typically costs $200–$800 for a full kitchen. Everything else on this list involves construction or custom orders.
Checklist for Shaker Cabinets with the Right Hardware FAQs
What goes best with Shaker cabinets?
Bar pulls, cup pulls, and simple round knobs are the three most popular types for Shaker cabinets. The best choice depends on your style direction. Modern Shaker kitchens work well with flat bar pulls or edge pulls in matte black or brushed nickel. Traditional Shaker pairs naturally with cup pulls and round knobs in oil-rubbed bronze or unlacquered brass. Transitional Shaker — the largest market segment — is most flexible, working with D-pulls, arced bar pulls, and mixed combinations in champagne bronze or satin nickel. Inspire’s Shaker collection and Houzz’s top 8 styles guide both offer strong visual references.
What is the 1/3 rule for cabinet pulls and knobs?
A pull’s overall length should be roughly one-third of the drawer width or door height. A 15″-wide drawer gets a 5″ pull. A 30″-wide drawer gets a 10″ pull. A 36″-tall pantry door works with a 12″ pull. The same proportion applies both horizontally (drawers) and vertically (doors). This guideline prevents fittings from looking either too small or too large for the cabinet face. The one-third rule guide from Hardware Resources has a printable reference chart.
Where should you place knobs and pulls on Shaker cabinets?
On wall cabinets, position them on the stile 2.5–3″ from the bottom edge. On base cabinets, 2.5–3″ from the top edge. Always mount on the solid wood stile or rail — never on the recessed center panel, which is designed to float and will crack if pinned by a screw. For drawers, center fittings horizontally on the drawer front. True Position Tools’ placement guide has detailed measurement diagrams for every setup. Use a jig for consistency — Shaker’s geometric grid makes even small misalignments visible across a wall of cabinets.
How do I match cabinet fittings to my cabinets?
Match by temperature first. Warm cabinet tones (cream, wood, warm gray) pair with warm metals (brass, bronze, copper). Cool tones (white, navy, cool gray) pair with cool metals (nickel, chrome, stainless). After temperature, coordinate with your faucet and lighting fixtures using the 70/30 rule — 70% dominant metal, 30% secondary accent. Make sure the scale fits door proportions (rule of thirds for pulls, 1–2″ diameter for knobs). Order physical samples and test them under your actual kitchen lighting, because metal tones shift dramatically between showroom fluorescent and home LED.
What is the trend in cabinet fittings for 2026?
Unlacquered brass, knurled textures, sculptural oversized pulls, and sustainable artisan materials are the biggest 2026 shifts. Unlacquered brass develops a natural patina over time, aligning with the “living surface” movement. Knurled (cross-hatched) textures add tactile interest that contrasts against flat Shaker panels. Oversized pulls that span beyond the traditional rule of thirds are becoming acceptable for bold, architectural statements. Push-to-open handleless systems are gaining ground in high-traffic zones. Homes & Gardens’ trend report and Kitchen Tune-Up’s 2026 forecast cover these shifts in detail.
How do you make Shaker cabinets look high end?
Five upgrades, ranked by cost-effectiveness:
- Swap to premium pulls and knobs ($200–$800 for a full kitchen)
- Add crown molding between wall cabinets and ceiling
- Install under-cabinet LED strip lighting
- Add glass inserts on 2–4 upper doors
- Choose inset construction if budget allows
The fitting swap is the fastest and cheapest because it requires no new doors or cabinet replacement. Fabuwood’s Shaker lines already include dovetail joinery, all-plywood boxes, and Blum soft-close hinges — a quality foundation that supports any upgrade.
What is the current trend in kitchen cabinet fittings?
Mixed metals (using the 70/30 rule), matte black, brushed gold, satin brass, and integrated push-to-open systems dominate the 2025–2026 cycle. The broader direction is away from perfectly matched, same-tone-everywhere kitchens and toward curated collections that feel assembled over time. Texture is growing — knurled, hand-forged, and hammered surfaces are replacing smooth, mass-produced options. Sustainability is a rising factor, with demand for small-batch artisan pieces and reclaimed materials increasing year over year.
Is it okay to mix knobs and pulls on kitchen cabinets?
Yes — most designer kitchens do it intentionally. Here’s the standard framework:
| Cabinet Zone | Fitting Type | Why |
|---|---|---|
| Upper doors | Knobs | Lighter doors, easy single-finger open |
| Lower drawers | Pulls | Heavier loads, better grip |
| Base cabinet doors | Pulls | Ergonomic, reduces bending strain |
| Pantry / tall doors | Long pull or latch | Proportional to door height |
Keep all pieces in the same metal family. If mixing two tones, apply the 70/30 rule. Avoid mixing more than two shapes — one knob style and one pull style is the ceiling for cohesion. Dowsing & Reynolds’ guide has good visual examples of successful combinations.
How should you style pulls and knobs on kitchen cabinets?
Start with the kitchen’s style direction, choose a fitting type that matches, select a metal tone that coordinates with cabinet color and fixtures, size using the rule of thirds, and place consistently across all doors and drawers. Style fittings as you’d style jewelry — one or two metals maximum, scale proportional to what it’s worn on, and cohesion across the whole ensemble. The single biggest styling mistake is inconsistency: mixed placement heights, varied pull lengths, or random tone changes from cabinet to cabinet. Pick a system and repeat it.
Ready to Choose Your Shaker Cabinet Hardware?
Fabuwood Shaker cabinets, available through IST Cabinets, ship with premium Blum soft-close hinges, full-extension Blumotion drawer glides, dovetail joinery, and all-plywood cabinet boxes. The craftsmanship in the construction — including durable materials and oven-cured coatings — means the foundation is built for whatever direction you choose.
For help selecting the right fittings for your project, IST Cabinets offers complimentary design consultations at our showrooms in Virginia, Maryland, Delaware, Texas, Illinois, and Washington DC. Our team reviews project scope, discusses functional requirements, and provides tailored recommendations based on your cabinet color, kitchen layout, and budget.