Shaker cabinets punish sloppy hardware work. Their five-piece door construction — two vertical stiles, two horizontal rails, and a recessed center panel — creates a rigid visual grid that exposes every crooked pull, every misaligned knob, and every poorly matched finish. Where a raised-panel or slab door might forgive a 1/8-inch deviation, the Shaker profile amplifies it.
For designers and contractors, that means hardware integration on Shaker cabinets isn’t a finishing touch. It’s a precision task that intersects with door engineering, material science, and the ergonomics of daily kitchen use. The mistakes below cost real money — in callbacks, replacement doors, and damaged reputations. Every one of them is preventable.
10 Takeaways for Contractors and Designers
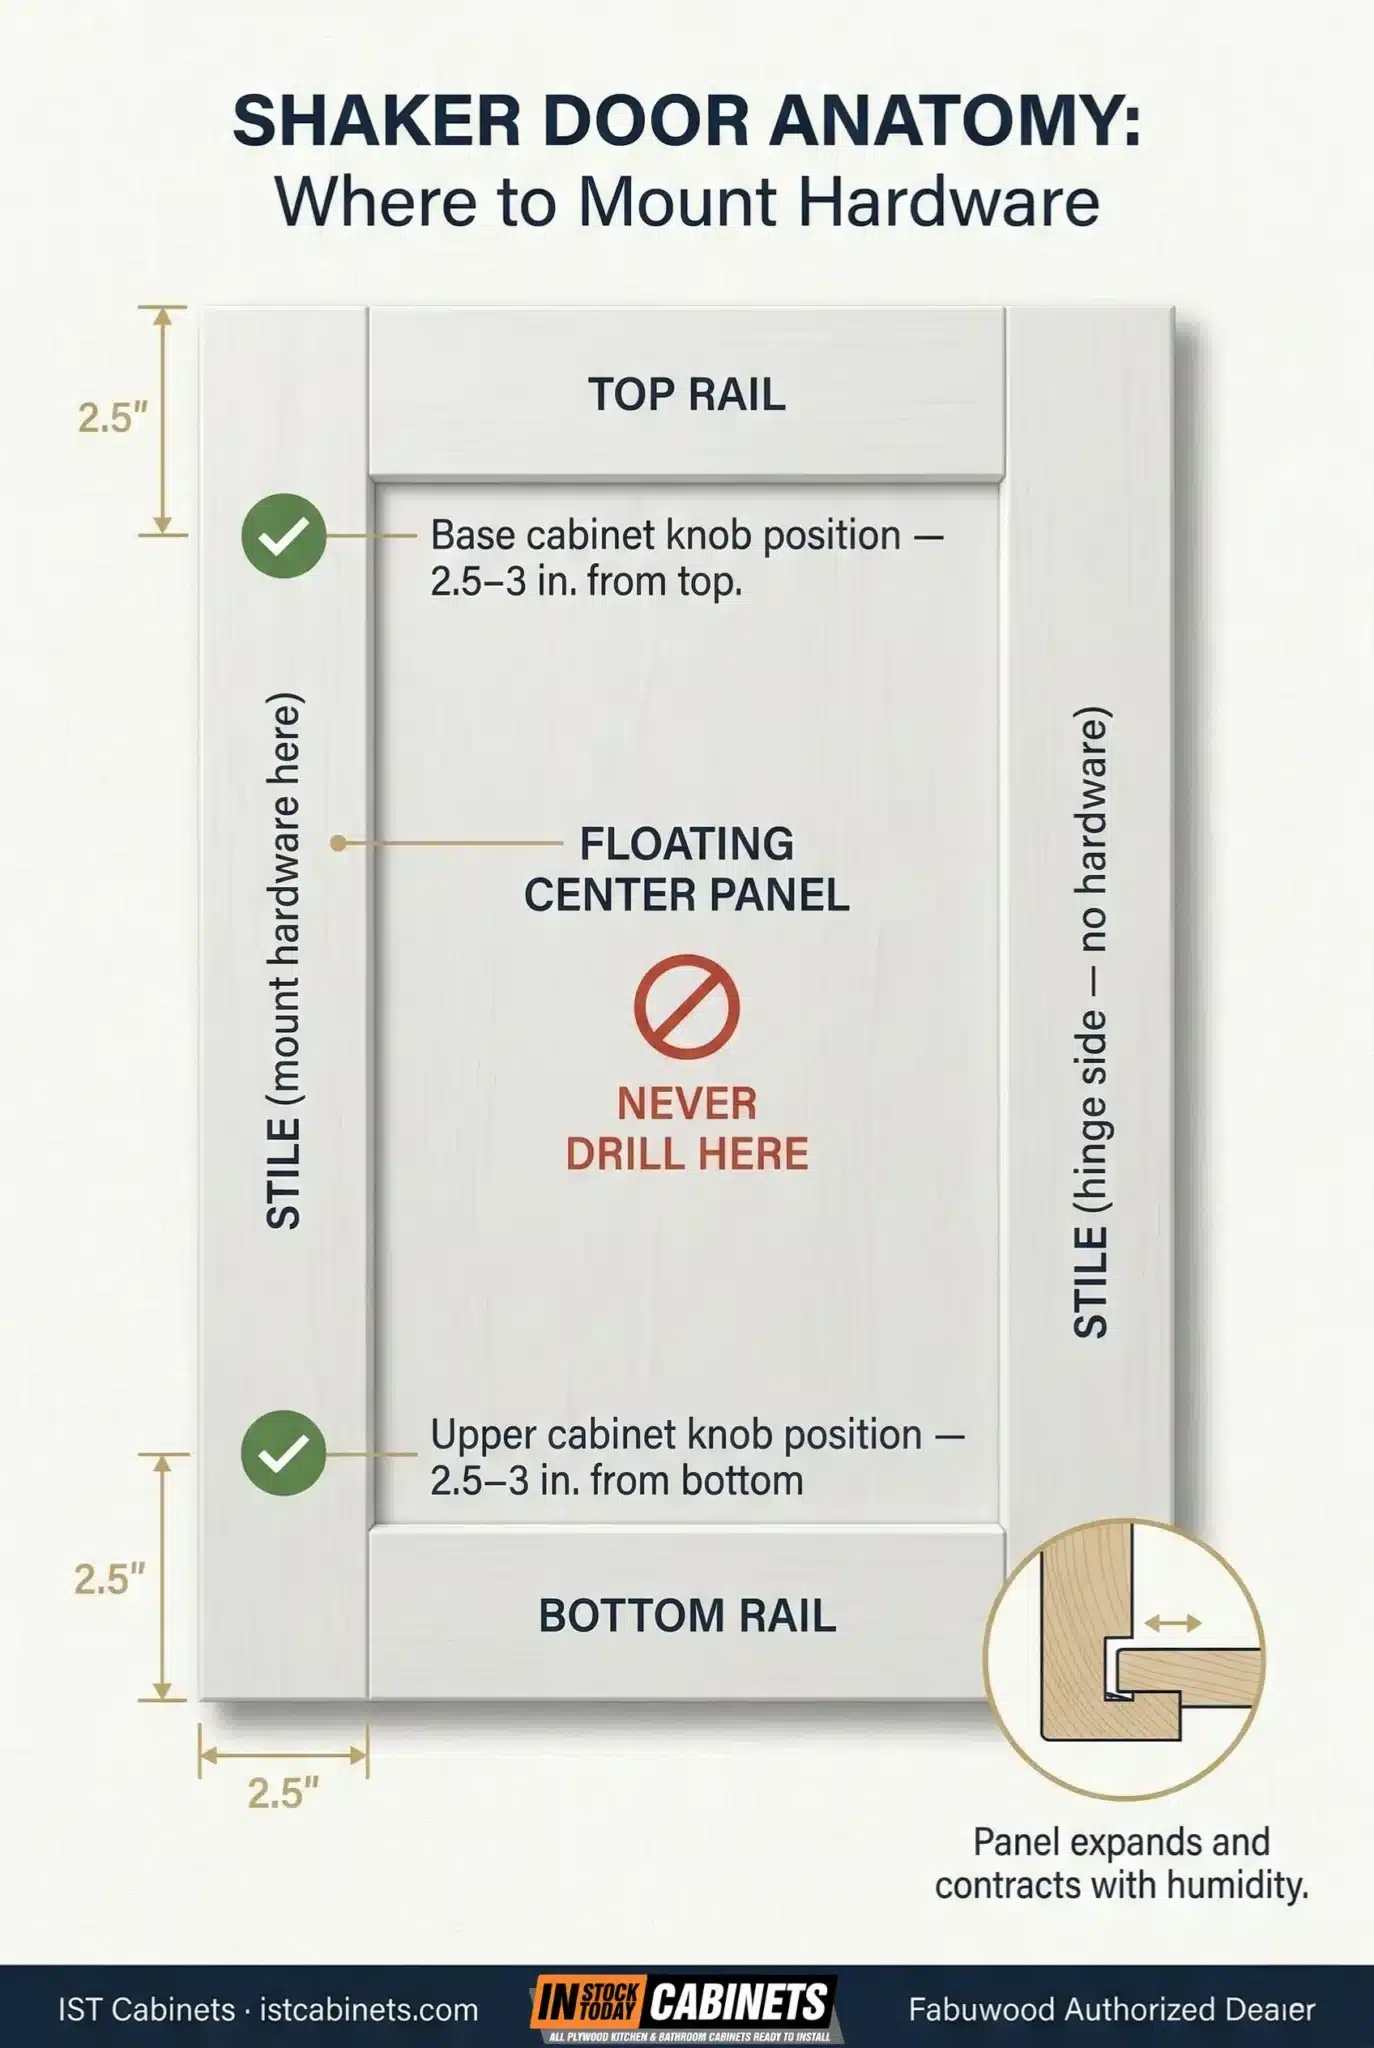
- Hardware mounts on stiles and rails — never the center panel. The recessed panel floats inside a dado groove to absorb seasonal wood movement. Drilling into it pins the panel in place, generates shear stress, and cracks the finish within a few humidity cycles. On premium Shaker lines with catalyzed conversion varnish, a misplaced hole means a full door replacement.
- Drawer fronts are not doors — treat them differently. Screws on a five-piece drawer front must pass through the thin center panel and the drawer box wall behind it. Any micro-gap between those surfaces causes flex and finish cracking under torque. For heavy pull-outs (trash, recycling, appliance panels), mount hardware on the solid top rail to bypass the fragile panel entirely.
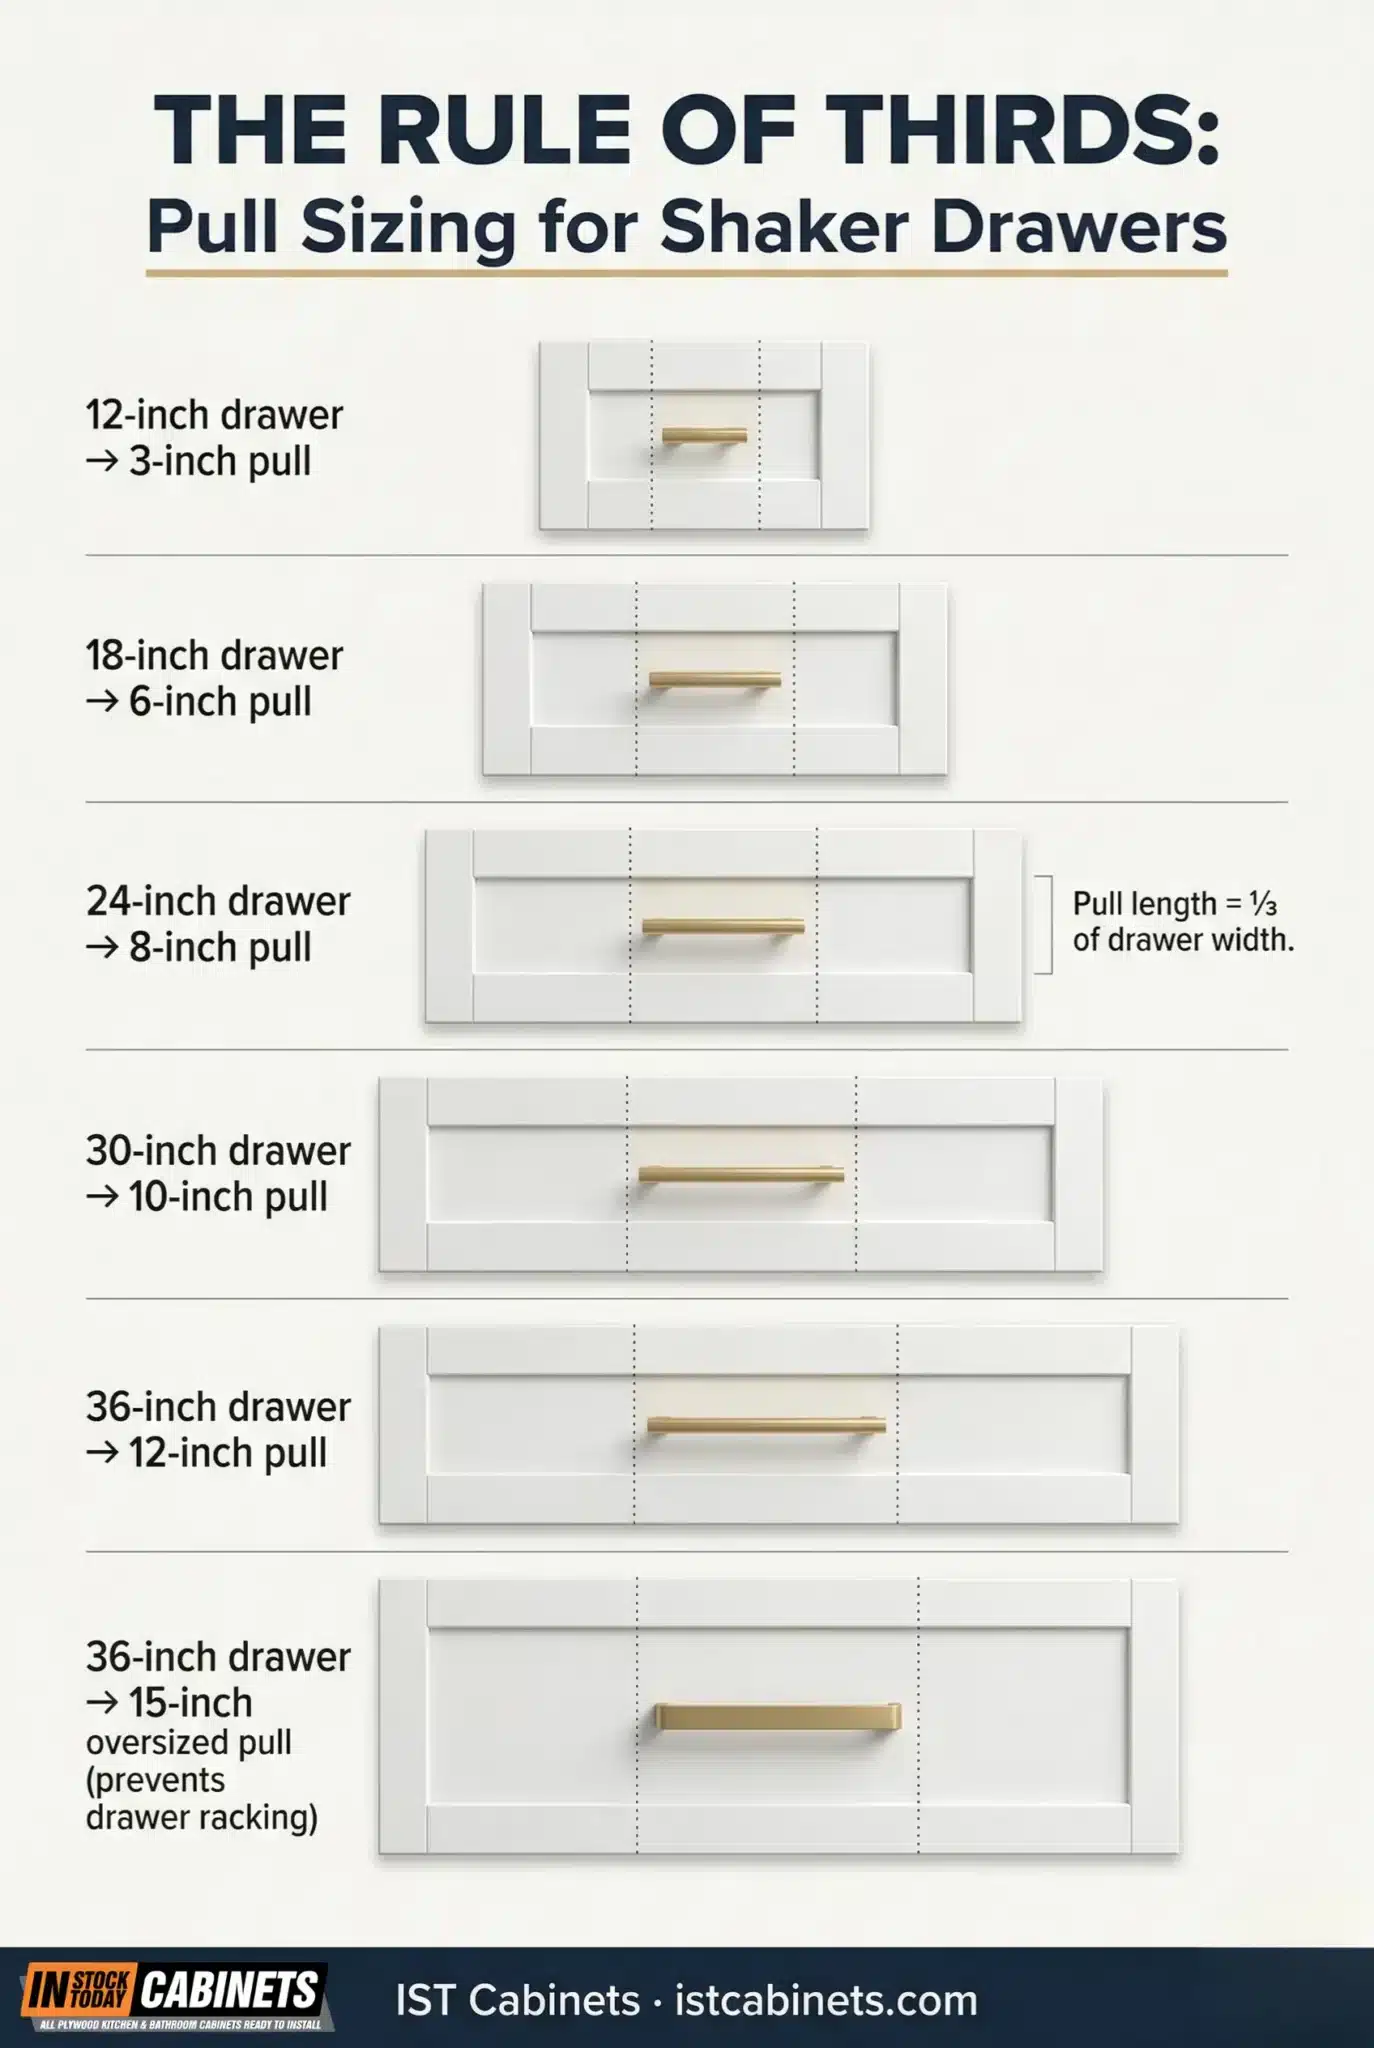
- The rule of thirds prevents every proportion mistake. Pull length should equal roughly one-third of the drawer width. A 6-inch pull for an 18-inch drawer. A 10-inch pull for a 30-inch drawer. A 12- to 15-inch pull for a 36-inch pot drawer. Buying one pull size in bulk for an entire kitchen is the fastest path to visual imbalance.
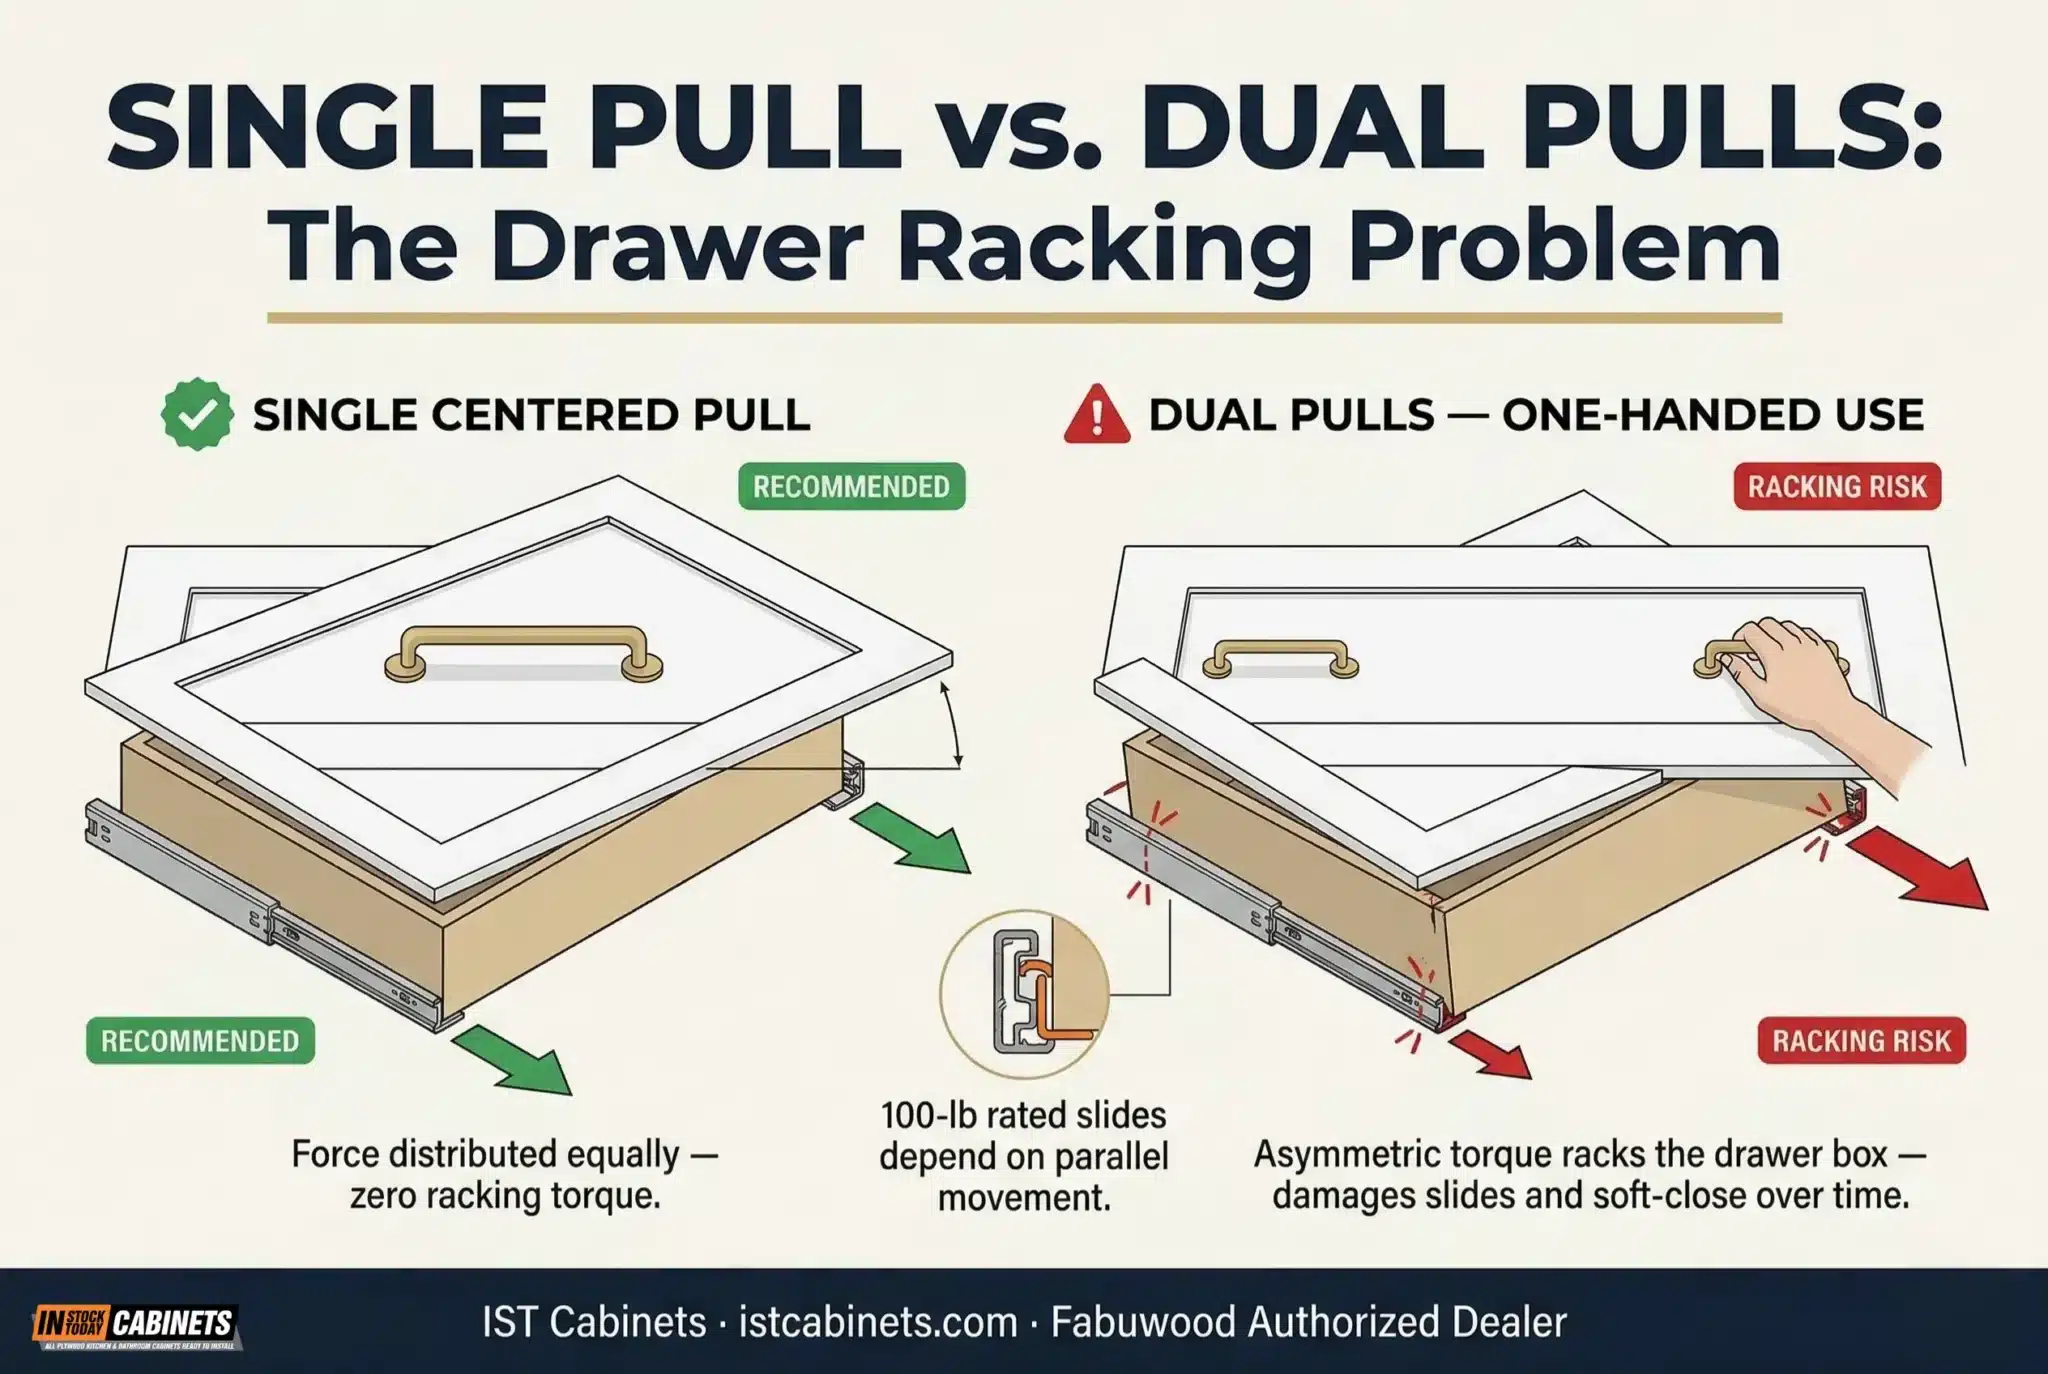
- A single centered pull on wide drawers is structurally superior to dual pulls. Central placement eliminates drawer racking — the asymmetric torque that degrades undermount slide mechanisms when users pull from one side. Dual pulls invite one-handed use, which racks the drawer box diagonally and wears out soft-close dampening over thousands of cycles.
- Measure slim Shaker stiles before specifying hardware. On profiles with 1.5-inch or narrower frames, standard hardware bases overhang the bevel where the flat stile meets the recessed panel. That overhang creates wobble, finish grinding, and permanent indentation damage. Edge pulls, finger pulls, and micro-knobs solve this on frames down to 3/4 inch.
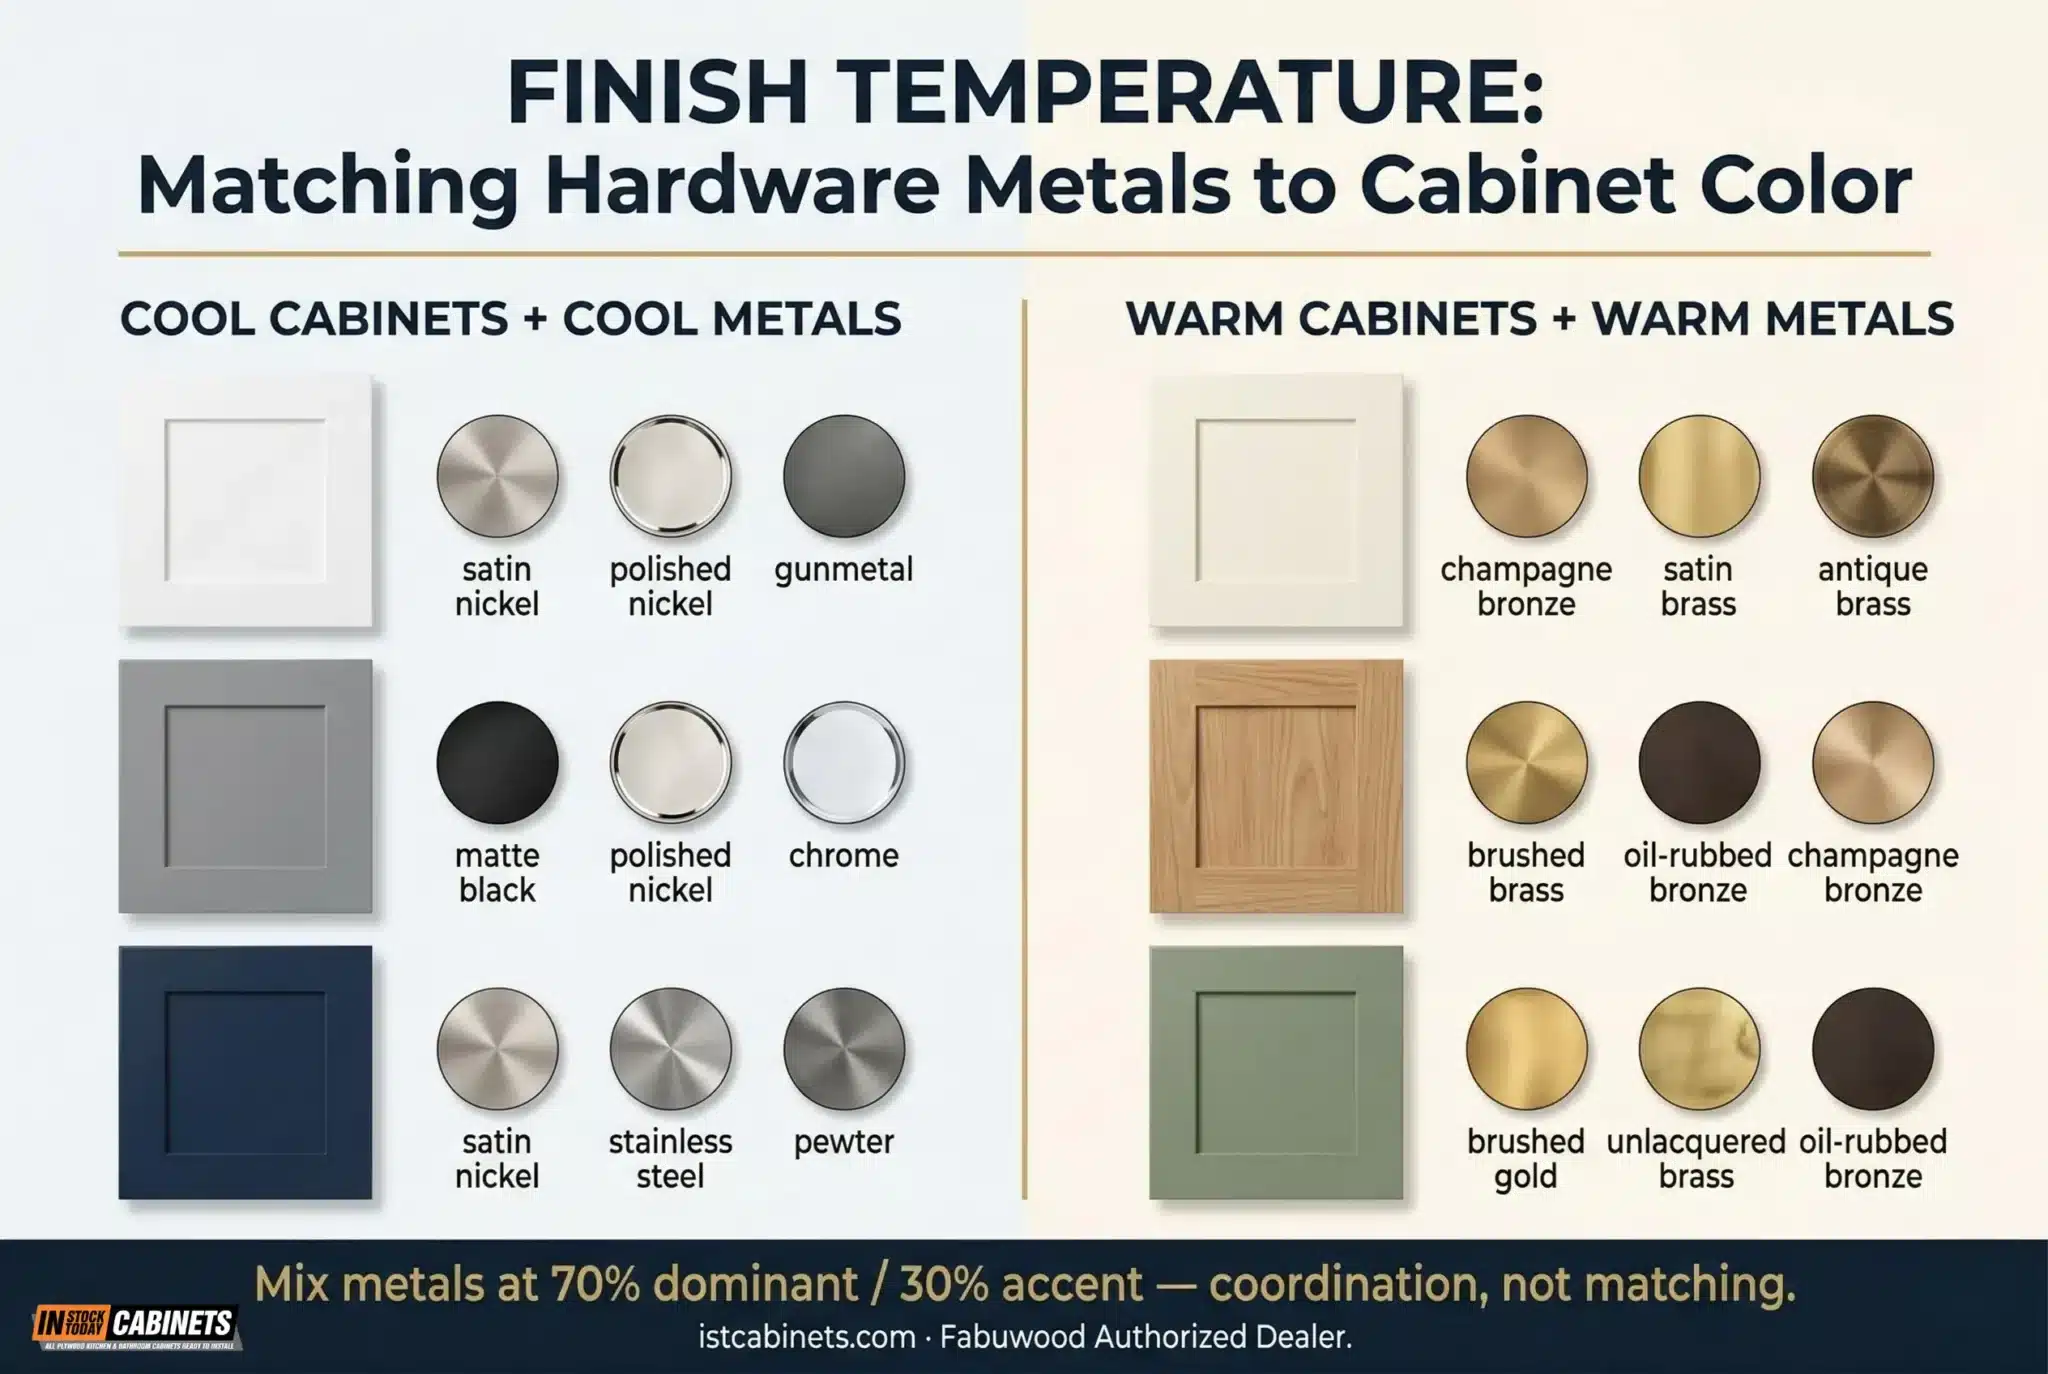
- Match finish temperature to cabinet undertone, not to the faucet. Cool-toned cabinets (white, gray, navy) pair with cool metals (satin nickel, chrome, gunmetal). Warm-toned cabinets (cream, wood, green) pair with warm metals (brass, bronze, champagne bronze). Mix metals intentionally at a 70/30 dominant-to-accent ratio. Matching hardware to the faucet is an outdated constraint that narrows your design options.
- A calibrated jig eliminates the compounding error that ruins entire cabinet runs. Hand-measuring with a tape and pencil introduces 1/16-inch drift that compounds door-to-door. A hardware jig (Kreg KHI-PULL, True Position Tools Pro) locks edge offsets and hole spacing, guaranteeing millimeter-perfect repeatability across every door and drawer in the kitchen.
- Pilot holes are non-negotiable on dense hardwood. Hard maple (1,450 Janka) and birch frames split along the grain when screws are driven without a pilot hole. Drill 1/64 inch larger than the screw’s non-threaded shank. Test on scrap first. Apply masking tape over the drill point on finished surfaces to prevent entry-side splintering.
- Recalibrate European concealed hinges after installing hardware. Added hardware weight shifts the door’s mass distribution and can cause imperceptible sagging that ruins reveal consistency across a wall of Shaker cabinets. The six-way adjustment on Blum CLIP top BLUMOTION hinges (vertical, lateral, depth) exists specifically for this post-installation tuning.
- Select hardware during the design phase — not after installation. Choosing hardware as a last-minute afterthought leads to proportion mismatches, finish conflicts with already-installed fixtures, and settling for whatever’s in stock. Order samples early, test them on actual cabinet doors, and confirm clearances against countertops, backsplashes, appliance handles, and adjacent door swings before any drilling begins.
Mistake #1: Drilling Into the Recessed Center Panel
This is the most structurally destructive error in Shaker hardware installation, and it happens more often than it should.
The center panel of a Shaker door is engineered as a floating panel — it sits inside a channeled groove (dado) cut into the inner edges of the stiles and rails. That floating panel design exists for one reason: wood moves. As kitchen humidity fluctuates across seasons, the center panel expands and contracts within its frame. The mortise-and-tenon joinery at the corners stays rigid while the panel breathes freely.
When an installer drills through the stile and into the center panel — or worse, drives a screw that pins the panel to an internal shelf or drawer box — they lock that panel in place. The expansion forces that would normally dissipate harmlessly now become shear stress concentrated at the fastener point. Within a few humidity cycles, hairline fractures appear in the catalyzed conversion varnish finish. Finishers call these “witness lines.” On painted MDF or HDF center panels, the drilled hole also creates a moisture ingress point that risks swelling, bubbling, and permanent delamination.
The rule is absolute: hardware mounts exclusively on the solid stiles or rails. No exceptions. On premium Shaker lines with 3/4-inch solid wood frames and mortise-and-tenon joinery — like Fabuwood’s Allure collections distributed through IST Cabinets — a misplaced hole on the center panel means a full door replacement. That’s hundreds of dollars per incident before labor.
Mistake #2: Ignoring Drawer Front Mechanics
Cabinet doors and drawer fronts are not the same substrate, and they don’t tolerate the same hardware approach.
On a Shaker drawer front, centering hardware on the recessed panel looks clean — but it introduces a mechanical problem most homeowner guides never mention. The screws must pass through two distinct layers: the thin center panel (typically 1/4 inch on a five-piece drawer front) and the front wall of the dovetail drawer box behind it (typically 5/8-inch solid hardwood on quality cabinetry). If the drawer box wall doesn’t sit perfectly flush against the back of the recessed panel — and a microscopic gap is common — tightening the screw flexes the thin panel inward. That flexion cracks the rigid finish instantly.
For standard drawers, this risk is manageable with careful screw selection and controlled torque. For heavy pull-outs — trash receptacles, recycling bins, appliance panels — it’s a structural concern. These applications place maximum pulling strain on the fasteners, and thin center panels can’t sustain that load over thousands of cycles.
The professional fix: Mount handles on the solid top rail of heavy pull-out drawer fronts. The screw passes through the thickest, most structurally sound portion of the hardwood frame (3/4 inch), completely bypassing the fragile center panel. Rail mounting also distributes pulling force more effectively for heavy vertical loads, preventing screw stripping that commonly plagues center-panel-mounted hardware.
Mistake #3: Wrong Scale and Proportion
Proportion errors are the number-one aesthetic mistake designers identify on Shaker kitchens. Hardware that’s too small disappears against the flat planes of the door frame, creating a visual void where punctuation should be. Hardware that’s too large overwhelms the recessed panel geometry and competes with the clean lines that make Shaker appealing.
The most common version of this mistake: buying one pull size in bulk for the entire kitchen. A 5-inch pull looks proportionate on a standard 18-inch drawer. On a 36-inch pot drawer, it looks stunted. On a 12-inch spice pull-out, it dominates.
The rule of thirds provides the proportional framework professionals rely on. Pull length should equal approximately one-third of the drawer width. An 18-inch drawer gets a 6-inch pull. A 30-inch drawer calls for a 10-inch pull. A massive 36-inch drawer warrants a 12-inch pull — or even a 15-inch statement pull, which is the direction current design trends are heading for wide Shaker drawers.
For tall pantry doors (60–84 inches), 12- to 18-inch appliance-style pulls mounted vertically on the stile provide both proper proportion and the pulling force needed to open heavy doors. Standard 5-inch pulls on a full-height pantry look like an afterthought.
Pro tip: Use elevation drawings to evaluate hardware scale across the full cabinet run before ordering. Hardware that looks perfect held against a single door may look wildly inconsistent when installed across a wall of varied cabinet sizes.
Mistake #4: Hardware That Fights Shaker’s Design DNA
Shaker design emerged from a philosophy of restraint — function over decoration, simplicity over ornamentation. Installing ornate, heavily detailed hardware on a Shaker door creates a stylistic contradiction that experienced designers spot immediately.
The mismatch works in both directions. Scrollwork and filigree pulls on a simple Shaker frame look fussy and confused. But flat, ultra-modern slab-style pulls — the kind designed for frameless European cabinets — look equally wrong on a traditional Shaker profile. They belong on flat-panel doors, not on five-piece construction with visible stile-and-rail geometry.
The style matrix for Shaker hardware:
Traditional Shaker — Cup pulls on drawers, simple round knobs on doors, oil-rubbed bronze or antique brass. Bin pulls in particular reinforce Shaker’s heritage craft aesthetic. For drawers 30 inches and wider, two cup pulls (placed using the rule of thirds) is the traditional approach.
Transitional Shaker — Arced or footed bar pulls, tubular barrel pulls, mixed knob-and-pull combinations. This is the largest market segment. Keep a common design thread across mixed hardware — same finish, related shape family, or shared material. Champagne bronze and satin brass paired with matte black accents define this space right now.
Modern Shaker — Flat bar pulls, edge pulls, integrated finger pulls. Flat bars work because they mirror the door frame’s linear geometry. Edge pulls create a minimal profile that keeps the cabinet face clean. Longer pulls (12–18 inches) on wide drawers emphasize horizontal lines. Matte black, brushed nickel, and stainless steel are the standard finishes here.
Mistake #5: Ignoring Stile Width on Slim Shaker Profiles
This mistake has become significantly more common as slim and skinny Shaker profiles have surged in popularity. Traditional Shaker stiles measure 2.25 to 3 inches wide — plenty of surface for standard hardware bases. Slim Shaker variants narrow the frame to 1.5 inches, 1 inch, or even 3/4 inch.
The problem is geometric. A standard Shaker stile transitions from its flat outer face into the recessed panel via an angled drop-off — the bevel. If the base of a knob or the rosette of a pull is wider than the flat surface of the slim stile, it overhangs that bevel. The hardware can’t sit flush. The fastener can’t be properly torqued. The result is a wobbly, unstable connection that grinds against the finish every time it’s pulled, leaving permanent indentation and scratch damage on the stile.
The fix for narrow profiles: Measure the exact flat dimension of the stile before the bevel drop-off using digital calipers. If standard 1.25-inch knob bases are too wide, switch strategies entirely. Edge pulls and finger pulls bypass the narrow front face completely — they mount to the top or side edge of the door and wrap slightly over the back. Micro-knobs with small-footprint bases prevent bevel overhang on frames down to 3/4 inch.
For skinny Shaker uppers with frames as narrow as 3/4 inch, TaylorCraft’s placement guidelines recommend positioning the hardware hole 1 inch from the inside of the frame edge — ensuring the screw anchors into solid wood rather than the bevel transition zone.
Mistake #6: One Centered Pull on Heavy Wide Drawers vs. Two — Without Understanding the Physics
The single-pull versus dual-pull debate on wide drawers (30 inches and above) is one of the most contested topics in cabinet hardware installation. Most sources treat it as purely aesthetic. It’s actually a structural engineering decision.
When a heavy drawer has two separate pulls, users frequently open it one-handed — grabbing whichever pull is closest while the other hand holds a plate or utensil. That off-center force generates asymmetrical torque on the drawer box — a destructive phenomenon known as drawer racking. The side closest to the pulled handle advances faster than the opposite side, racking the box diagonally within the cabinet cavity.
Premium cabinetry uses full-extension undermount drawer slides — Blum Tandem Plus systems carry a verified 100-pound load rating and depend on perfectly parallel movement. Repeated racking grinds the internal bearings laterally against their steel tracks, degrades the hydraulic soft-close dampening, and eventually causes the drawer to bind or refuse to close properly.
A single oversized pull, centered on the drawer front, eliminates racking entirely. Regardless of pull length — 6 inches or 15 inches — central placement distributes human pulling force equally to both slides. This is the mechanically superior solution for heavy drawers.
If a client’s design vision demands dual pulls, place them using the rule of thirds (dividing the drawer into three equal segments, centering each pull in the outer thirds). This minimizes the torque moment arm. But it still relies on the user consciously pulling with both hands — which they often won’t.
Mistake #7: Finish Mismatches and the Temperature Rule
Hardware finish is high-contrast jewelry on Shaker’s flat planes. A poorly coordinated finish doesn’t just look wrong — it actively undermines the design intent of the entire kitchen.
The foundational coordination principle is undertone temperature. Cool-undertone cabinets (crisp white, gray, navy blue) pair with cool-toned hardware: chrome, stainless steel, satin nickel, gunmetal, pewter. Warm-undertone cabinets (cream, off-white, natural wood tones, warm greens) pair with warm-toned hardware: brass, bronze, copper, champagne bronze.
Specific pairings that work in 2026:
White Shaker — Matte black for high contrast. Brushed brass or satin gold for warmth. Satin nickel for subtle coordination. White is the most versatile canvas — it pairs with almost any finish.
Navy or dark blue Shaker — Satin brass or brushed gold. This is the signature “designer-approved” combination. Avoid matte black, which disappears against dark cabinets.
Gray Shaker — Matte black, polished nickel, or gunmetal. Avoid antique brass, which creates an undertone clash with cool gray tones.
Natural wood Shaker — Follow the wood’s undertones. Oak (warm/golden) pairs with champagne bronze. Walnut (rich brown) with oil-rubbed bronze or antique brass. Maple (neutral) with satin nickel.
On mixed metals: Coordination, not matching, is the current standard. The 70/30 rule works: 70% dominant finish across primary hardware, 30% accent finish on selected knobs or specialty pulls. Hardware does not need to match the faucet — that outdated rule narrows options without improving design cohesion. But any accent finish must appear at least twice in the space to read as intentional rather than accidental.
One finish caution gaining traction among designers: all-black hardware is becoming overused as a singular approach. It can read as flat and one-dimensional when applied uniformly across every cabinet. Matte black works best as part of a layered finish strategy — paired with warm metals for depth and visual tension.
Mistake #8: Skipping the Jig (and Why Hand-Measuring Compounds Errors)
A single misdrilled hole on a Shaker cabinet is permanent. Wood filler and touch-up paint cannot replicate the texture of a catalyzed finish under kitchen lighting. The only clean fix is a replacement door — typically $150–$300+ per door on premium lines.
The root cause of most drilling errors isn’t carelessness. It’s methodology. Measuring placement with a tape measure and pencil, door by door, introduces compounding error. If the first door is off by 1/16 inch, and the installer uses that door’s visual position as a reference for the next, the deviation grows down the entire cabinet run. Standard tape measures are also prone to parallax — the perceived position of a pencil mark shifts based on viewing angle.
A calibrated hardware jig eliminates all of this. Professional jigs (Kreg KHI-PULL, True Position Tools Pro) use hardened-steel drill guides and adjustable sliding stops that lock against the door edges. Set the precise offset on the first door, then replicate it identically across every cabinet in the kitchen. No measuring. No parallax. No compounding drift.
For oversized pulls (12–15 inches) that exceed standard jig capacity, the painter’s tape template method is the professional field technique. Apply low-tack painter’s tape to the backside of the hardware itself. Mark the exact mounting hole positions with an awl or sharp pencil through the tape. Peel the tape off and apply it directly to the drawer face — it’s a 1:1 scale drilling template with mathematically exact hole spacing. Level it with a bubble level before drilling.
Before drilling anything, tape hardware in position on one upper and one lower cabinet. Step back. Evaluate from across the room. Confirm alignment, proportion, and visual weight. This five-minute test prevents permanent mistakes.
Mistake #9: Wrong Screws, Missing Pilot Holes, and Fastener Failures
Most decorative cabinet hardware ships with standard 1-inch, 8-32 machine screws. Those screws assume a standard 3/4-inch door thickness. They don’t account for the realities of varied Shaker construction.
Screw length problems: On drawer fronts — where screws must pass through the drawer face and engage the drawer box behind it — 1-inch screws are almost always too short. Measure the combined thickness (typically 1.25–1.5 inches) and source the correct length. Screws that are too short strip out within weeks of daily use. Screws that are too long poke through the back of the door or puncture the drawer box interior.
On slim Shaker doors where the panel is recessed approximately 1/8 inch below the face frame, screw length may also need adjustment to account for the thinner panel depth if mounting hardware on the recessed section of a drawer front.
Pilot holes are non-negotiable on hardwood. Premium Shaker frames use hard maple (Janka hardness: 1,450 lbf) or dense birch. Forcing a threaded screw into this material without a pilot hole generates massive outward radial pressure against the surrounding wood fibers. The stile splits along the grain line. Once a stile splits, the mortise-and-tenon joint is compromised, the crack telegraphs through the finish, and the entire door requires replacement.
The professional standard: drill a pilot hole exactly 1/64 inch larger than the screw’s non-threaded shank diameter. This allows the threads to bite securely while the core passes through without generating splitting pressure. Test on scrap material first. Apply masking tape over the drill point on painted or finished surfaces to prevent splintering at the entry hole.
Mistake #10: Skipping Post-Installation Hinge Recalibration
This mistake happens at the very end of the job — when the installer assumes factory hinge settings are final and walks away.
Adding solid brass or steel hardware physically changes the mass distribution and swing behavior of the cabinet door. Even small decorative knobs add enough weight to cause imperceptible sagging over time. On Shaker cabinets, where the geometric grid makes 1/8-inch reveal margins visible across an entire wall of cabinetry, that sag is devastating.
Modern European concealed hinges — such as the Blum CLIP top BLUMOTION standard across IST Cabinets’ Fabuwood Shaker lines — offer six-way post-installation adjustment specifically for this purpose. Whether the project uses full overlay doors (where the door face covers nearly the entire cabinet frame) or inset doors (where the door sits flush within the frame), these adjustments are critical:
Vertical adjustment corrects for hardware-induced sag, ensuring the top and bottom edges of adjacent doors form unbroken horizontal lines.
Lateral (side-to-side) adjustment maintains consistent reveals — the gaps between adjacent doors. On Shaker cabinets, uneven reveals instantly telegraph poor craftsmanship.
Depth (in-and-out) adjustment ensures the door face sits flush against the cabinet frame, allowing soft-close dampening to actuate smoothly without binding.
These Blum hinges are rated for 200,000+ cycles — eight times the KCMA minimum of 25,000 cycles. But they only perform at that level when properly adjusted after hardware is installed. Skipping this final calibration is the difference between a kitchen that looks perfect on day one and one that still looks perfect two years later.
Mistake #11: Ignoring Clearances and Ergonomics
A hardware position that looks correct on a closed cabinet may fail completely in use. Common clearance problems that don’t surface until installation is complete: a knob that collides with the countertop backsplash when the base cabinet door swings open, a pull that clips an adjacent drawer front during simultaneous operation, or hardware that interferes with an appliance handle.
Before committing to any position, physically test it. Open the door fully with hardware held in place. Check contact with countertops, backsplashes, adjacent doors, neighboring drawers, and appliance handles. Pay specific attention to corner cabinets where door swings overlap.
For base cabinets, placing hardware 2–3 inches from the top edge provides both ergonomic comfort and countertop collision clearance. For upper cabinets, 2–3 inches from the bottom edge minimizes shoulder reach strain — placing hardware higher forces users to extend their rotator cuff unnaturally over years of repeated use.
On accessibility: round knobs require a pinch-and-twist grip that creates difficulty for users with arthritis, limited hand strength, or reduced dexterity. D-shaped pulls and lever-style handles can be operated with a closed fist, a single finger, or an elbow when hands are wet or full. For ADA-compliant kitchens, hardware should be operable between 15 and 48 inches from the floor with no sharp corners or pinch points.
Mistake #12: Chasing Trends That Fight Shaker’s Timelessness
Hardware is the easiest and cheapest kitchen element to swap — it’s the right place to be slightly trend-forward since it can be changed in an afternoon. But certain trends contradict Shaker’s core principle of simplicity, and they date a kitchen faster than they elevate it.
Trends to approach with caution in 2026: ultra-polished high-sheen finishes (read as flashy rather than refined against Shaker’s matte planes), industrial-style hardware (pipe fittings and raw metal conflict with Shaker’s craft tradition), and overly ornate cup handles on every surface (the trend has peaked and now reads as dated on modern Shaker kitchens).
What’s working now: Brushed and satin finishes dominate — matte textures over polished shine. Unlacquered brass is the prestige choice, developing a living patina over time. Textured hardware — hammered, ribbed, knurled surfaces — adds tactile dimension without visual clutter. Mixed-material pulls (wood caps on metal bodies, leather-wrapped handles) emerged strongly from KBIS 2025 and align naturally with Shaker’s craft-forward heritage. Wooden knobs are a notable 2026 trend, adding warmth and authenticity that resonates with Shaker’s original material philosophy.
The guiding principle: choose materials and finishes that age gracefully rather than degrade. Hardware that develops character over time — rather than chipping, peeling, or looking tired — matches Shaker’s built-to-last ethos.
Quick Reference: Shaker Hardware Placement Guide
| Cabinet Type | Hardware Position | Standard Measurement |
|---|---|---|
| Upper doors | Lower corner, stile opposite hinges | 2.5–3 inches from bottom edge, centered on stile |
| Base doors | Upper corner, stile opposite hinges | 2.5–3 inches from top edge, centered on stile |
| Standard drawers | Centered on drawer front | Horizontally and vertically centered on recessed panel |
| Heavy pull-out drawers | Top rail | Centered horizontally on the solid rail |
| Wide drawers (30″+) | Single oversized pull, centered | Or dual pulls placed at the rule-of-thirds positions |
| Tall pantry doors | Center of stile, vertical orientation | Centered vertically or slightly above center for ergonomic reach |
| Slim Shaker uppers (<1″ frame) | 1 inch from inside frame edge | Use narrow-footprint hardware only |
Pull Sizing by Drawer Width
| Drawer Width | Recommended Pull Length (CTC) |
|---|---|
| Under 12″ | 3″ center-to-center |
| 12″–18″ | 3″–5″ center-to-center |
| 18″–24″ | 5″–6″ |
| 24″–30″ | 6″–8″ |
| 30″–36″ | 8″–12″ |
| Over 36″ | 12″–15″ (single pull) or two 5″–6″ pulls at thirds |
2026 Hardware Trends for Shaker Cabinets
| Trend | Details |
|---|---|
| Leading finishes | Brushed brass, satin brass, champagne bronze, matte black (as accent, not sole finish) |
| Prestige finish | Unlacquered brass (develops living patina over time) |
| Declining finishes | Polished chrome, high-gloss metals, uniform matte black |
| Emerging styles | Knurled/textured pulls, wooden knobs, mixed-material hardware, oversized statement pulls |
| Mixed metals | 70/30 dominant-to-accent ratio; warm + cool pairing for visual tension |
| Surface direction | Matte, brushed, and satin finishes over polished and high-sheen |
The 12 Rules, Condensed
- Never drill into the floating center panel on cabinet doors. Hardware mounts on solid stiles and rails only — the recessed panel must stay free to expand and contract with humidity changes.
- Treat drawer fronts differently than doors. The dual-substrate construction (thin panel + drawer box wall) creates flex and cracking risks. Mount heavy pull-out hardware on the solid top rail, not the center panel.
- Scale hardware to each cabinet size. Follow the rule of thirds — pull length equals roughly one-third of the drawer width. One pull size across an entire kitchen creates visual imbalance.
- Match hardware personality to Shaker’s simplicity. Ornate scrollwork and ultra-modern slab pulls both clash with five-piece door geometry. Choose hardware that respects the stile-and-rail frame without competing with it.
- Measure slim Shaker stiles before ordering hardware. If the flat face of the stile is narrower than the hardware base, you’ll get bevel overhang, wobble, and finish damage. Use edge pulls, finger pulls, or micro-knobs on narrow profiles.
- Use a single centered pull on heavy wide drawers. Central placement eliminates drawer racking — the asymmetric torque that destroys undermount slides when users pull from one side. Dual pulls are aesthetically valid but structurally riskier.
- Coordinate finish temperature to cabinet undertone. Cool cabinets (white, gray, navy) pair with cool metals. Warm cabinets (cream, wood, green) pair with warm metals. Mix metals intentionally with a 70/30 dominant-to-accent ratio.
- Use a calibrated jig for every hole. Hand-measuring compounds errors door to door. A hardware jig guarantees millimeter-perfect repeatability across the entire kitchen. For oversized pulls that exceed jig capacity, use the painter’s tape template method.
- Drill pilot holes and verify screw length. Dense hardwood frames (hard maple at 1,450 Janka) split without pilot holes. Standard 1-inch hardware screws are too short for most drawer fronts. Measure, test on scrap, then drill.
- Recalibrate hinges after installing hardware. Added hardware weight shifts door mass and can cause sag. Use the six-way adjustment on European concealed hinges (vertical, lateral, depth) to restore reveal consistency.
- Test clearances before committing. Open every door and drawer fully with hardware held in position. Check for collisions with countertops, backsplashes, adjacent doors, and appliance handles — especially at corner cabinets.
- Choose finishes that age well, not just trend well. Hardware is the cheapest element to swap. Use it to stay current — but pick materials that develop character (patina, warmth) rather than degrade (peeling, chipping).
Frequently Asked Questions about Mistakes When Integrating Hardware with Shaker Cabinets
What style hardware goes with Shaker cabinets?
Shaker cabinets pair with hardware that respects their five-piece door geometry — clean lines, minimal ornamentation, and functional forms. The strongest matches by style direction: Traditional Shaker works with cup pulls (bin pulls) on drawers, simple round knobs on doors, and finishes like oil-rubbed bronze or antique brass. Transitional Shaker — the largest market segment — pairs with arced bar pulls, tubular barrel pulls, and mixed knob-and-pull combinations in champagne bronze, satin brass, or satin nickel. Modern Shaker calls for flat bar pulls, edge pulls, or integrated finger pulls in matte black, brushed nickel, or stainless steel. The common thread across all three: hardware should complement the stile-and-rail frame without competing with it. Ornate scrollwork, heavy filigree, and ultra-modern slab-style pulls (designed for frameless European cabinets) all clash with Shaker’s foundational simplicity.
What is the 1/3 rule for cabinet hardware?
The rule of thirds is the proportional sizing guideline professionals use for cabinet pulls. The pull length should equal approximately one-third of the drawer width. A standard 18-inch drawer gets a 6-inch pull. A 30-inch pot drawer calls for a 10-inch pull. A wide 36-inch drawer warrants a 12-inch pull — or even a 15-inch oversized statement pull, which is trending strongly in 2026. For very wide drawers where a single pull would exceed visual comfort, the rule of thirds also governs dual-pull placement: divide the drawer face into three equal horizontal segments and center each pull within the left and right outer thirds. This proportional logic prevents the two most common scale mistakes — pulls that look stunted on large drawers, and oversized hardware that overwhelms small cabinet faces.
What is the trend in cabinet hardware in 2026?
The defining shift in 2026 is texture and warmth replacing polish and uniformity. Brushed brass, satin brass, and champagne bronze are the leading warm finishes. Unlacquered brass — which develops a living patina over time — is the prestige choice for high-end Shaker kitchens. Matte black remains popular but is evolving from a standalone finish to an accent role, paired with warm metals for layered depth rather than applied uniformly across every cabinet. Polished chrome and high-gloss metals are declining.
On the shape and material side: knurled and textured pulls (hammered, ribbed surfaces) add tactile interest without visual clutter. Wooden knobs are a notable emerging trend that pairs naturally with Shaker’s craft heritage. Mixed-material hardware — wood caps on metal pulls, leather-wrapped handles, marble knobs with brass bases — gained strong momentum at KBIS 2025. Oversized pulls (12–18 inches) on wide drawers serve both aesthetic and aging-in-place accessibility purposes. The guiding philosophy: choose finishes and materials that age gracefully rather than degrade.
How do you avoid the 5 worst kitchen design mistakes?
The five hardware-related design mistakes that cost contractors and designers the most in callbacks and client dissatisfaction:
1. Wrong proportion. A single pull size across an entire kitchen creates visual chaos — 5-inch pulls look adequate on an 18-inch drawer but stunted on a 36-inch pot drawer. Follow the rule of thirds and spec different pull lengths by cabinet size.
2. Drilling without a jig. Hand-measuring compounds error door-to-door. A single misdrilled hole on a premium Shaker door means a $150–$300+ replacement. A calibrated hardware jig (Kreg KHI-PULL or True Position Tools Pro) eliminates this entirely.
3. Finish mismatch. Selecting hardware in isolation — without testing against the actual cabinet color, countertop, and faucet — creates jarring disconnects. Match finish “temperature” to cabinet undertone: cool metals for cool-toned cabinets, warm metals for warm-toned cabinets.
4. Skipping clearance testing. A pull that hits the backsplash, clips an adjacent drawer, or collides with an appliance handle doesn’t reveal itself until installation is complete. Physically test every hardware position with the door fully open before drilling.
5. Ignoring ergonomics. Round knobs require a pinch-and-twist grip that creates difficulty for users with arthritis or limited dexterity. D-shaped pulls and lever handles operate with a closed fist or single finger. Hardware positioned outside the 15- to 48-inch ADA reach zone forces unnatural body mechanics over years of daily use.
What’s outdated in the kitchen?
Several hardware and cabinet choices that were popular as recently as 2023–2024 are now reading as dated in 2026 kitchen design:
All-polished-chrome hardware has lost ground to brushed, satin, and matte finishes. Chrome reads cold and sterile against the warm, natural materials dominating current kitchen trends. Uniform matte black on every surface — once the go-to modern choice — now looks flat and one-dimensional when applied without contrast. Matte black works best as part of a mixed-finish strategy, not a monolithic one.
Industrial-style hardware (pipe fittings, raw metal, exposed fasteners) conflicts with the craft-forward warmth that defines 2026 kitchens. Ultra-polished high-sheen finishes in general are giving way to textured, lived-in surfaces. Cup pulls on every drawer — a farmhouse staple from the 2018–2022 wave — has peaked and now reads as formulaic rather than intentional on modern Shaker cabinets.
On the cabinet side: all-white kitchens with matching white hardware are fading. The movement is toward warm neutrals, nature-inspired tones, two-tone color combinations, and natural wood finishes that bring depth and personality. Fabuwood’s 2025 Designer Collection — including finishes like Forest Green and Cabernet Red — reflects this shift.
What is the 3 kitchen rule?
The kitchen work triangle — the “three kitchen rule” — is a spatial planning principle that connects the three primary work stations in a kitchen: the sink, the refrigerator, and the cooking surface (stove/range). The concept dates to 1940s efficiency research and dictates that the three stations should form a rough triangle, with each leg measuring between 4 and 9 feet, and the total perimeter staying under 26 feet. No major obstacle (island, table, peninsula) should cross any leg of the triangle.
For hardware selection, the work triangle matters because it dictates which cabinets and drawers get the heaviest daily use. Cabinets within the triangle — especially base cabinets flanking the sink and cooktop — need hardware optimized for ergonomic grip and durability, not just aesthetics. These are the locations where D-shaped pulls outperform round knobs, where heavy-duty drawer slides justify single oversized pulls (to prevent drawer racking), and where high-cycle soft-close hinges like the Blum CLIP top BLUMOTION earn their investment over the life of the kitchen.
How to make Shaker cabinets look expensive?
Five moves that elevate Shaker cabinets from builder-grade to custom-quality appearance:
1. Upgrade the hardware finish. Brushed brass, satin brass, or unlacquered brass reads substantially more expensive than standard chrome or basic satin nickel. A $12 pull in champagne bronze transforms the same cabinet that a $4 pull in polished chrome makes look cheap.
2. Scale hardware properly. Oversized pulls (8–15 inches) on wide drawers and tall pantry doors signal intentional design. Uniform small knobs everywhere signal budget constraints.
3. Mix knobs and pulls by cabinet zone. Knobs on uppers, pulls on lowers, cup pulls on specialty drawers — this layered approach reads as curated rather than bulk-ordered.
4. Choose quality construction underneath. The hardware is the visible detail, but what sells the “expensive” impression is consistent reveals (the gaps between adjacent doors), smooth soft-close action, and full-extension drawer glides. IST Cabinets’ Fabuwood Shaker lines include Blum soft-close hinges rated for 200,000+ cycles and full-extension Tandem Plus drawer slides standard — these are the features that make a kitchen feel premium every time a door or drawer is opened.
5. Coordinate — don’t match — metals across the kitchen. Intentionally pairing two complementary finishes (70% dominant, 30% accent) using the mixed-metal approach looks more expensive than rigidly matching every fixture. It signals design confidence.
What color hardware never goes out of style?
Satin nickel is the safest long-term choice across all design styles. It’s warm enough to avoid chrome’s coldness, cool enough to avoid brass’s trendiness risk, and neutral enough to pair with virtually any cabinet color — white, gray, navy, green, or natural wood. It doesn’t show fingerprints or water spots the way polished finishes do, and its brushed surface ages gracefully without visible wear.
Oil-rubbed bronze is the other perennial. It’s been a staple of traditional and transitional kitchens for decades and shows no signs of dating. The dark, warm tone creates gentle contrast on light cabinets and quiet sophistication on darker finishes.
For designers who want something with more current energy that still won’t date quickly: champagne bronze sits at the intersection of classic and contemporary. It’s warmer than satin nickel but more restrained than polished brass — a finish that reads as timeless rather than trend-driven.
The finishes most likely to feel dated within 5 years: high-polish gold, polished chrome, and uniform matte black applied without any secondary finish for contrast.
What color cabinets are in style for 2026?
The all-white kitchen still accounts for the largest share of installations, but the trend line is clearly moving toward warmer, more expressive colors. Warm whites and creamy off-whites are overtaking blue-white and bright-white tones. Greige (gray-beige blends) and warm gray with brown undertones are the dominant neutral choices.
Nature-inspired colors are the fastest-growing segment: sage green, olive, forest green, and deep navy blue are all strong. Fabuwood’s 2025 Designer Collection added Forest Green, Cabernet Red, Mint Green, Orchid Purple, and Macadamia Beige — reflecting the industry’s movement toward bolder, more personal color choices.
Natural wood finishes — particularly white oak and walnut — are surging as the biophilic design movement gains momentum. These work beautifully with Shaker’s five-piece door construction because the visible stile-and-rail frame showcases wood grain in a structured way that slab doors can’t match.
Two-tone kitchens remain a defining 2026 trend: a light or neutral color on perimeter cabinets paired with a contrasting island (dark green, navy, or stained wood). For hardware on two-tone kitchens, choose one finish that bridges both cabinet colors — champagne bronze and satin brass are the most versatile bridge finishes — rather than introducing a different hardware finish for each color zone.
Getting Hardware Right from the Start
On Shaker cabinets, there is nowhere to hide. Every hardware decision — material, scale, placement, fastener, and finish — is amplified by the door’s clean geometry. The margin for error is effectively zero on premium cabinetry.
Every mistake in this guide is preventable with upfront planning, a calibrated jig, sample testing on real doors, and the discipline to measure once and template forever.
IST Cabinets’ design team works directly with contractors and designers to spec the right hardware for every Fabuwood Shaker collection — from the Galaxy and Nexus lines to Fusion, Luna, and the frameless Illume series. With showroom locations in Alexandria and Fairfax, Virginia; Columbia, Maryland; Bear, Delaware; and Houston, Texas, you can evaluate hardware options on actual Shaker doors before making a commitment.
Ready to get your next project’s hardware right the first time? Visit istcabinets.com or schedule a design consultation at any IST showroom.